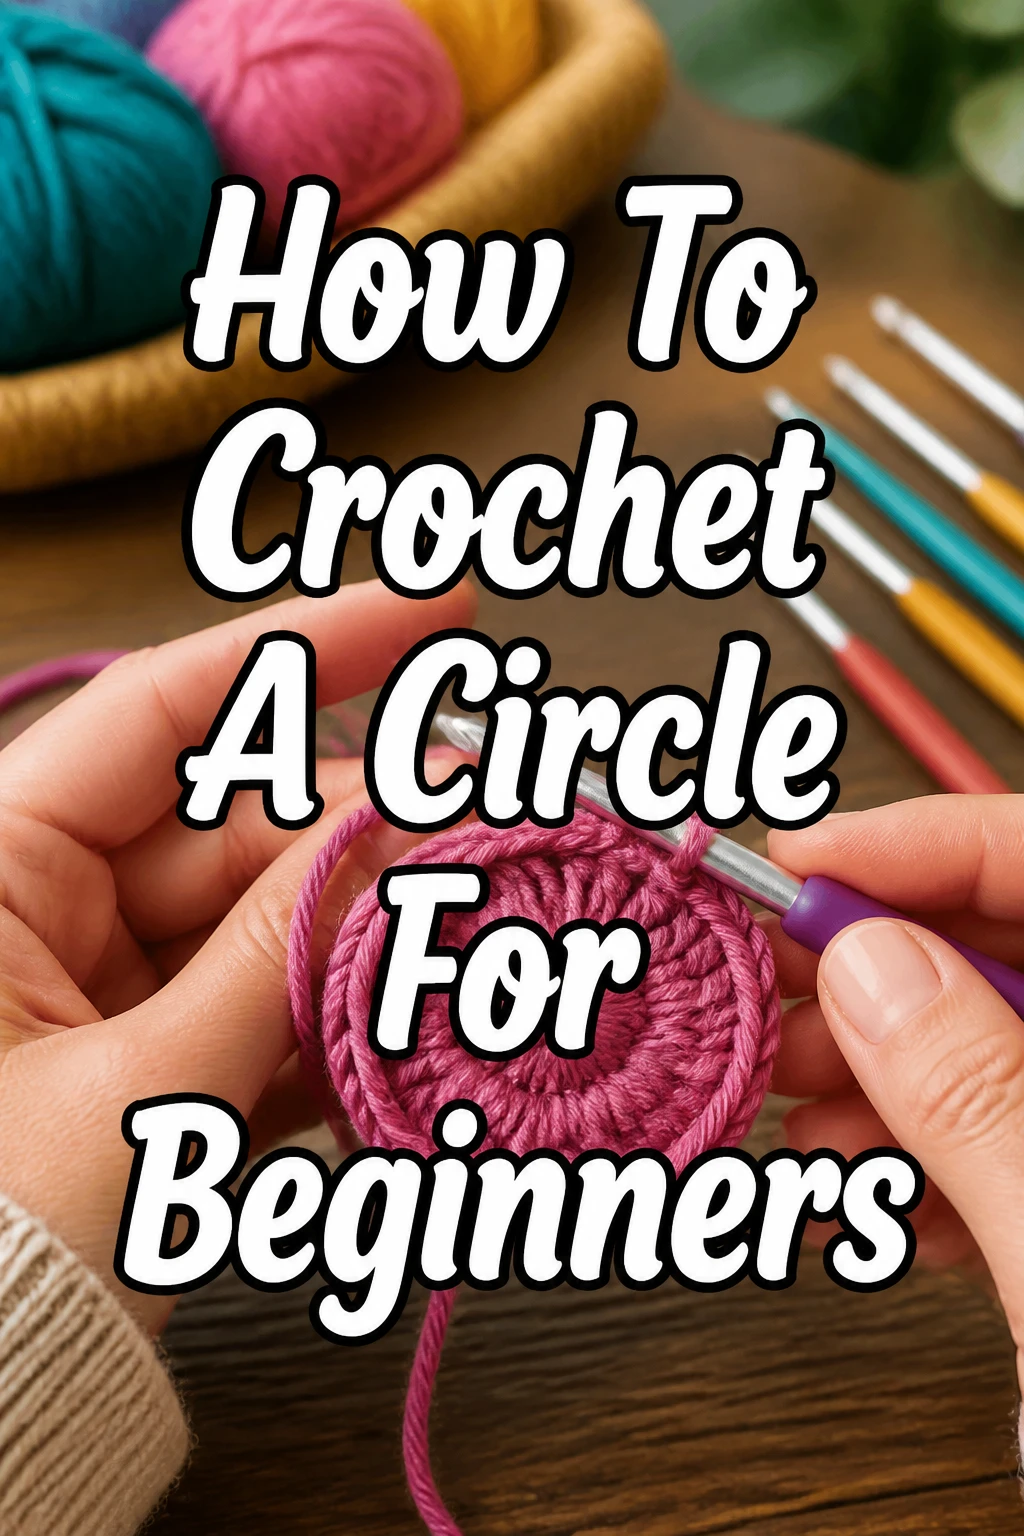
How To Crochet A Circle For Beginners
Learning to crochet a perfect circle might seem a bit daunting at first.
I remember feeling a little confused myself when I first picked up a hook, but it’s a fundamental skill that opens up so many possibilities.
This guide will walk you through each stitch and technique, making it simple and straightforward for you to master.
Quick Overview
You’re about to learn how to create the foundational shape for countless crochet projects. From coasters to hats, understanding the circle is key.
We’ll cover everything from starting the circle to ensuring it lays flat and even.
- Time needed: 30-60 minutes for your first circle
- Difficulty: Beginner
- What you’ll need: Yarn, a crochet hook, scissors, and a tapestry needle
Step-by-Step Instructions
Step 1: Gather Your Supplies
Before you begin, make sure you have everything ready. This prevents interruptions and helps you stay focused.
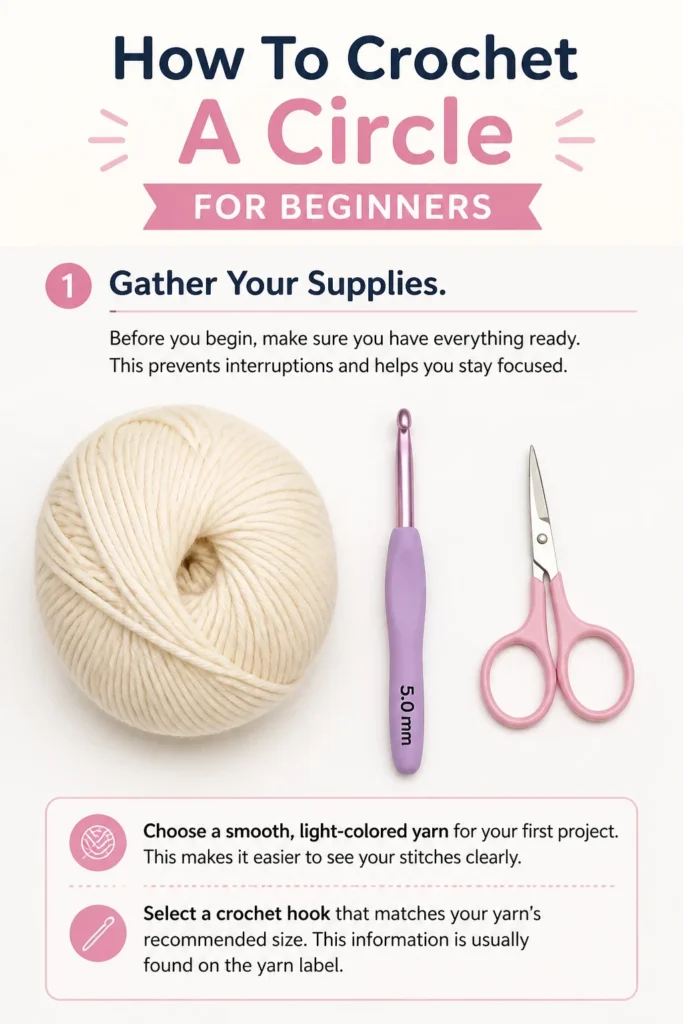
Choose a smooth, light-colored yarn for your first project. This makes it easier to see your stitches clearly.
Select a crochet hook that matches your yarn’s recommended size. This information is usually found on the yarn label.
Step 2: Create a Slip Knot
Every crochet project begins with a slip knot on your hook.
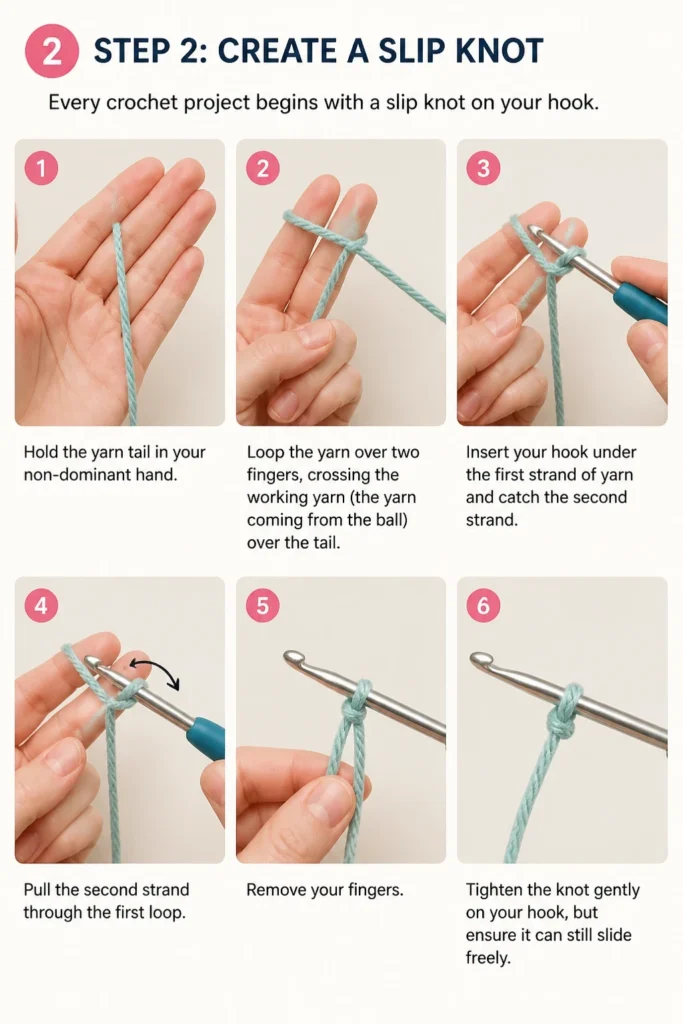
Hold the yarn tail in your non-dominant hand. Loop the yarn over two fingers, crossing the working yarn (the yarn coming from the ball) over the tail.
Insert your hook under the first strand of yarn and catch the second strand.
Pull the second strand through the first loop, then remove your fingers.
Tighten the knot gently on your hook, but ensure it can still slide freely.
Step 3: Master the Magic Ring (Magic Circle)
The magic ring is the best way to start a circle without a hole in the center. It creates a tight, neat beginning.
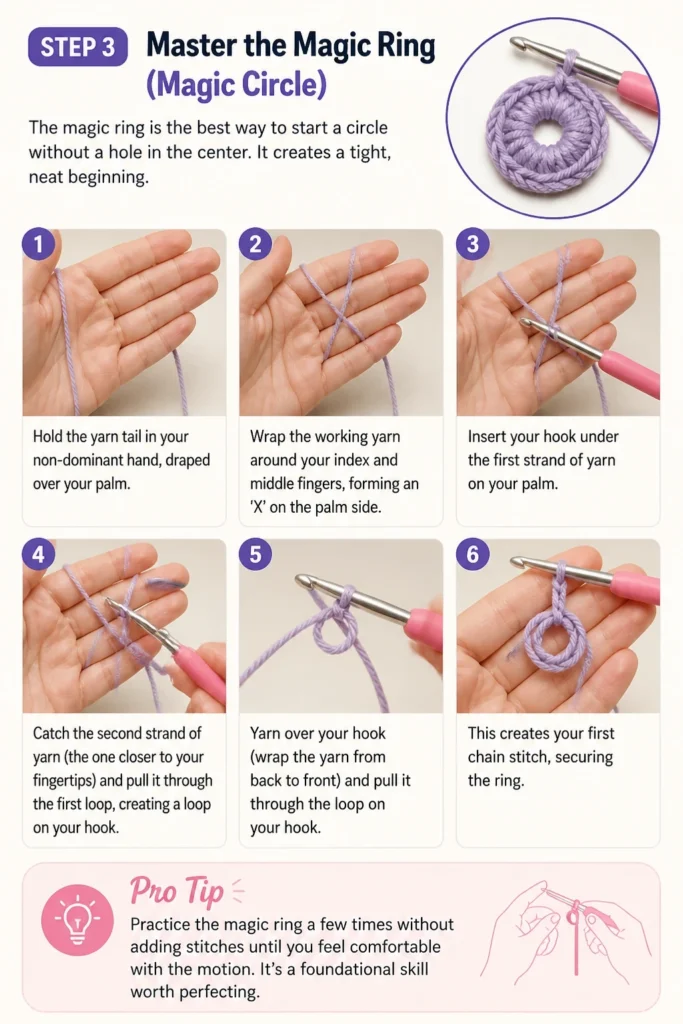
Hold the yarn tail in your non-dominant hand, draped over your palm.
Wrap the working yarn around your index and middle fingers, forming an ‘X’ on the palm side.
Insert your hook under the first strand of yarn on your palm.
Catch the second strand of yarn (the one closer to your fingertips) and pull it through the first loop, creating a loop on your hook.
Yarn over your hook (wrap the yarn from back to front) and pull it through the loop on your hook. This creates your first chain stitch, securing the ring.
Pro Tip: Practice the magic ring a few times without adding stitches until you feel comfortable with the motion. It’s a foundational skill worth perfecting.
Step 4: Chain and Single Crochet into the Ring
Now we’ll work our first stitches into the magic ring.
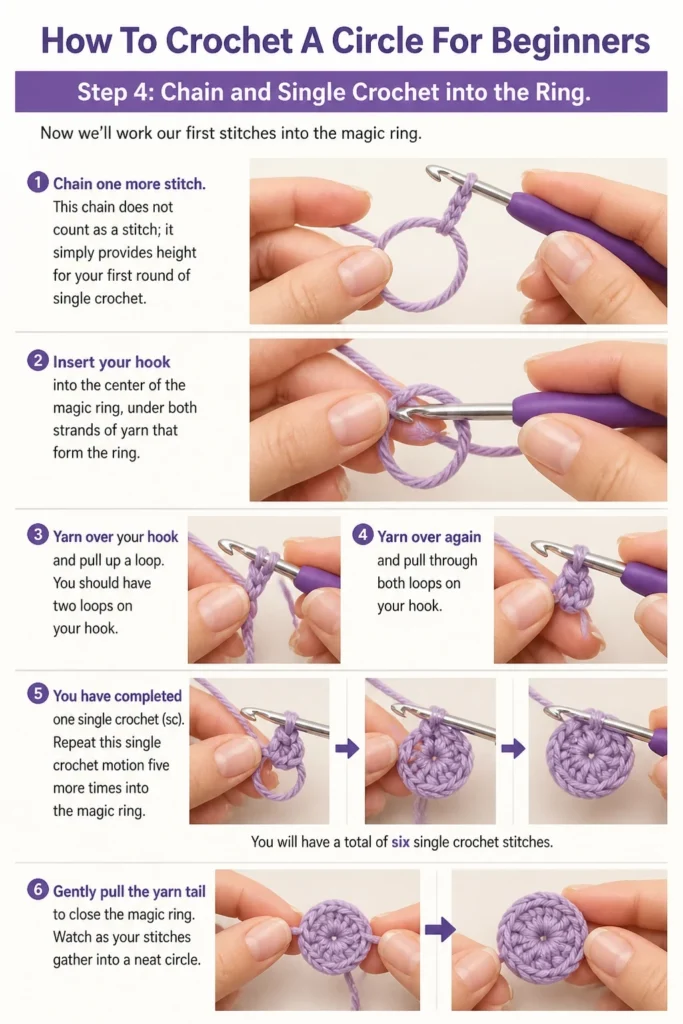
Chain one more stitch. This chain does not count as a stitch; it simply provides height for your first round of single crochet.
Insert your hook into the center of the magic ring, under both strands of yarn that form the ring.
Yarn over your hook and pull up a loop. You should have two loops on your hook.
Yarn over again and pull through both loops on your hook. You have completed one single crochet (sc).
Repeat this single crochet motion five more times into the magic ring. You will have a total of six single crochet stitches.
Gently pull the yarn tail to close the magic ring. Watch as your stitches gather into a neat circle.
Step 5: Join the Round with a Slip Stitch
Closing the round properly keeps your circle continuous and prevents gaps.
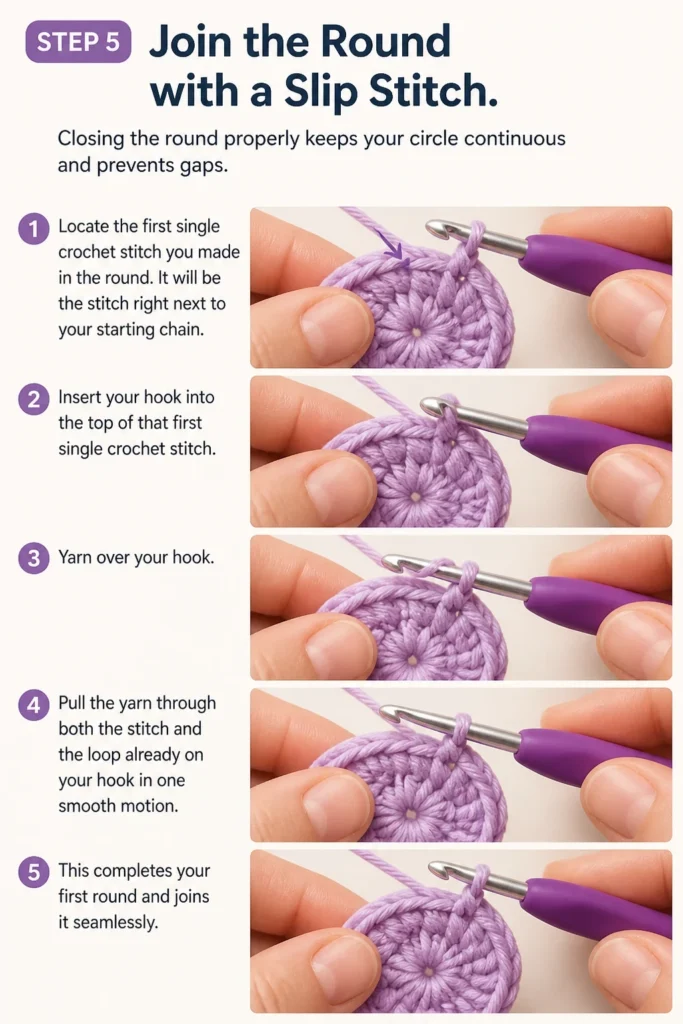
Locate the first single crochet stitch you made in the round. It will be the stitch right next to your starting chain.
Insert your hook into the top of that first single crochet stitch.
Yarn over your hook and pull the yarn through both the stitch and the loop already on your hook in one smooth motion.
This completes your first round and joins it seamlessly.
Step 6: Begin Your Second Round (Increasing)
To make your circle grow and lay flat, you need to add stitches in each round. This is called increasing.
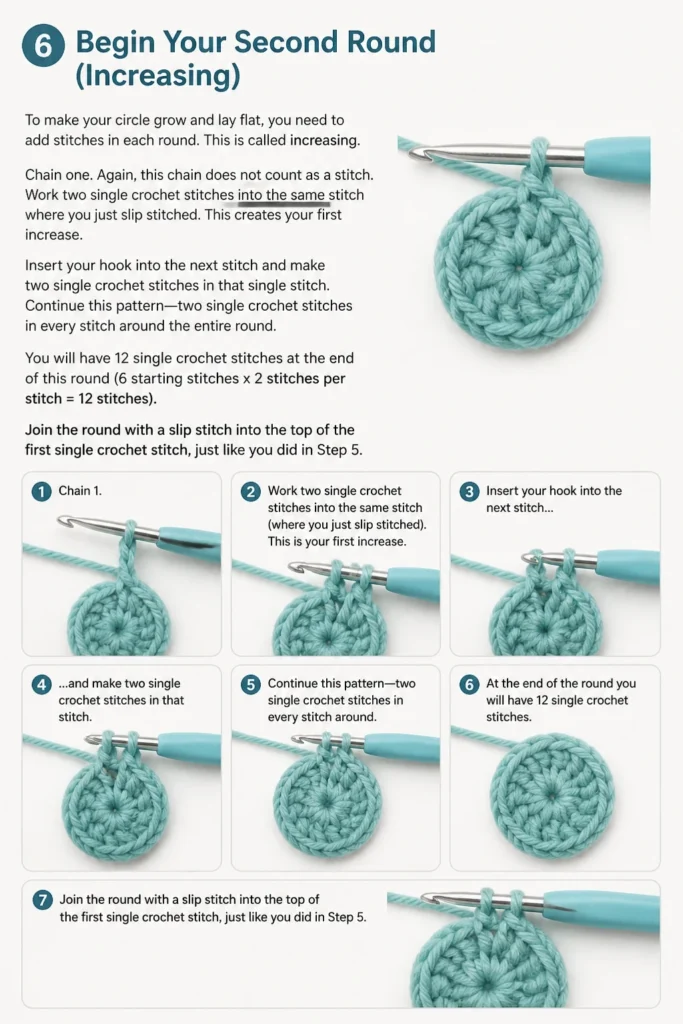
Chain one. Again, this chain does not count as a stitch.
Work two single crochet stitches into the same stitch where you just slip stitched. This creates your first increase.
Insert your hook into the next stitch and make two single crochet stitches in that single stitch.
Continue this pattern: two single crochet stitches in every stitch around the entire round.
You will have 12 single crochet stitches at the end of this round (6 starting stitches x 2 stitches per stitch = 12 stitches).
Join the round with a slip stitch into the top of the first single crochet stitch, just like you did in Step 5.
Step 7: Continue Increasing for a Flat Circle
The key to a flat circle is consistent increases. Each round adds a specific number of stitches.
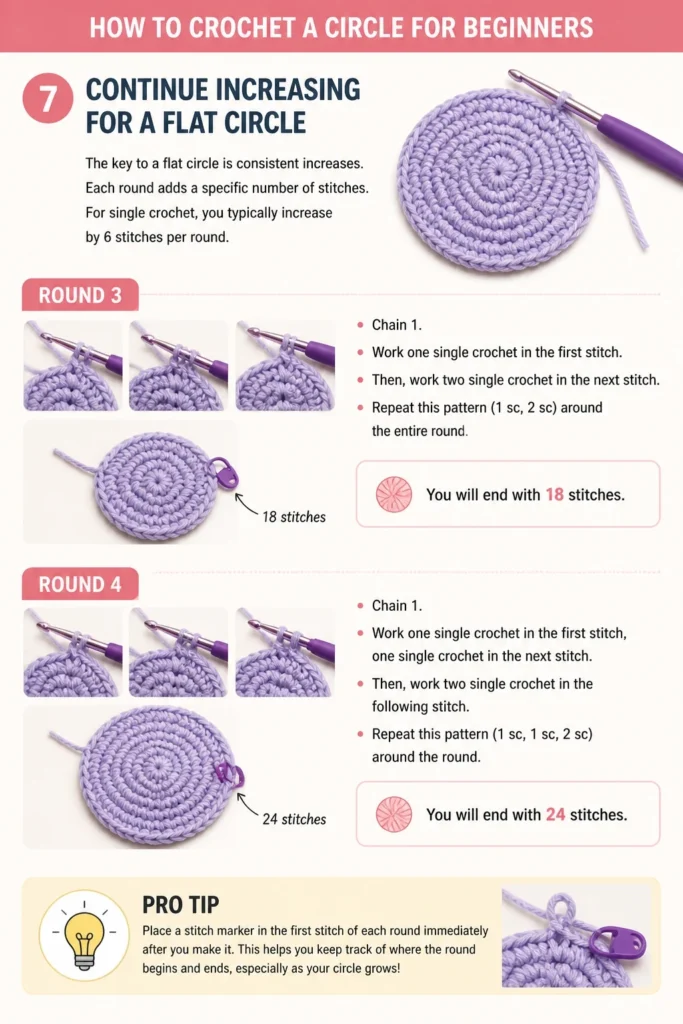
For single crochet, you typically increase by 6 stitches per round.
Round 3: Chain 1. Work one single crochet in the first stitch. Then, work two single crochet in the next stitch. Repeat this pattern (1 sc, 2 sc) around the entire round. You will end with 18 stitches.
Round 4: Chain 1. Work one single crochet in the first stitch, one single crochet in the next stitch. Then, work two single crochet in the following stitch. Repeat this pattern (1 sc, 1 sc, 2 sc) around the round. You will end with 24 stitches.
Pro Tip: Place a stitch marker in the first stitch of each round immediately after you make it. This helps you keep track of where the round begins and ends, especially as your circle grows.
Continue this pattern for as many rounds as you need, adding one more single crochet between increases in each subsequent round.
For example, Round 5 would be (1 sc, 1 sc, 1 sc, 2 sc) repeated around, resulting in 30 stitches.
Step 8: Fasten Off Your Yarn
Once your circle reaches the desired size, it’s time to finish your work neatly.
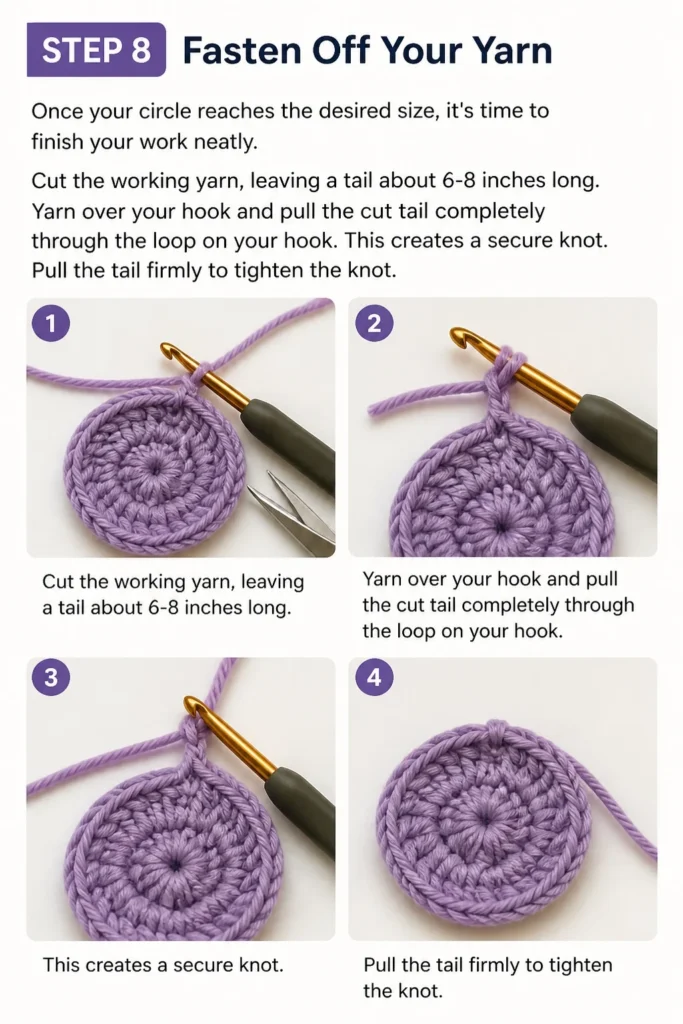
Cut the working yarn, leaving a tail about 6-8 inches long.
Yarn over your hook and pull the cut tail completely through the loop on your hook. This creates a secure knot.
Pull the tail firmly to tighten the knot.
Step 9: Weave in Your Ends
Hiding the yarn tails creates a professional and durable finish.
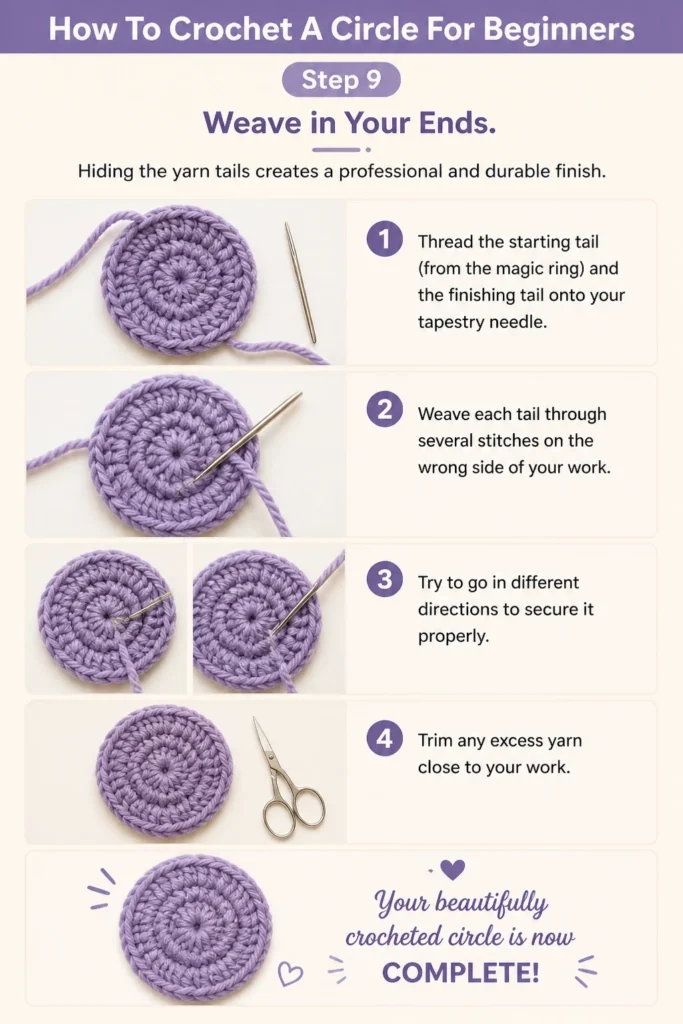
Thread the starting tail (from the magic ring) and the finishing tail onto your tapestry needle.
Weave each tail through several stitches on the wrong side of your work. Try to go in different directions to secure it properly.
Trim any excess yarn close to your work.
Your beautifully crocheted circle is now complete.
Common Mistakes to Avoid
Inconsistent Tension
Crocheting too tightly or too loosely is a common issue for beginners. This can lead to a circle that puckers or ripples rather than lying flat.
Try to maintain an even grip on your yarn and hook. Practice helps build muscle memory for consistent tension. If your circle puckers, you might be crocheting too tightly. If it ripples, you might be too loose or adding too many increases.
Incorrect Stitch Count
Forgetting to count your stitches can throw off the entire circle. Missing or adding extra stitches will cause your circle to distort.
Always count your stitches at the end of each round before joining. Using a stitch marker in the first stitch of each round is incredibly helpful for staying on track.
Joining in the Chain-1 Space
It’s easy to accidentally join your round into the initial chain-1 space instead of the first single crochet stitch. This can create a noticeable gap or misalign your subsequent stitches.
Always make sure you insert your hook into the actual top of the first single crochet stitch, not the chain that was made to begin the round. The chain-1 typically sits slightly to the side of the first stitch.
Not Increasing Enough
If you don’t add enough stitches in each round, your circle will start to curl up like a bowl. This is because the circumference isn’t expanding enough to stay flat.
Follow the increase pattern precisely (usually 6 stitches per round for single crochet) to ensure your circle lays perfectly flat. If it starts to curl, check your stitch count immediately.
Troubleshooting
My Circle is Wavy or Ruffled
A wavy or ruffled circle usually means you’ve added too many increases in a round. The fabric has too much circumference for the stitches you’ve made, causing it to ripple.
Carefully recount your stitches in the last few rounds. Ensure you are only increasing by 6 stitches per round for single crochet circles. If you’ve added more, undo the last round or two and re-crochet with the correct stitch count.
My Circle is Cupping or Curling Up
If your circle looks more like a bowl or cup, you haven’t added enough increases. The stitches are too tight around the circumference, forcing the fabric to curl upwards.
Check your increase pattern. For single crochet, you should be increasing by 6 stitches each round. If your stitch count is too low, frog (unravel) a few rounds and add the correct number of increases to keep it flat.
I Can’t Find the First Stitch to Join
Locating the first stitch can be tricky, especially for beginners. It often hides next to the chain-1.
Place a stitch marker in the very first single crochet you make in each round. This way, you’ll always know exactly where to insert your hook for your slip stitch join. Alternatively, count back the number of stitches you made from your hook to find the correct one.
Key Takeaways
- The magic ring provides a neat, hole-free start for your circles.
- Consistent increases are essential for a flat circle (typically 6 stitches per round for single crochet).
- Always join your rounds with a slip stitch into the first actual single crochet, not the starting chain.
- Use a stitch marker to easily identify the first stitch of each new round.
- Maintaining even tension is crucial for a smooth and consistent fabric.
- Practice is key; don’t be afraid to unravel and try again.
Frequently Asked Questions
What if my magic ring won’t close completely?
If your magic ring won’t close, it’s possible you crocheted too tightly into the ring, making it difficult to pull the tail. Sometimes, the yarn itself can be a factor; very fluffy or textured yarns might snag. Try gently wiggling the stitches as you pull the tail, or use a slightly larger hook for the initial stitches into the ring.
Can I use double crochet instead of single crochet for a circle?
Absolutely! The principle of increasing remains the same, but the starting chain and increase pattern will differ. For double crochet, you’d typically chain 2 or 3 to start, and increase by 12 stitches per round instead of 6 to maintain flatness due to the taller stitch height.
How do I make a larger circle?
To make a larger circle, simply continue the established increase pattern for more rounds. Each round adds more stitches, expanding the circle’s diameter while keeping it flat. Just keep adding one more single crochet between your increases in each subsequent round.
Why is my circle not perfectly round?
A slightly irregular shape can be due to inconsistent tension, slight variations in stitch height, or accidentally missing an increase here or there. Don’t worry, a handmade item rarely looks machine-made. With practice, your circles will become more uniform. Blocking your finished piece (wetting and shaping it) can also help even out minor imperfections.
Our Top Recommended Finds
- Soft Acrylic Yarn: Ideal for beginners, this yarn is affordable, easy to work with, and comes in many colors.
- Ergonomic Crochet Hook Set: Hooks with comfortable handles reduce hand fatigue, making long crochet sessions more enjoyable.
- Locking Stitch Markers: These small tools are invaluable for keeping track of your stitches and rounds, preventing errors.
Your Crochet Journey Begins Now
You’ve just taken a significant step in your crochet journey by learning to create a basic circle.
This fundamental shape is the starting point for so many exciting projects, from simple coasters to intricate amigurumi.
Don’t stop here. Practice this technique until it feels natural, then explore patterns for granny squares, hats, or even small bags that build upon your new skill.