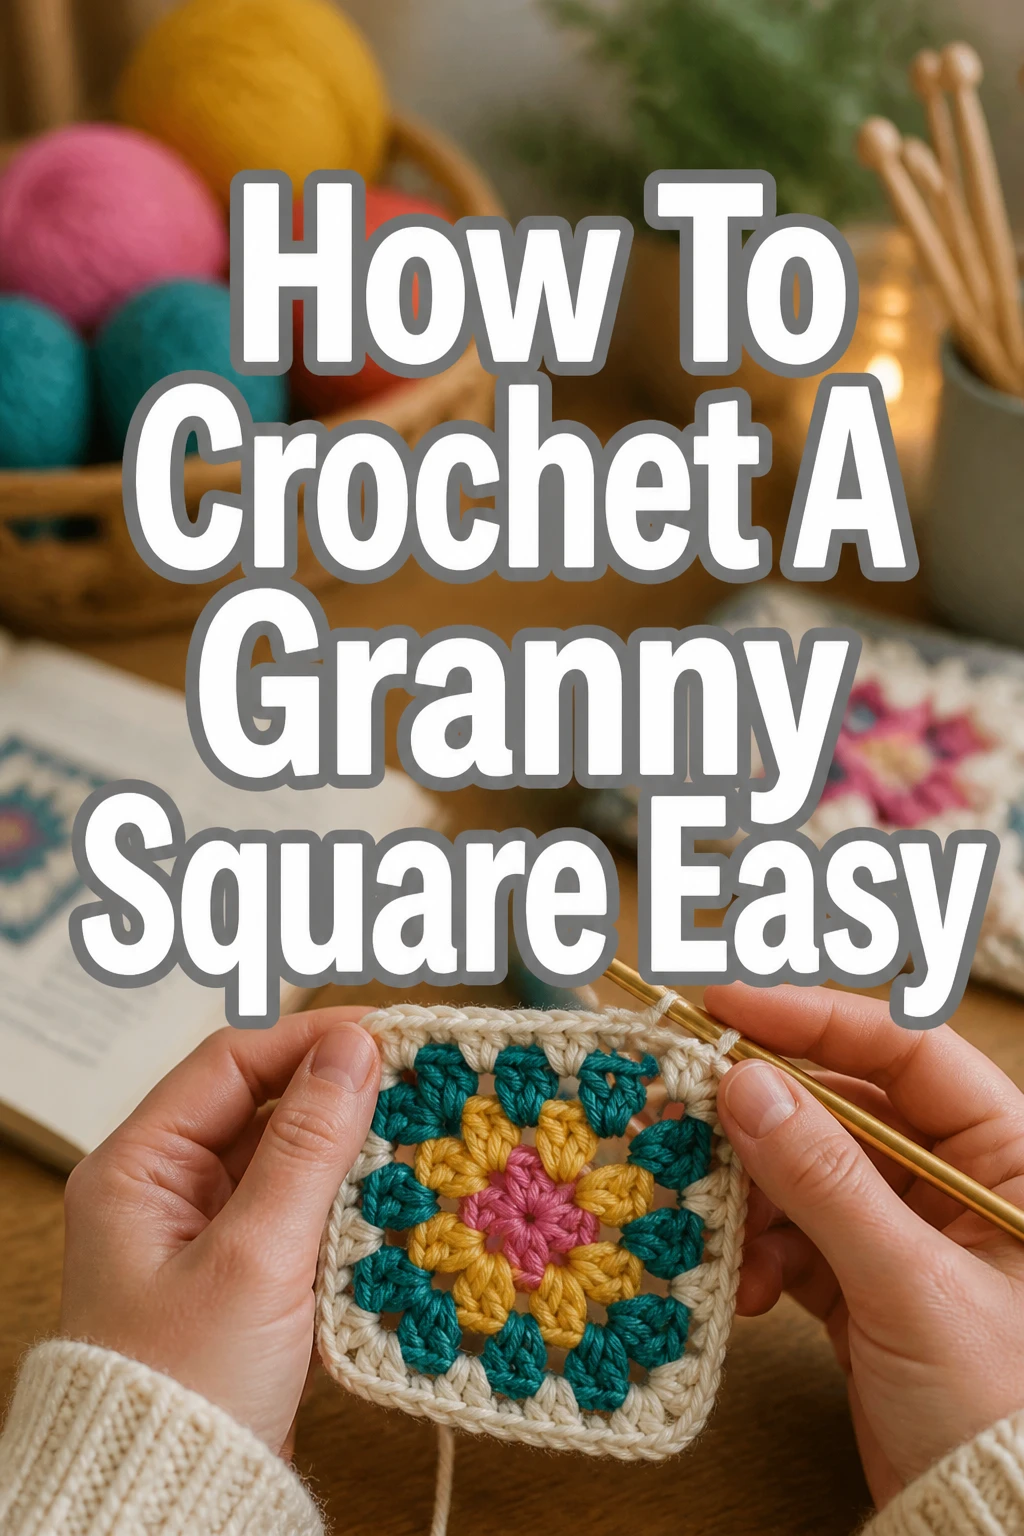
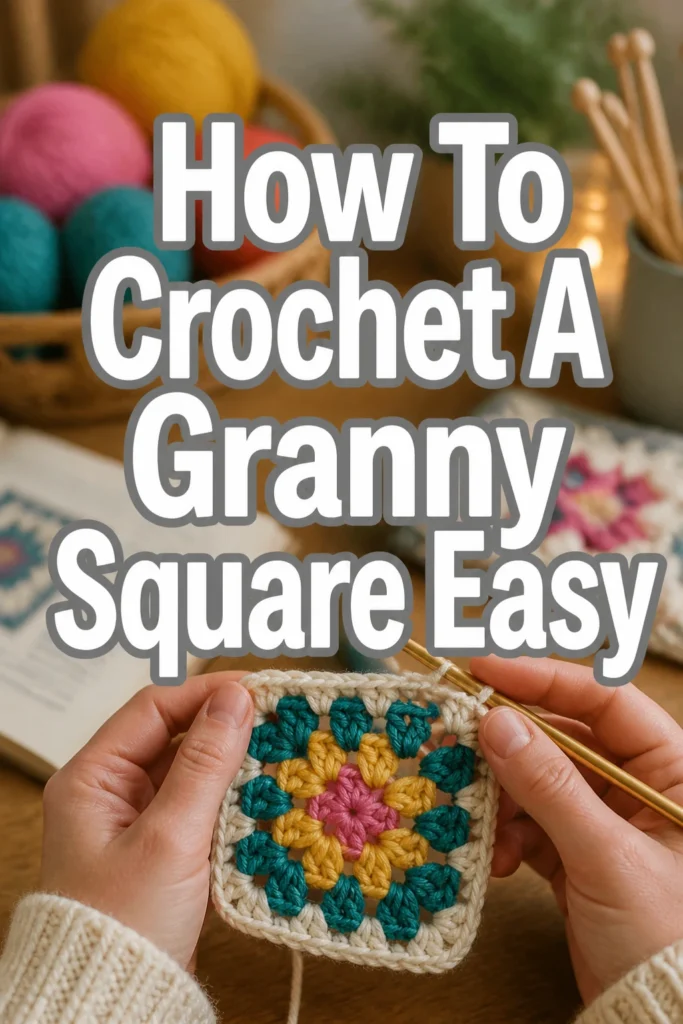
How To Crochet A Granny Square Easy
Learning to crochet a granny square feels like stepping into a cozy, creative world.
I remember making my very first one, a slightly wobbly but incredibly satisfying little square, and that feeling of accomplishment is what I want to share with you.
This guide is built on practical experience, designed to help you create beautiful granny squares with confidence and ease.
Quick Overview
This guide will walk you through the simple process of crocheting a classic granny square.
You’ll learn the fundamental stitches and techniques needed to create your first square, ready to join with others for larger projects or stand alone as a charming coaster.
- Time needed: 30-60 minutes for your first square
- Difficulty: Beginner
- What you’ll need: Yarn, crochet hook, scissors, yarn needle
Step-by-Step Instructions
Step 1: Gather Your Supplies
Before you begin, ensure you have all the necessary tools within reach.
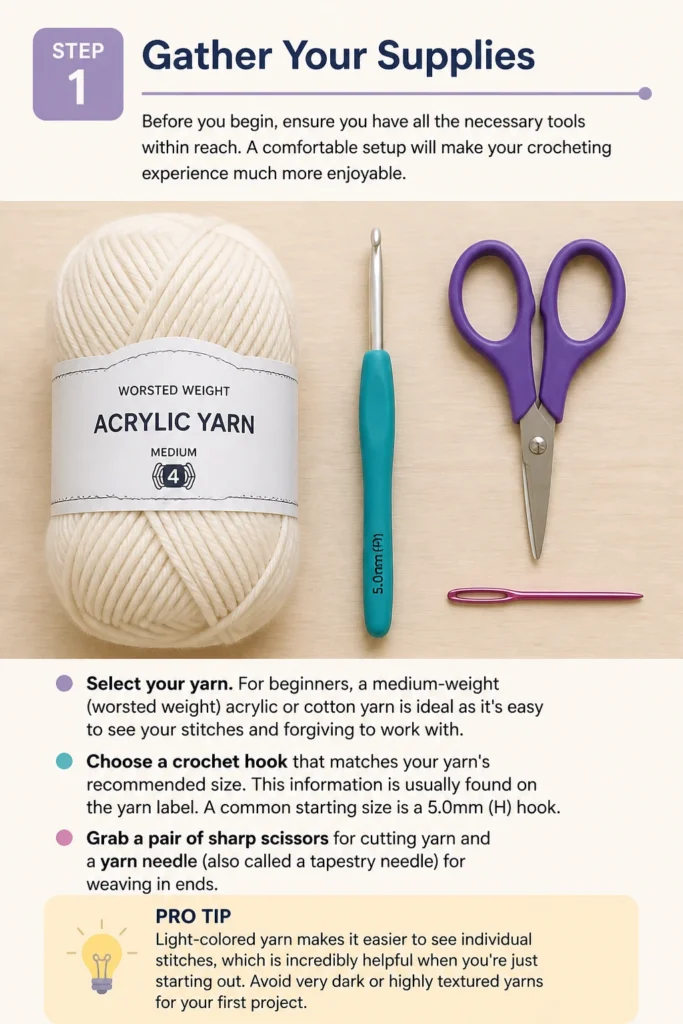
A comfortable setup will make your crocheting experience much more enjoyable.
Select your yarn. For beginners, a medium-weight (worsted weight) acrylic or cotton yarn is ideal as it’s easy to see your stitches and forgiving to work with.
Choose a crochet hook that matches your yarn’s recommended size. This information is usually found on the yarn label. A common starting size is a 5.0mm (H) hook.
Grab a pair of sharp scissors for cutting yarn and a yarn needle (also called a tapestry needle) for weaving in ends.
Pro Tip: Light-colored yarn makes it easier to see individual stitches, which is incredibly helpful when you’re just starting out. Avoid very dark or highly textured yarns for your first project.
Step 2: Create a Slip Knot
The slip knot is the very first step in starting most crochet projects.
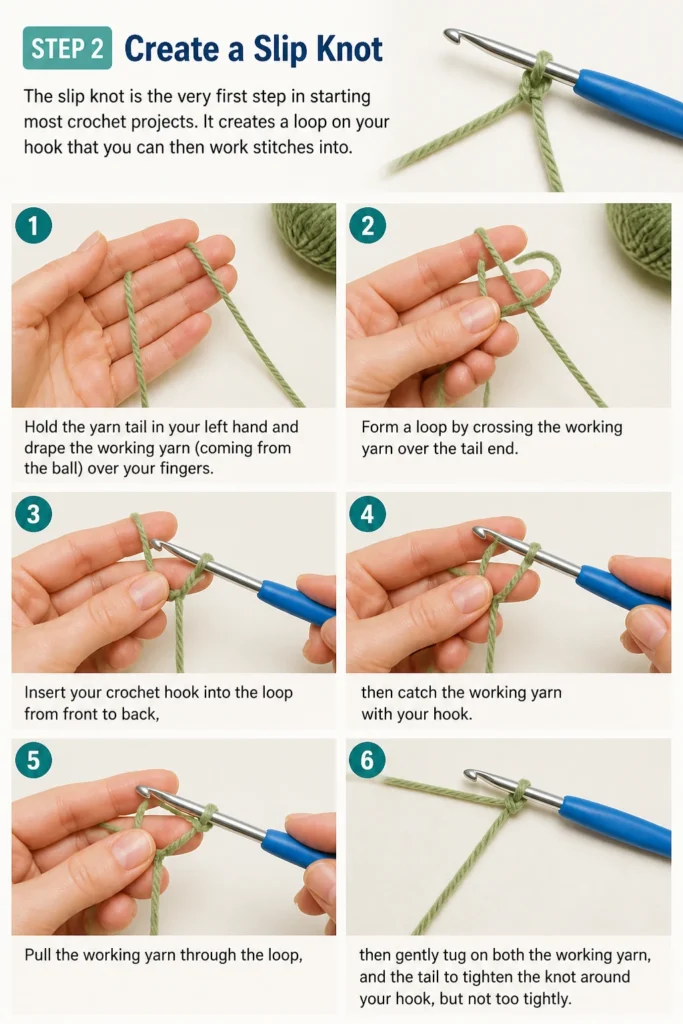
It creates a loop on your hook that you can then work stitches into.
Hold the yarn tail in your left hand and drape the working yarn (coming from the ball) over your fingers.
Form a loop by crossing the working yarn over the tail end.
Insert your crochet hook into the loop from front to back, then catch the working yarn with your hook.
Pull the working yarn through the loop, then gently tug on both the working yarn and the tail to tighten the knot around your hook, but not too tightly.
Step 3: Chain Four and Form a Ring
Your granny square begins with a small ring in the center, which you’ll create using chain stitches.
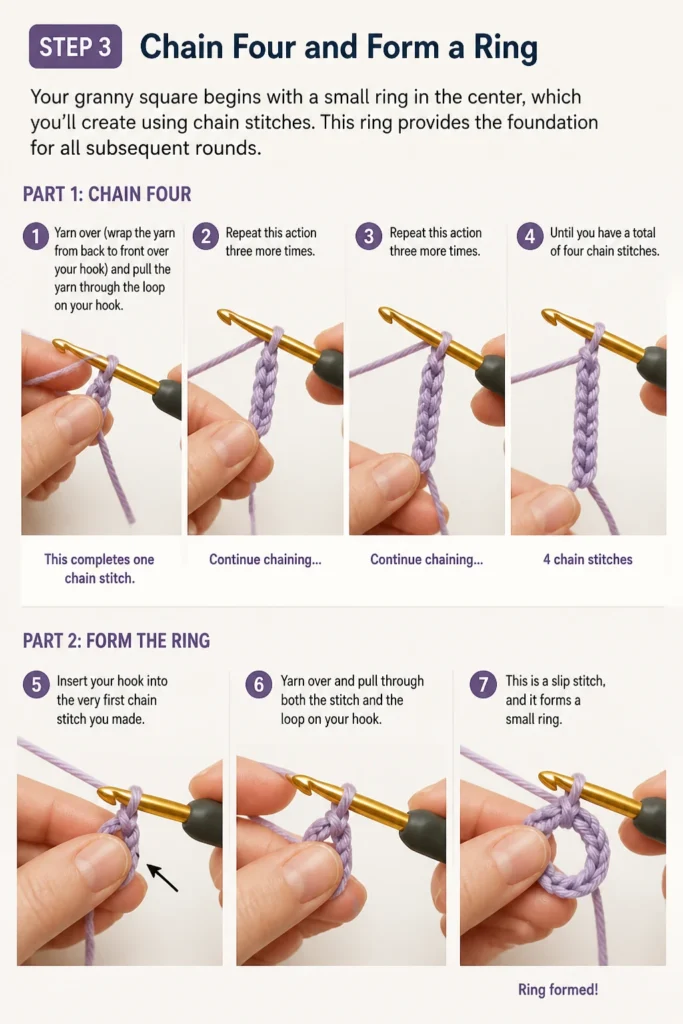
This ring provides the foundation for all subsequent rounds.
Yarn over (wrap the yarn from back to front over your hook) and pull the yarn through the loop on your hook. This completes one chain stitch.
Repeat this action three more times until you have a total of four chain stitches.
Insert your hook into the very first chain stitch you made. This will bring the two ends of your chain together.
Yarn over and pull through both the stitch and the loop on your hook. This is a slip stitch, and it forms a small ring.
Step 4: Begin Round 1
Round one is where the granny square truly starts to take shape with its first clusters of double crochet stitches.
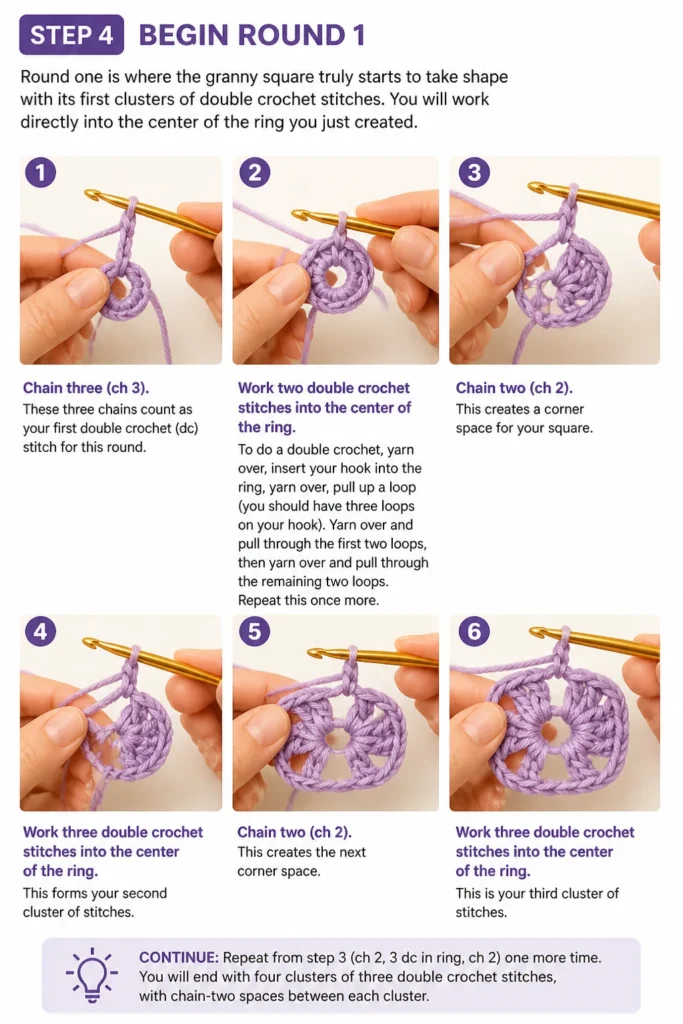
You will work directly into the center of the ring you just created.
Chain three (ch 3). These three chains count as your first double crochet (dc) stitch for this round.
Work two double crochet stitches into the center of the ring. To do a double crochet, yarn over, insert your hook into the ring, yarn over, pull up a loop (you should have three loops on your hook).
Yarn over and pull through the first two loops, then yarn over and pull through the remaining two loops. Repeat this once more.
Chain two (ch 2). This creates a corner space for your square.
Work three double crochet stitches into the center of the ring. This forms your second “cluster” of stitches.
Chain two (ch 2) again to create your second corner space.
Repeat the sequence of “three double crochet stitches, chain two” two more times. You should now have four clusters of three double crochet stitches, separated by four chain-2 spaces.
Join the round by inserting your hook into the top of the initial chain-3 (the third chain from your hook at the beginning of the round) and working a slip stitch.
Pro Tip: When working into the ring, make sure to work over your starting yarn tail. This will help secure it and make weaving in ends easier later.
Step 5: Begin Round 2
Round two builds upon the first, expanding the square and establishing the iconic “granny” pattern.
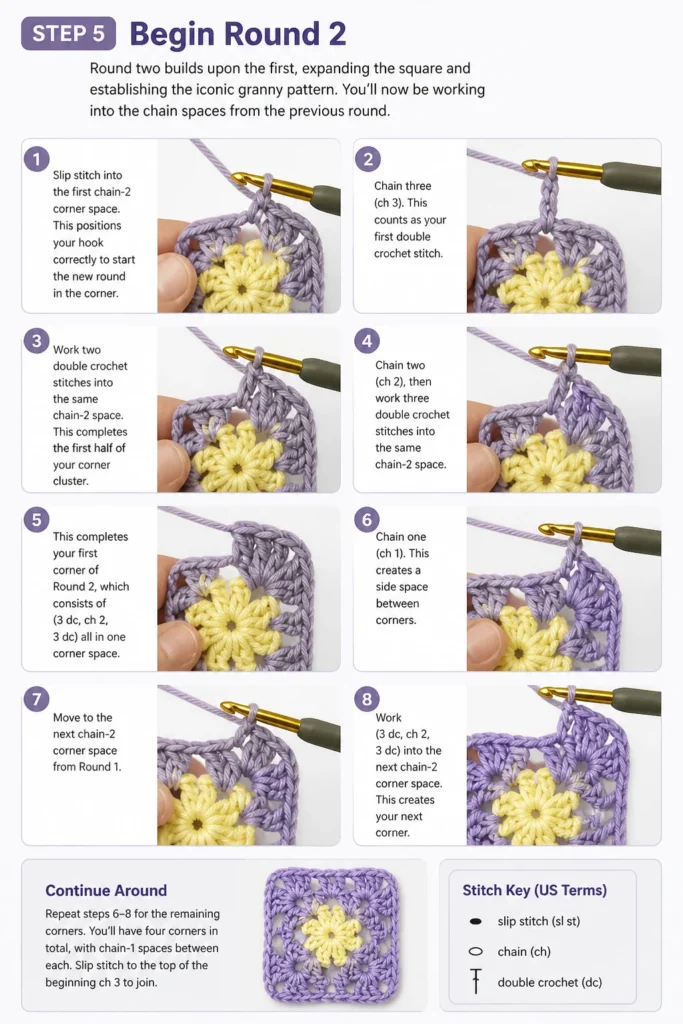
You’ll now be working into the chain spaces from the previous round.
Slip stitch into the first chain-2 corner space. This positions your hook correctly to start the new round in the corner.
Chain three (ch 3). This counts as your first double crochet stitch.
Work two double crochet stitches into the same chain-2 space. This completes the first half of your corner cluster.
Chain two (ch 2), then work three double crochet stitches into the same chain-2 space. This completes your first corner of Round 2, which consists of (3 dc, ch 2, 3 dc) all in one corner space.
Chain one (ch 1). This creates a “side” space between corners.
Move to the next chain-2 corner space from Round 1. Work (3 dc, ch 2, 3 dc) into this space.
Chain one (ch 1).
Repeat the sequence of “(3 dc, ch 2, 3 dc) into the next corner space, then ch 1” two more times until you’ve worked into all four corners.
Join the round with a slip stitch into the top of the initial chain-3.
Step 6: Continue Building Rounds (Optional)
You can make your granny square as large as you like by repeating the pattern of Round 2.
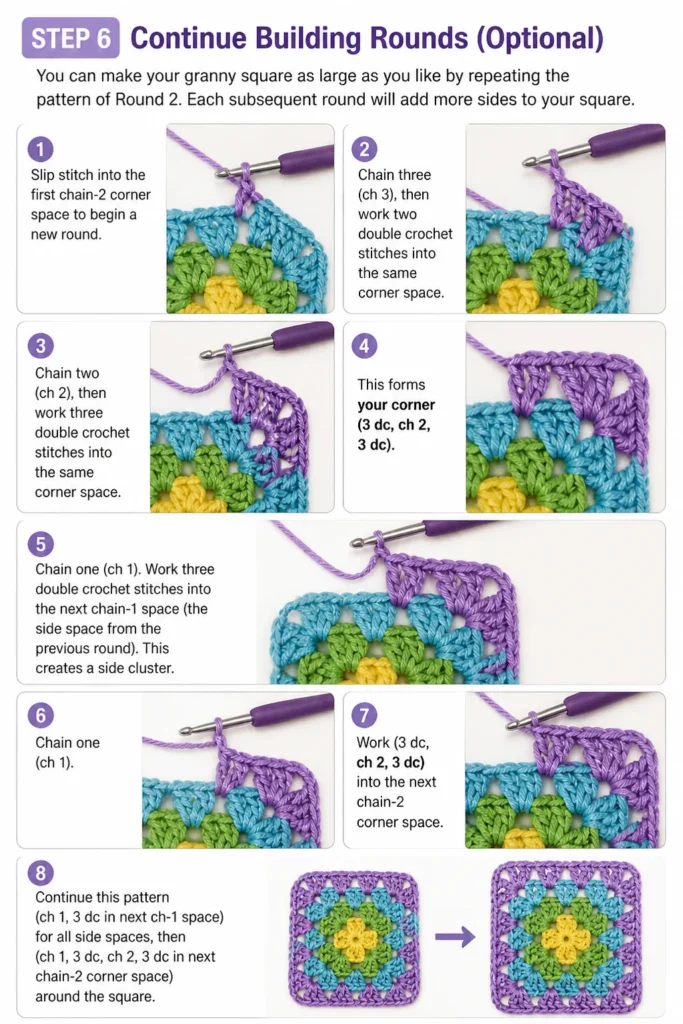
Each subsequent round will add more “sides” to your square.
Slip stitch into the first chain-2 corner space to begin a new round.
Chain three (ch 3), then work two double crochet stitches into the same corner space.
Chain two (ch 2), then work three double crochet stitches into the same corner space. This forms your corner (3 dc, ch 2, 3 dc).
Chain one (ch 1).
Work three double crochet stitches into the next chain-1 space (the “side” space from the previous round). This creates a side cluster.
Chain one (ch 1).
Work (3 dc, ch 2, 3 dc) into the next chain-2 corner space.
Continue this pattern: (ch 1, 3 dc in next ch-1 space) for all side spaces, then (ch 1, 3 dc, ch 2, 3 dc in next ch-2 corner space) for all corners.
Join the round with a slip stitch into the top of the initial chain-3.
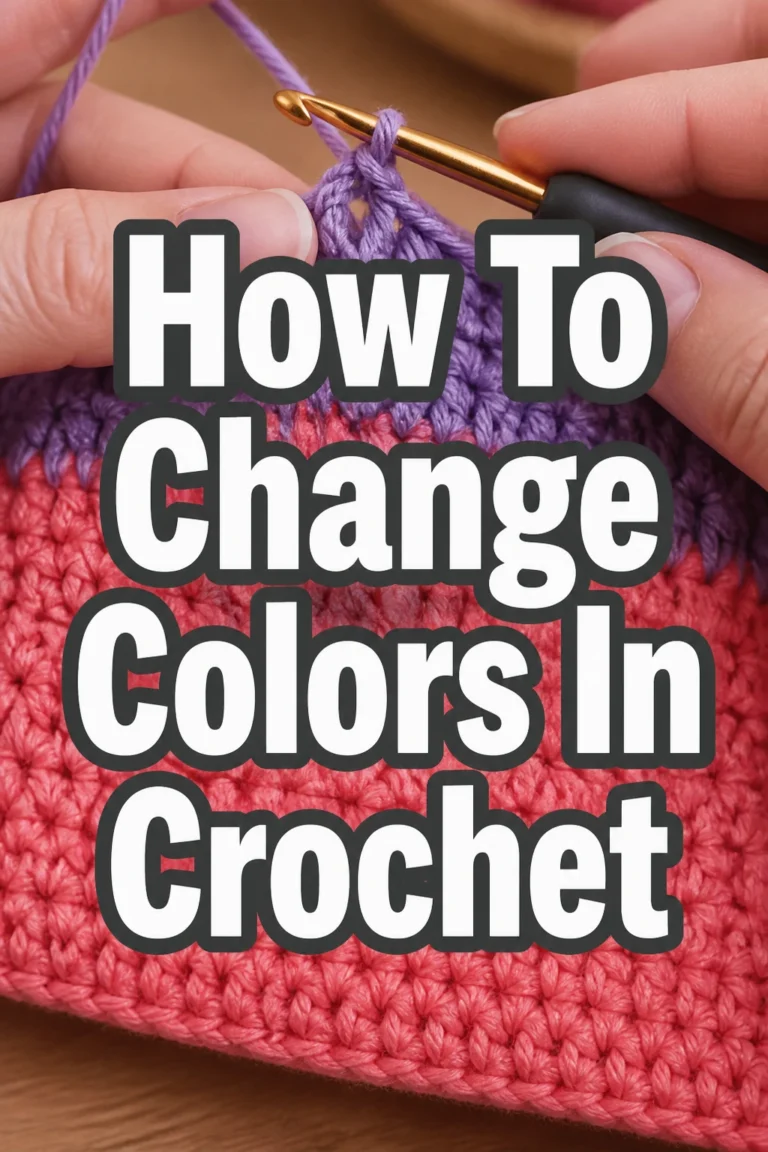
Pro Tip: To change colors, complete the last slip stitch of the round with your new color. Cut the old yarn, leaving a tail to weave in, and continue with the new color. This creates a clean transition.
Step 7: Finish Your Square
Once your granny square reaches the desired size, it’s time to secure your work.
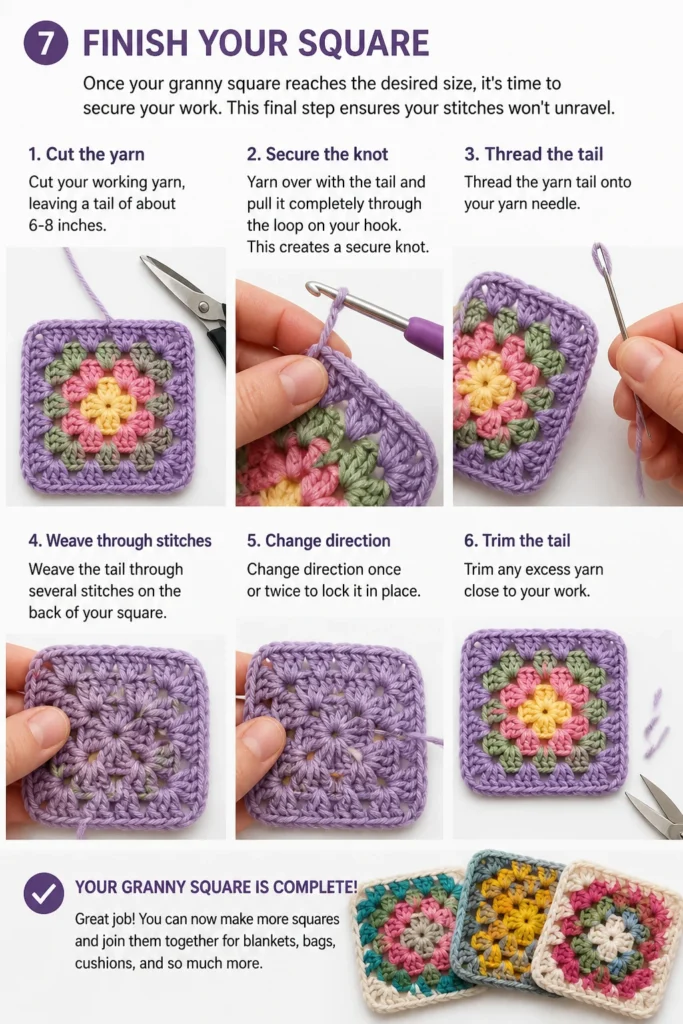
This final step ensures your stitches won’t unravel.
Cut your working yarn, leaving a tail of about 6-8 inches.
Yarn over with the tail and pull it completely through the loop on your hook. This creates a secure knot.
Thread the yarn tail onto your yarn needle.
Weave the tail through several stitches on the back of your square, changing direction once or twice to lock it in place.
Trim any excess yarn close to your work, and your granny square is complete!
Common Mistakes to Avoid
Skipping Chain Spaces
A common error for beginners is forgetting to chain one between the 3-double crochet clusters along the sides, or chaining the wrong number in the corners.
This leads to a square that pulls in, looks tight, and doesn’t lay flat, distorting its shape.
Always double-check your pattern for chain counts. Remember, it’s typically “chain one” between side clusters and “chain two” in the corners to create the necessary space and flexibility.
Incorrect Stitch Count
Miscounting double crochet stitches within a cluster or in a corner can throw off the entire square.
If you have too many or too few stitches, your square might become wavy or lopsided instead of maintaining its clean, geometric form.
Take your time and count your stitches as you go. It’s much easier to correct a mistake immediately than to unravel several rounds later.
Tension Issues
Maintaining consistent tension is crucial for a neat and evenly sized granny square.
If your tension is too tight, your square will be stiff and small; too loose, and it will be floppy and gappy.
Practice helps immensely with tension. Try to relax your grip on the yarn and hook. If your square isn’t looking right, consider trying a different hook size – a larger hook for tight tension, a smaller one for loose tension.
Joining in the Wrong Spot
The slip stitch used to join rounds needs to go into the correct stitch to ensure a seamless transition.
If you join into a double crochet stitch instead of the top of the initial chain-3, your starting chain will be hidden or displaced, creating an uneven edge.
Always aim for the third chain of your starting chain-3. This keeps your square symmetrical and your joins virtually invisible.
Troubleshooting
My Square is Curling or Cupping
If your granny square is curling up like a bowl, it usually means your tension is too tight or you’re not chaining enough in your corner spaces.
Try using a larger crochet hook to loosen your stitches. Additionally, double-check that you are consistently chaining two in your corners, as this space is essential for the square to expand flatly.
My Square is Wavy or Ruffled
A wavy or ruffled square suggests your tension might be too loose, or you are adding too many stitches or chains.
Consider going down a hook size to tighten your stitches slightly. Ensure you are only chaining one between the 3-double crochet clusters on the sides of your square, and not chaining extra stitches anywhere else.
My Stitches Look Uneven
Uneven stitches are very common when you’re first learning, and they often relate to inconsistent tension.
Practice is the best remedy here; the more you crochet, the more consistent your hand movements will become. Focus on making each yarn over and pull-through motion similar in strength and speed.
Key Takeaways
- The granny square is built from simple double crochet stitches and chain spaces.
- A magic ring or chain-4 ring forms the essential center foundation.
- Corners are always defined by a (3 dc, ch 2, 3 dc) sequence.
- Sides grow with 3 dc clusters separated by chain-1 spaces.
- Consistent tension and accurate stitch counting are vital for a neat square.
- Don’t be afraid to unravel and re-do if something doesn’t look right.
Frequently Asked Questions
Can I use any type of yarn for a granny square?
While you can theoretically use any yarn, beginners will find medium-weight (worsted weight) acrylic or cotton yarn the easiest to work with. These yarns show stitch definition well and are forgiving for mistakes.
How do I change colors in a granny square?
To change colors cleanly, complete the last slip stitch of the current round with your new color. Simply drop the old yarn, pick up the new color, and pull it through to complete the slip stitch. Then, continue crocheting with the new color, remembering to weave in all ends securely.
What can I make with granny squares?
Granny squares are incredibly versatile! You can join them to create blankets, scarves, bags, sweaters, and even home decor items like pillows or placemats. They are a fantastic building block for countless projects.
My first few squares don’t look perfect. Is that normal?
Absolutely! It’s completely normal for your first attempts to be a bit wobbly or uneven. Crochet is a skill that improves with practice. Keep going, and you’ll notice significant improvement in your tension and consistency very quickly.
Our Top Recommended Finds
- Ergonomic Crochet Hook Set: These hooks feature comfortable handles, reducing hand fatigue during longer crafting sessions. They make a noticeable difference for sustained crocheting.
- Yarn Winder and Swift: If you buy yarn in hanks or skeins, a winder and swift transform them into neat cakes, preventing tangles and making your yarn much easier to work with.
- Stitch Markers: Small, colorful clips that help you mark important stitches or the beginning of a round. They are invaluable for keeping track, especially in larger or more complex patterns.
Your Crochet Journey Begins Now
You’ve taken the first exciting step into the world of crochet by learning the granny square.
This humble square is more than just a pattern; it’s a gateway to endless creative possibilities.
Don’t just read these steps; pick up your hook and yarn today.
Embrace the learning process, enjoy the rhythm of the stitches, and watch as your very own handmade fabric comes to life.