How To Do A Decrease In Crochet
Learning to decrease in crochet is a game-changer for any project. It allows you to shape your work, turning flat rectangles into intricate designs.
I remember the frustration of wanting to make amigurumi or fitted garments, only to find my edges always straight. Mastering the decrease opened up a world of possibilities.
This guide will equip you with the essential techniques to confidently shape your crochet pieces, no matter your skill level.
Quick Overview
By the end of this guide, you’ll understand how to effectively reduce the number of stitches in your crochet work. You’ll be able to create tapers, curves, and seamless shaping for all your projects.
- Time needed: 20-45 minutes (to learn and practice the main techniques)
- Difficulty: Beginner to Intermediate
- What you’ll need: Yarn, crochet hook, scissors, tapestry needle (optional)
Step-by-Step Instructions
Decreasing in crochet means working two or more stitches together to form a single stitch. This reduces the total stitch count in your row or round, making your fabric narrower.
The most common decrease methods are often abbreviated as ‘2tog’ (two together) or ‘dec’ (decrease). The specific steps vary slightly depending on the stitch you’re working with.
Understanding the Basics of Decreasing
Before diving into specific stitches, grasp the core idea. You will start a stitch in one location, pause it, then start another stitch in the next location, and finally finish both together as one.
This fundamental concept applies across different stitch types, making it easier to learn variations once you understand the core.
Step 1: Prepare Your Work
Work a few stitches in your chosen pattern before you need to decrease. This helps you establish your rhythm and provides context for the decrease.
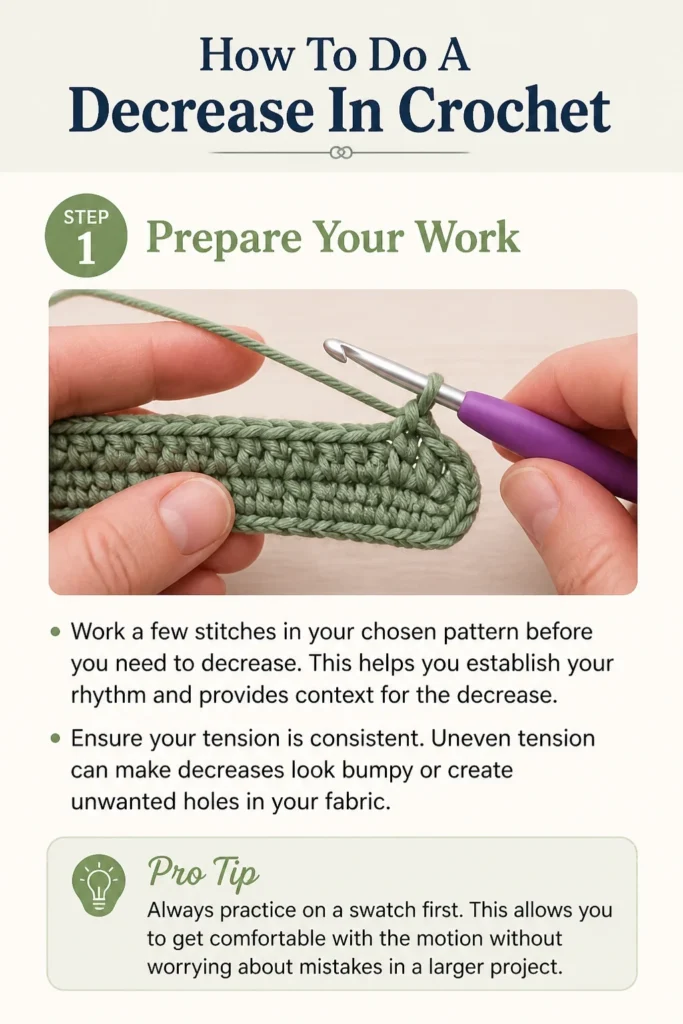
Ensure your tension is consistent. Uneven tension can make decreases look bumpy or create unwanted holes in your fabric.
Pro Tip: Always practice on a swatch first. This allows you to get comfortable with the motion without worrying about mistakes in a larger project.
Step 2: Single Crochet Decrease (Sc2tog)
The single crochet decrease is one of the most fundamental and widely used techniques. It’s perfect for creating tight, neat shaping.
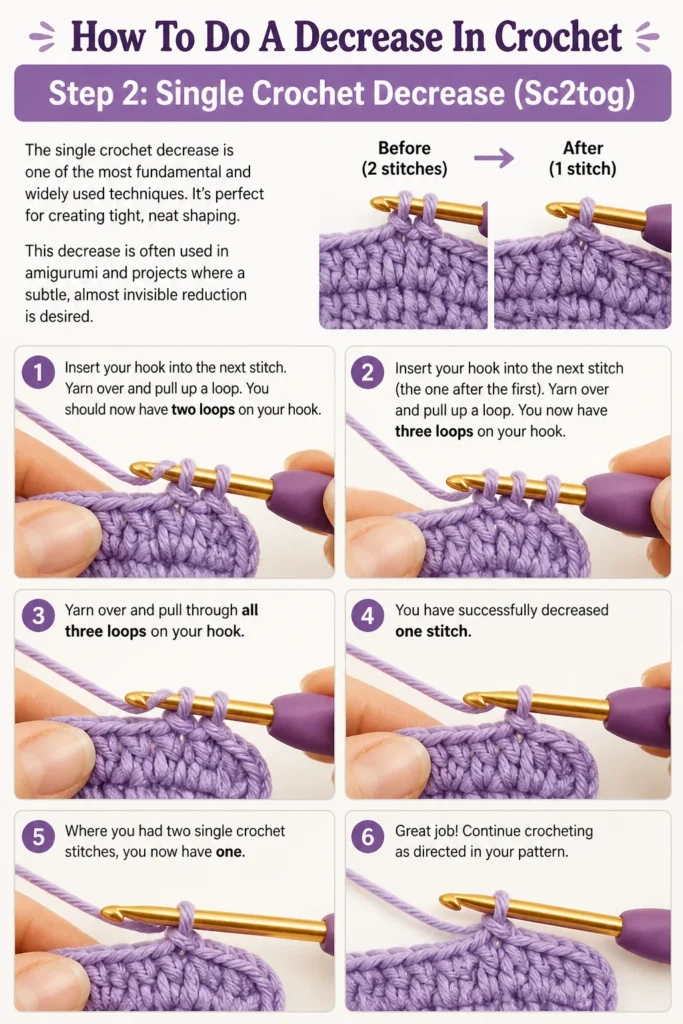
This decrease is often used in amigurumi and projects where a subtle, almost invisible reduction is desired.
- Insert your hook into the next stitch.
- Yarn over and pull up a loop. You should now have two loops on your hook.
- Insert your hook into the next stitch (the one after the first).
- Yarn over and pull up a loop. You now have three loops on your hook.
- Yarn over and pull through all three loops on your hook.
You have successfully decreased one stitch. Where you had two single crochet stitches, you now have one.
Step 3: Half Double Crochet Decrease (Hdc2tog)
The half double crochet decrease creates a slightly taller and looser decrease than the sc2tog. It blends well into half double crochet fabric.
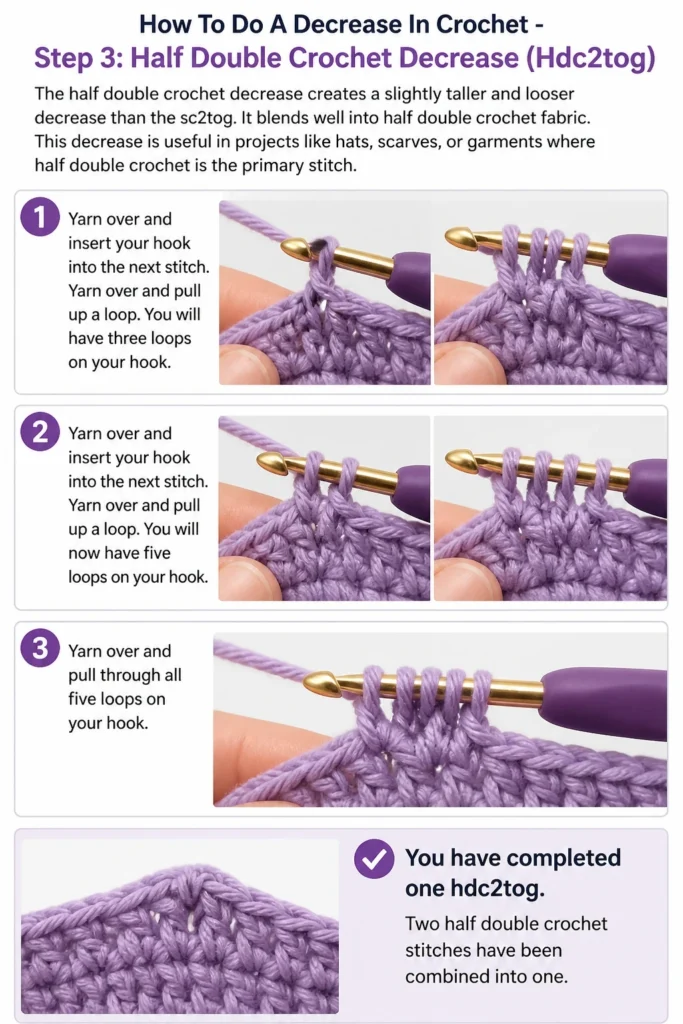
This decrease is useful in projects like hats, scarves, or garments where half double crochet is the primary stitch.
- Yarn over and insert your hook into the next stitch.
- Yarn over and pull up a loop. You will have three loops on your hook.
- Yarn over and insert your hook into the next stitch.
- Yarn over and pull up a loop. You will now have five loops on your hook.
- Yarn over and pull through all five loops on your hook.
You have completed one hdc2tog. Two half double crochet stitches have been combined into one.
Step 4: Double Crochet Decrease (Dc2tog)
The double crochet decrease is essential for shaping projects made with double crochet. It creates a more pronounced reduction due to the height of the stitch.
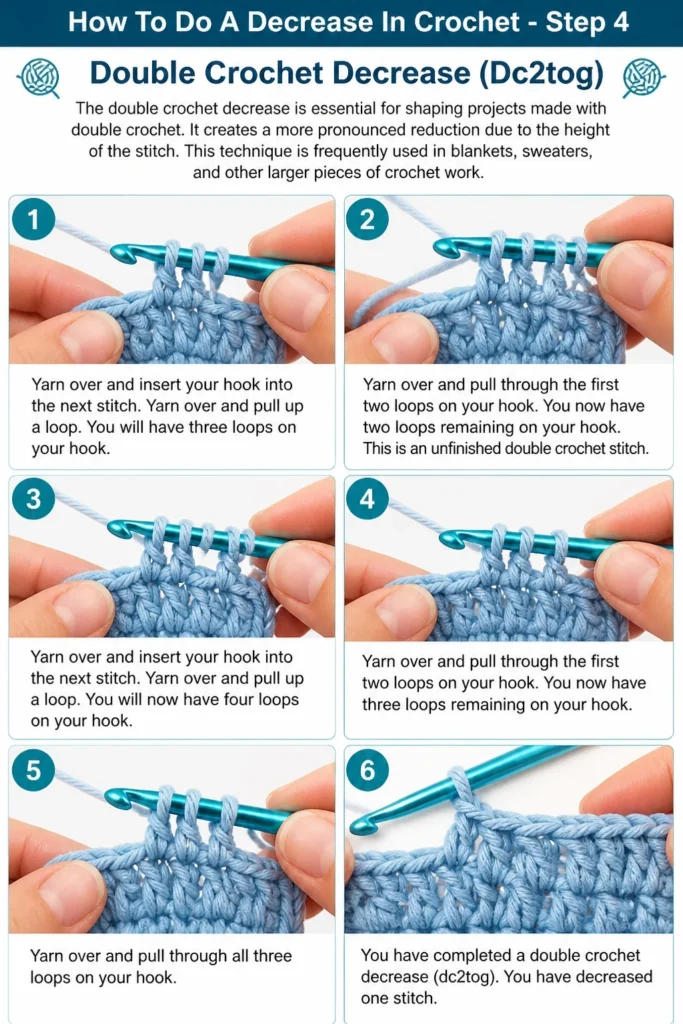
This technique is frequently used in blankets, sweaters, and other larger pieces of crochet work.
- Yarn over and insert your hook into the next stitch.
- Yarn over and pull up a loop. You will have three loops on your hook.
- Yarn over and pull through the first two loops on your hook. You now have two loops remaining on your hook. This is an unfinished double crochet stitch.
- Yarn over and insert your hook into the next stitch.
- Yarn over and pull up a loop. You will now have four loops on your hook.
- Yarn over and pull through the first two loops on your hook. You now have three loops remaining on your hook.
- Yarn over and pull through all three remaining loops on your hook.
You have successfully completed one dc2tog. Two double crochet stitches are now reduced to one.
Pro Tip: Practice each decrease type until the motion feels natural. Muscle memory is key to consistent, neat decreases.
Step 5: Invisible Single Crochet Decrease (Invdec or Sc2tog-blo)
The invisible decrease is a fantastic technique, especially for amigurumi or any project where you want a truly seamless look. It minimizes bumps and holes.
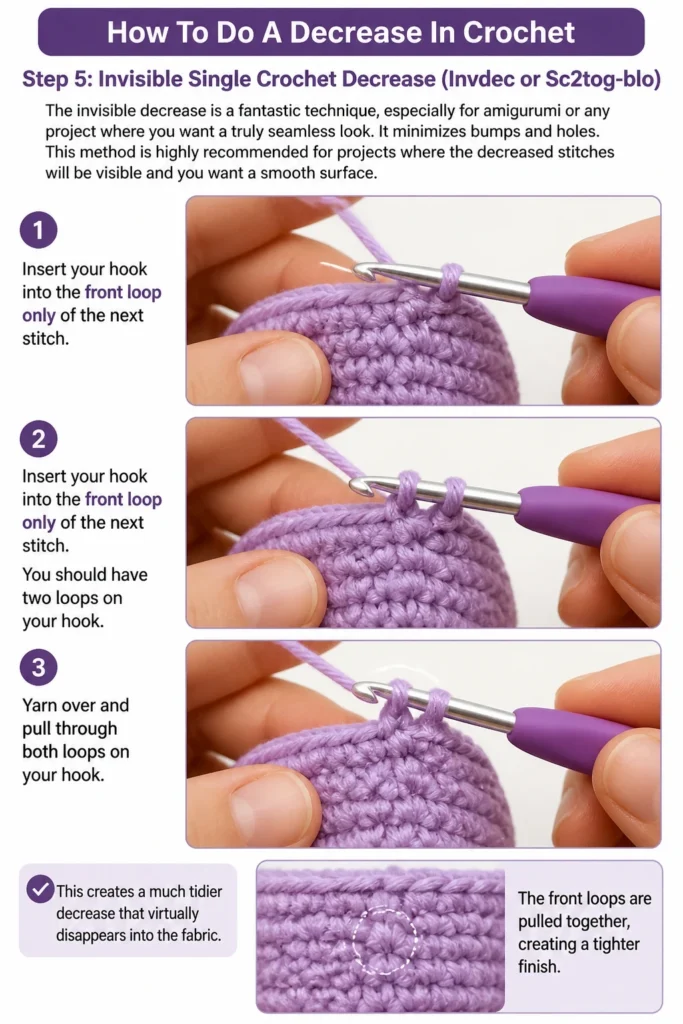
This method is highly recommended for projects where the decreased stitches will be visible and you want a smooth surface.
- Insert your hook into the front loop only of the next stitch.
- Insert your hook into the front loop only of the next stitch. You should have two loops on your hook.
- Yarn over and pull through both loops on your hook.
This creates a much tidier decrease that virtually disappears into the fabric. The front loops are pulled together, creating a tighter finish.
Step 6: Counting Your Stitches
After each decrease, it’s crucial to recount your stitches. This confirms you’ve reduced the stitch count correctly.
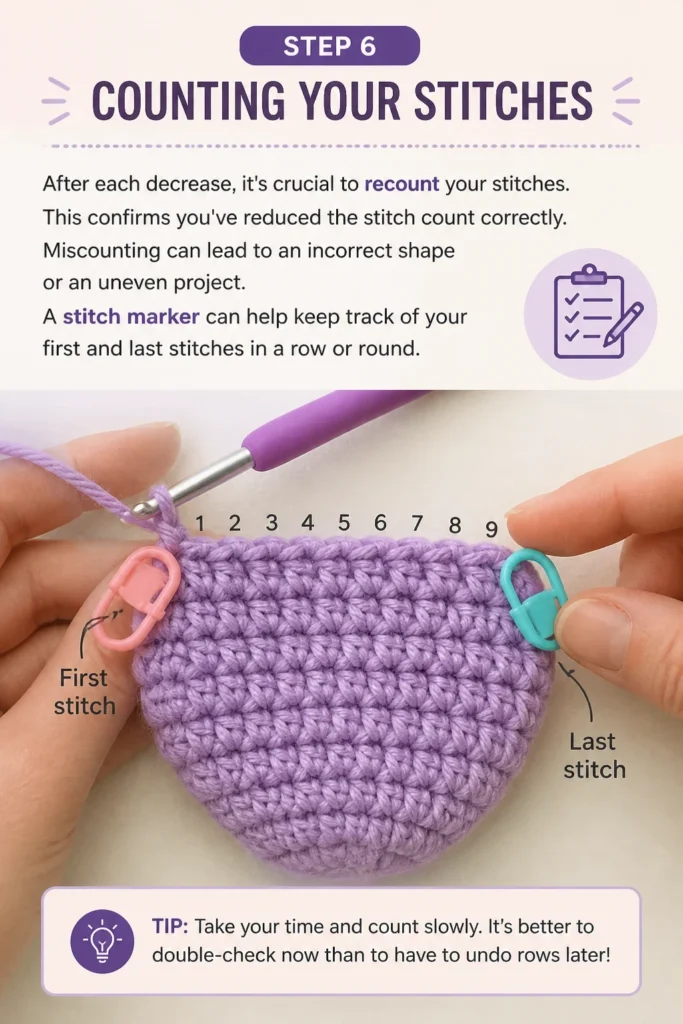
Miscounting can lead to an incorrect shape or an uneven project. A stitch marker can help keep track of your first and last stitches in a row or round.
Step 7: Check Your Fabric
Examine your work after a few decrease stitches. Look for consistency in tension and appearance.
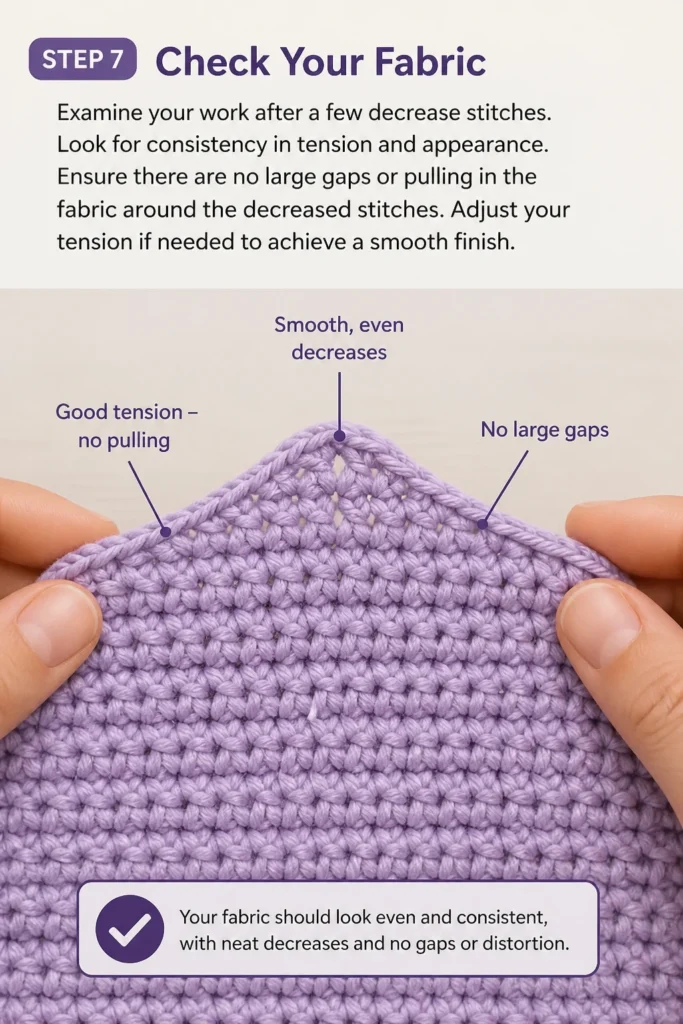
Ensure there are no large gaps or pulling in the fabric around the decreased stitches. Adjust your tension if needed to achieve a smooth finish.
Common Mistakes to Avoid
Pulling Too Tightly
When working decreases, it’s easy to pull the yarn too tightly, especially on the final yarn over. This can create a stiff, puckered section in your fabric.
Aim for consistent tension throughout the entire decrease process. Allow enough slack for the yarn to move freely, creating a neat, flexible stitch.
Missing a Loop
Sometimes, especially with the invisible decrease, you might accidentally insert your hook through both loops instead of just the front loop. This changes the appearance of the decrease.
Always double-check your hook placement before yarning over. Precision in loop selection ensures the decrease looks as intended and blends seamlessly.
Incorrect Stitch Placement
A common error is inserting the hook into the same stitch twice, or skipping a stitch entirely before the decrease. This throws off your stitch count and can create unintended holes.
Pay close attention to where your pattern indicates the next stitch should be. Ensure you are working into two distinct, consecutive stitches for a standard decrease.
Forgetting to Yarn Over
Forgetting a yarn over at any stage of a decrease, particularly with taller stitches like dc2tog, will result in an incorrectly formed stitch. The decrease will look much smaller or tighter than it should.
Carefully follow each step of the decrease, making sure to yarn over exactly when instructed. This ensures the correct height and tension for your decreased stitch.
Troubleshooting
My Decreases Are Uneven
If your decreased stitches look lumpy or inconsistent, it’s often a sign of uneven tension. You might be pulling too tight on some steps and too loose on others.
Focus on maintaining a consistent yarn tension throughout the entire decrease motion. Practice slowly, ensuring each pull of the yarn is uniform. Switching to an ergonomic hook can also sometimes help regulate tension.
There Are Small Holes Around My Decreases
Small gaps or holes can appear if you’re not pulling the loops snug enough before completing the final step of the decrease. This leaves a tiny opening where the stitches meet.
When you do the final yarn over and pull through all loops, give a gentle tug on your working yarn to close up any slack. This tightens the base of the decrease, reducing any gaps.
I Keep Losing Track of My Stitch Count
It’s easy to lose count, especially when learning new techniques or working on complex patterns. Decreases inherently change your stitch count, making it a common point of confusion.
Use stitch markers to mark the beginning and end of each row or round. After completing a decrease, recount your stitches immediately before moving on. Writing down your stitch count after each decreased row can also be very helpful.
Key Takeaways
- Decreasing reduces your stitch count, enabling shaping in crochet projects.
- The core principle involves working two or more stitches together as one.
- Different stitch types (sc, hdc, dc) have slightly varied decrease steps.
- The invisible decrease (invdec) creates a particularly neat and seamless look.
- Consistent tension is vital for smooth, even decreases without holes.
- Always practice new decrease techniques on a swatch before adding them to a main project.
Frequently Asked Questions
When should I use a decrease in crochet?
You use decreases whenever you need to make your crochet fabric narrower. This is essential for shaping projects like amigurumi (stuffed toys), garments (sleeves, necklines), hats (crowns), or any item that isn’t a simple rectangle.
How do I make my decreases look less noticeable?
For single crochet, the invisible decrease (invdec) is the best method for making decreases virtually disappear. For taller stitches, focus on consistent tension and trying to pull the final loop through smoothly. Some patterns might call for decreasing on the wrong side of your work to hide them.
Can I decrease in any stitch?
Yes, you can decrease in almost any basic crochet stitch. The principle remains the same: you start one stitch, pause it, start the next stitch in the following space, and then complete both stitches together. The number of yarn overs and loops on your hook will change depending on the stitch height.
What’s the difference between a standard decrease and an invisible decrease?
A standard decrease, like sc2tog, involves inserting your hook under both loops of the first stitch, then under both loops of the second. An invisible decrease (invdec) specifically uses only the front loops of the stitches. This method pulls the front loops together, creating a tighter, flatter decrease that blends more seamlessly into the fabric, especially when working in the round.
Our Top Recommended Finds
- Ergonomic Crochet Hooks: These hooks reduce hand strain, making long crocheting sessions more comfortable. Consistent grip can also aid in maintaining even tension.
- Stitch Markers: Essential for marking specific stitches, especially when working in the round or when decreases alter your stitch count. They prevent errors and save time.
- Good Quality Yarn: Using yarn that doesn’t split easily makes learning new techniques much smoother. It allows for clear stitch definition and easier hook insertion.
Embark on Your Shaping Journey
You now have the fundamental knowledge to confidently execute decreases in your crochet projects. This skill is a cornerstone of creating truly unique and beautifully shaped pieces.
Don’t hesitate to revisit these steps and practice each decrease until it feels like second nature. The more you practice, the more intuitive and seamless your shaping will become.
Now, grab your hook and yarn, and start experimenting with shaping. Try a simple amigurumi ball, or add some decreases to a hat pattern. The possibilities are endless!