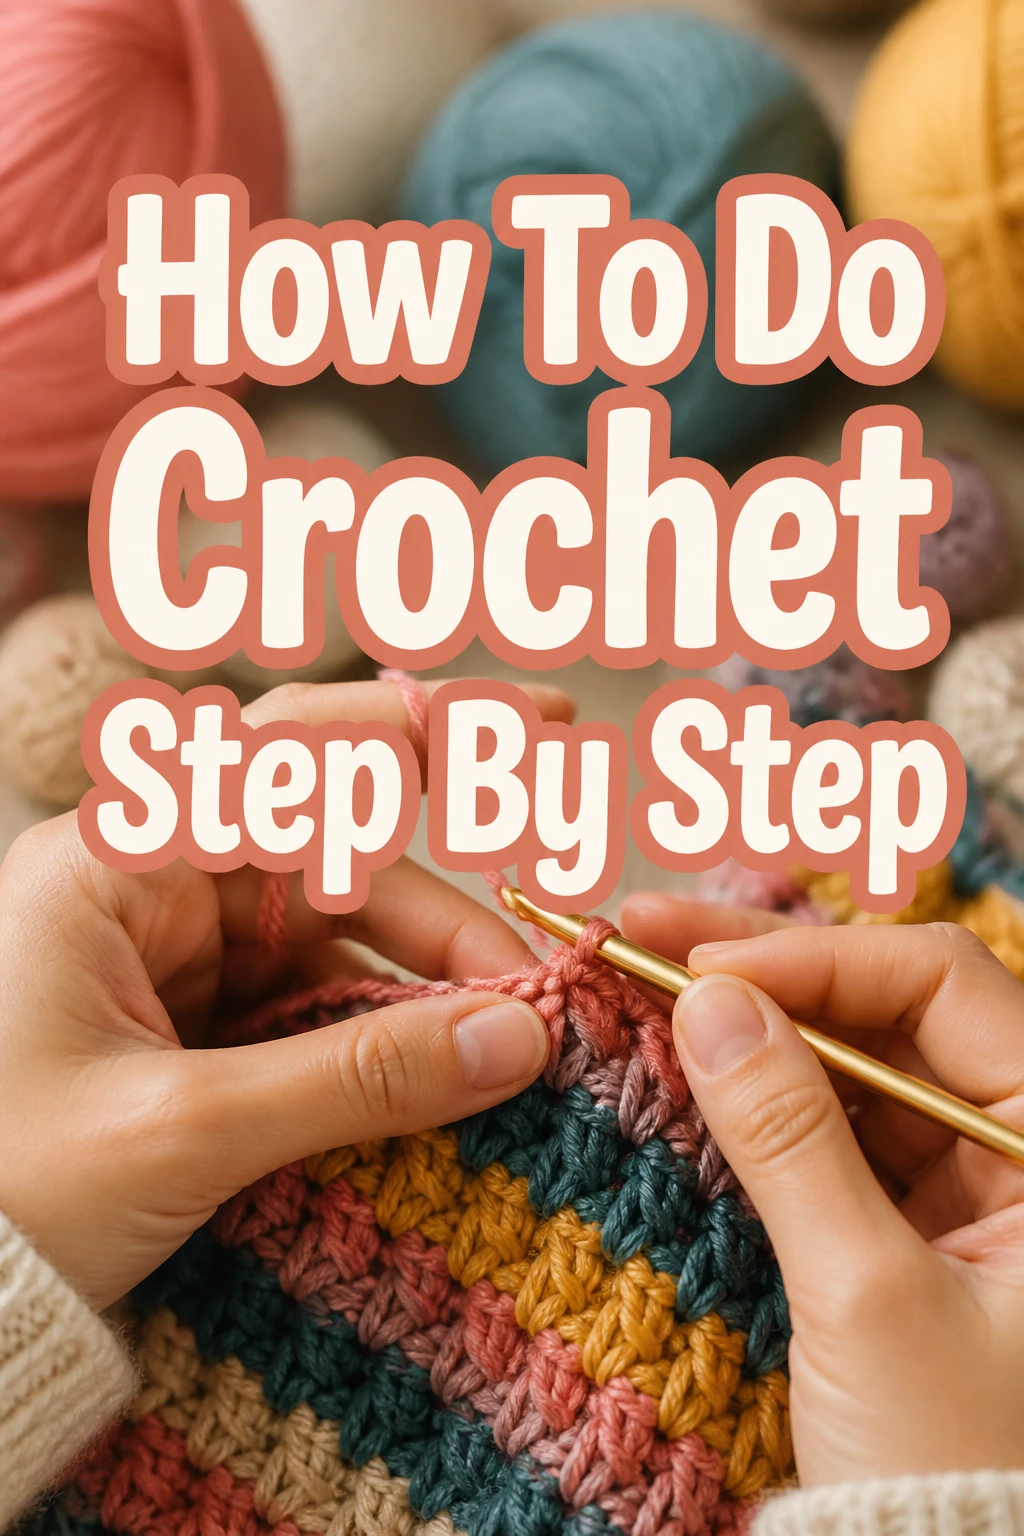
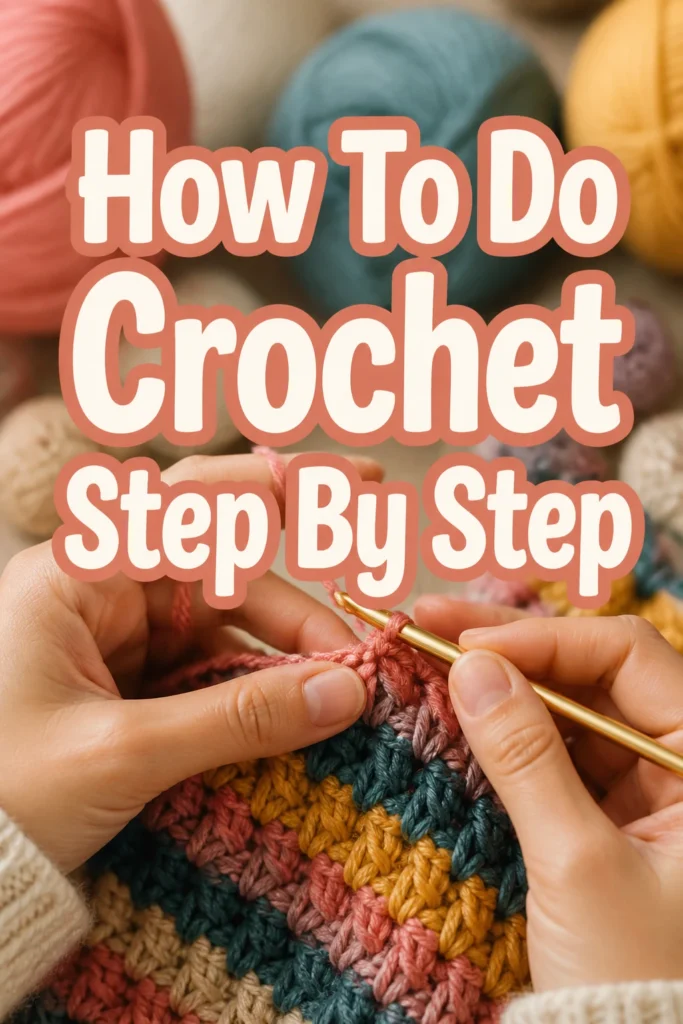
How To Do Crochet Step By Step
I remember the first time I picked up a crochet hook, feeling a mix of excitement and confusion.
This guide distills years of personal experience, making it easy for you to learn.
You’re about to discover the joy of creating beautiful things with just a hook and yarn.
Quick Overview
This guide will walk you through the absolute essentials of crochet, from selecting your tools to completing your very first simple project.
You’ll learn the foundational stitches and techniques needed to start your creative journey.
- Time needed: 1-2 hours for the basics, plus practice time
- Difficulty: Beginner
- What you’ll need: Yarn, a crochet hook, scissors, and a tapestry needle
Step-by-Step Instructions
Step 1: Gather Your Materials
Select your yarn. For beginners, a smooth, light-colored worsted weight (medium #4) acrylic yarn is ideal.
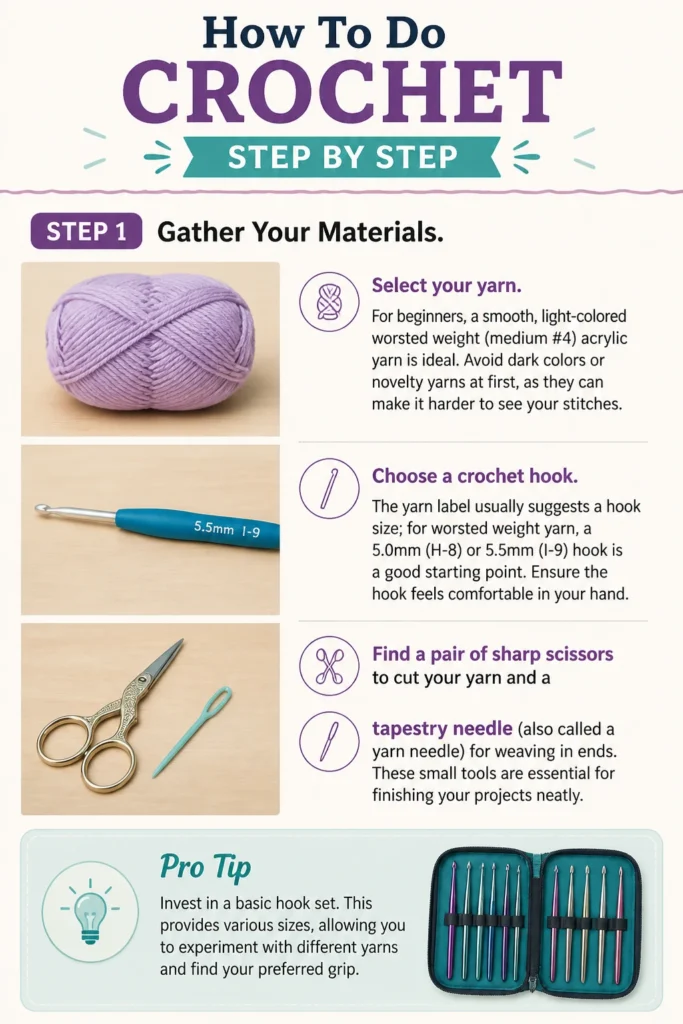
Avoid dark colors or novelty yarns at first, as they can make it harder to see your stitches.
Choose a crochet hook. The yarn label usually suggests a hook size; for worsted weight yarn, a 5.0mm (H-8) or 5.5mm (I-9) hook is a good starting point.
Ensure the hook feels comfortable in your hand.
Find a pair of sharp scissors to cut your yarn and a tapestry needle (also called a yarn needle) for weaving in ends.
These small tools are essential for finishing your projects neatly.
Pro Tip: Invest in a basic hook set. This provides various sizes, allowing you to experiment with different yarns and find your preferred grip.
Step 2: Understand Basic Crochet Terminology
Familiarize yourself with a few key terms. “Skein” refers to a ball of yarn, while “slip knot” is the first loop you make.
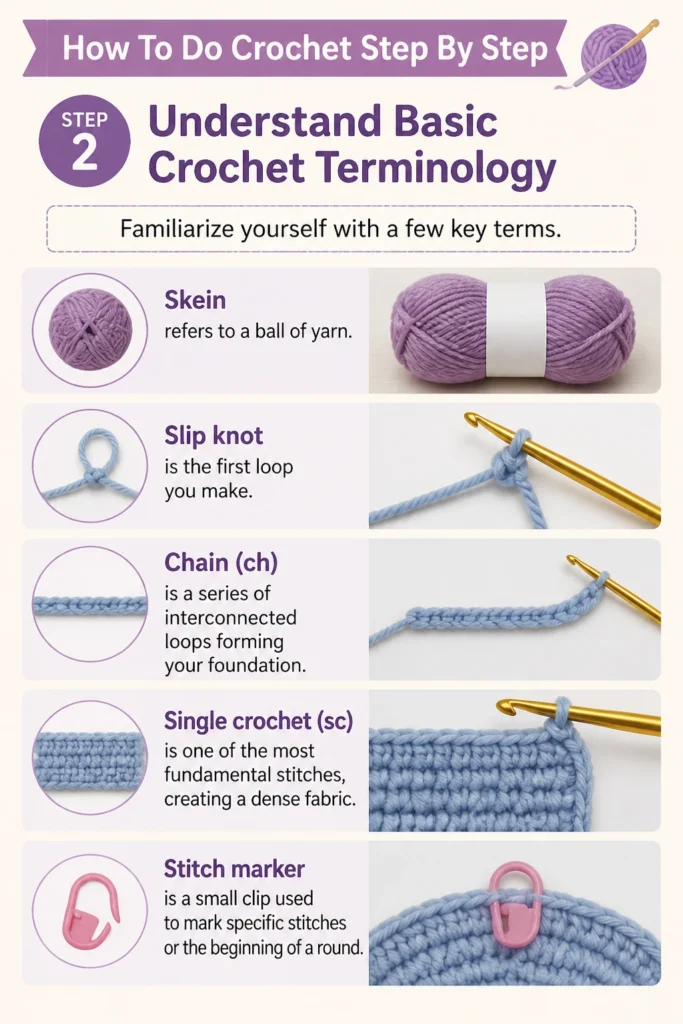
“Chain” (ch) is a series of interconnected loops forming your foundation.
“Single crochet” (sc) is one of the most fundamental stitches, creating a dense fabric.
“Stitch marker” is a small clip used to mark specific stitches or the beginning of a round.
Step 3: Hold Your Hook and Yarn
Hold the crochet hook in your dominant hand. There are two common grips: the “knife grip” (like holding a knife) or the “pencil grip” (like holding a pencil).
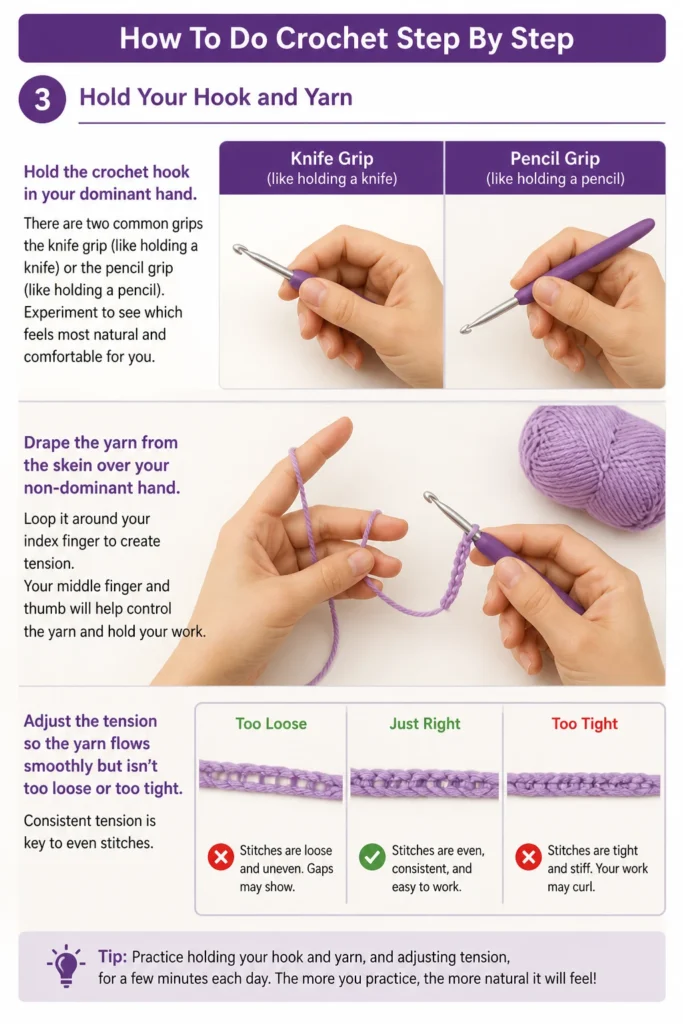
Experiment to see which feels most natural and comfortable for you.
Drape the yarn from the skein over your non-dominant hand. Loop it around your index finger to create tension.
Your middle finger and thumb will help control the yarn and hold your work.
Adjust the tension so the yarn flows smoothly but isn’t too loose or too tight.
Consistent tension is key to even stitches.
Step 4: Make a Slip Knot
Create a loop in your yarn, ensuring the tail end crosses over the working yarn (the yarn coming from the skein).
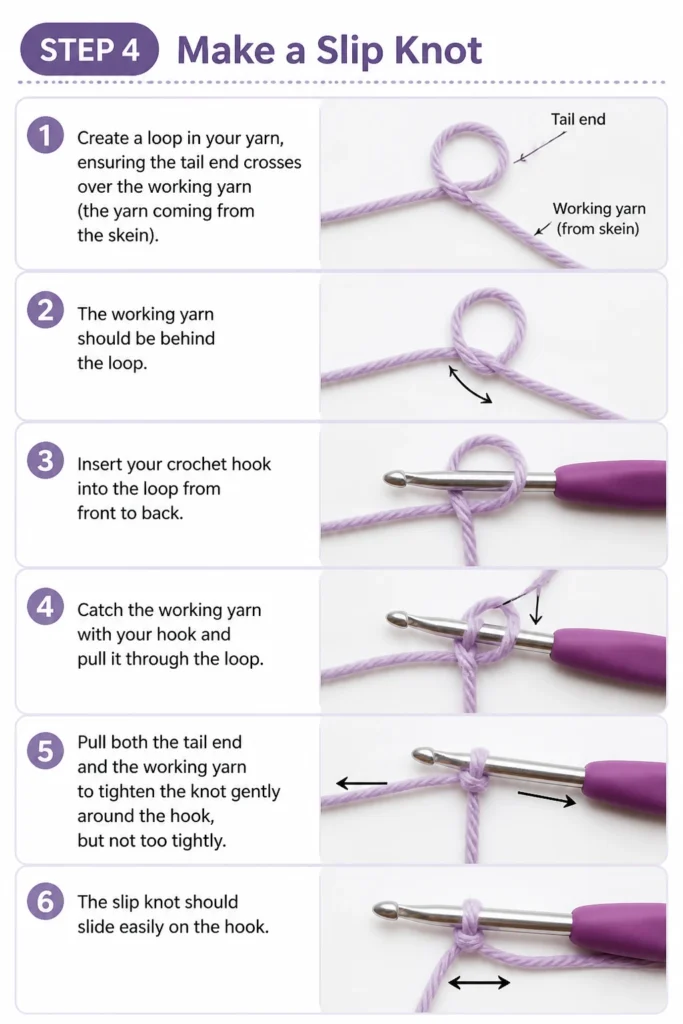
The working yarn should be behind the loop.
Insert your crochet hook into the loop from front to back.
Catch the working yarn with your hook and pull it through the loop.
Pull both the tail end and the working yarn to tighten the knot gently around the hook, but not too tightly.
The slip knot should slide easily on the hook.
Step 5: Chain Stitch (Ch)
Hold the slip knot on your hook with your non-dominant hand.
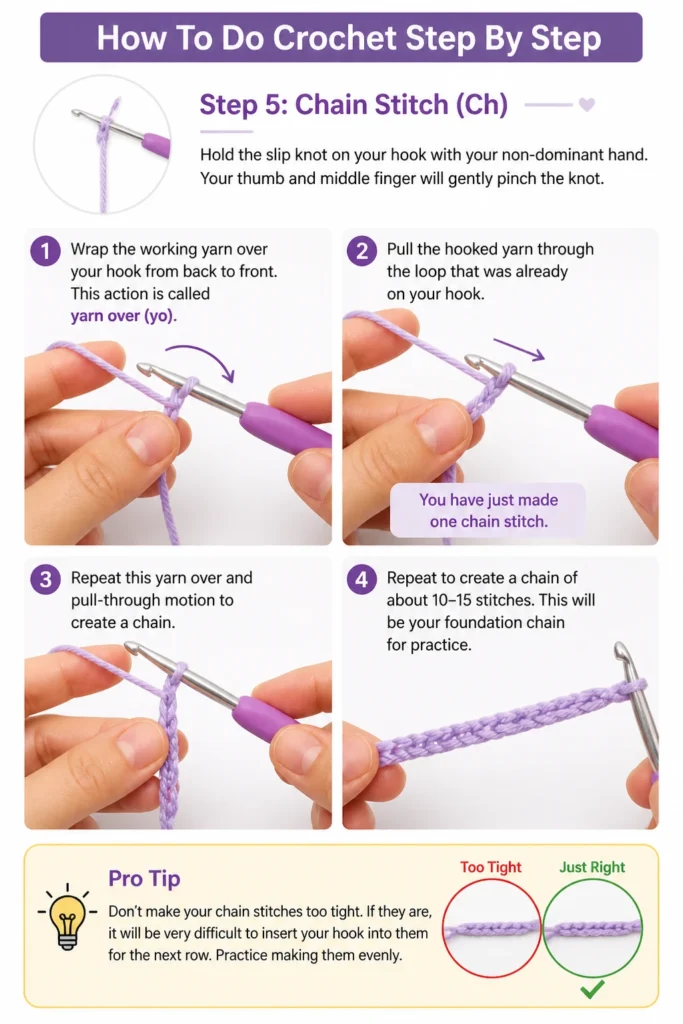
Your thumb and middle finger will gently pinch the knot.
Wrap the working yarn over your hook from back to front. This action is called “yarn over” (yo).
Pull the hooked yarn through the loop that was already on your hook.
You have just made one chain stitch.
Repeat this yarn over and pull-through motion to create a chain of about 10-15 stitches.
This will be your foundation chain for practice.
Pro Tip: Don’t make your chain stitches too tight. If they are, it will be very difficult to insert your hook into them for the next row. Practice making them evenly.
Step 6: Single Crochet (Sc) – First Row
Skip the first chain stitch closest to your hook. This skipped stitch often counts as a turning chain.
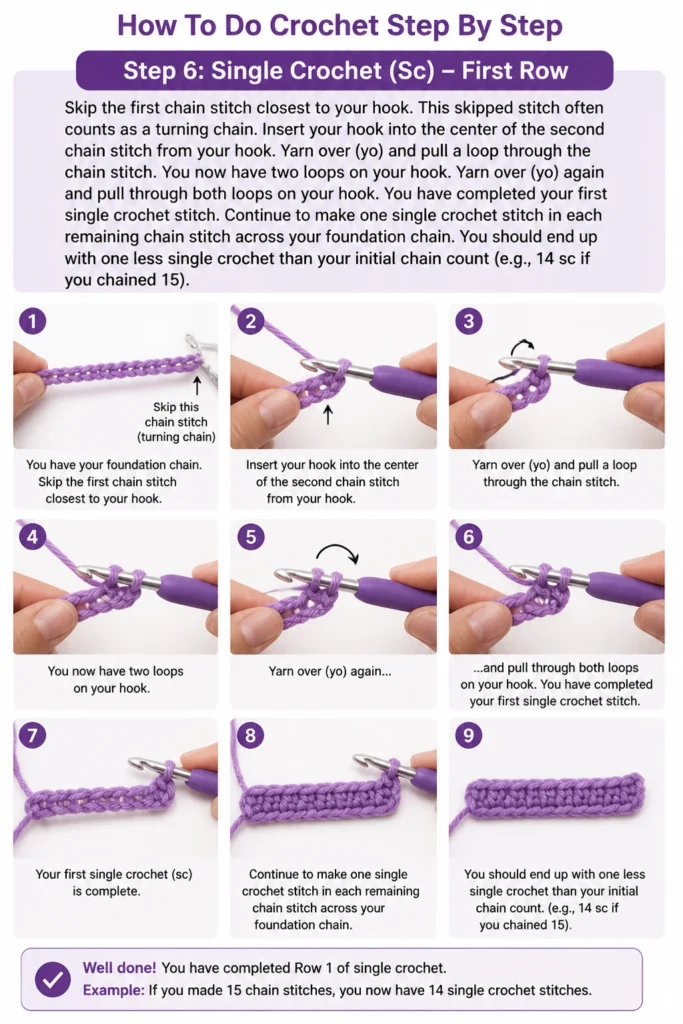
Insert your hook into the center of the second chain stitch from your hook.
Yarn over (yo) and pull a loop through the chain stitch. You now have two loops on your hook.
Yarn over (yo) again and pull through both loops on your hook.
You have completed your first single crochet stitch.
Continue to make one single crochet stitch in each remaining chain stitch across your foundation chain.
You should end up with one less single crochet than your initial chain count (e.g., 14 sc if you chained 15).
Step 7: Turning Your Work
Reach the end of your first row of single crochet stitches.
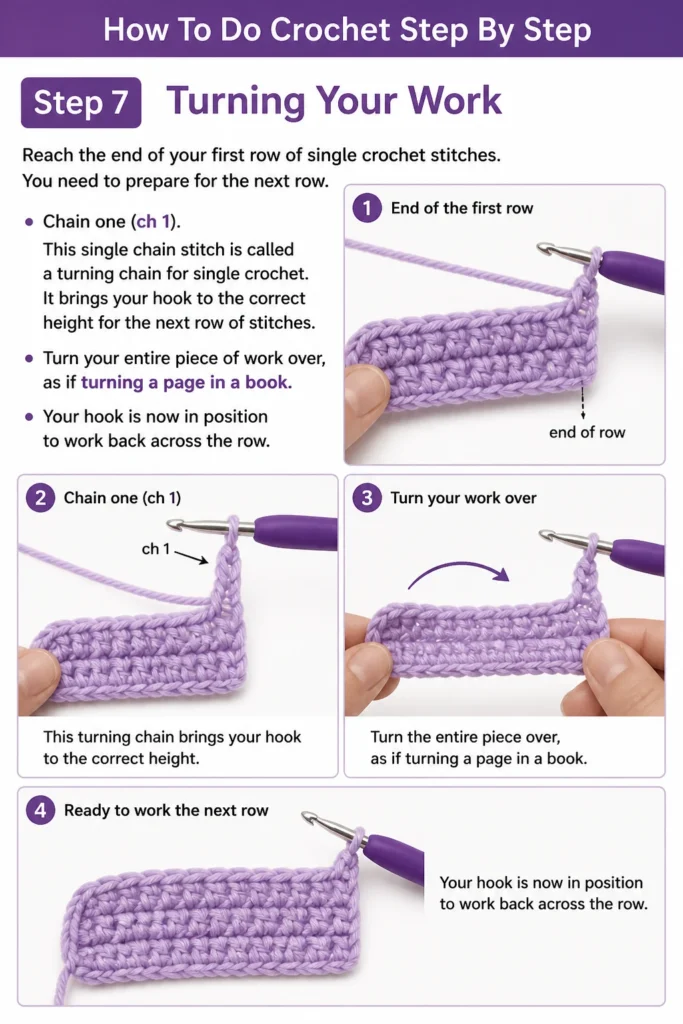
You need to prepare for the next row.
Chain one (ch 1). This single chain stitch is called a “turning chain” for single crochet.
It brings your hook to the correct height for the next row of stitches.
Turn your entire piece of work over, as if turning a page in a book.
Your hook is now in position to work back across the row.
Step 8: Continue Single Crochet
Skip the turning chain you just made. Do not work into it.
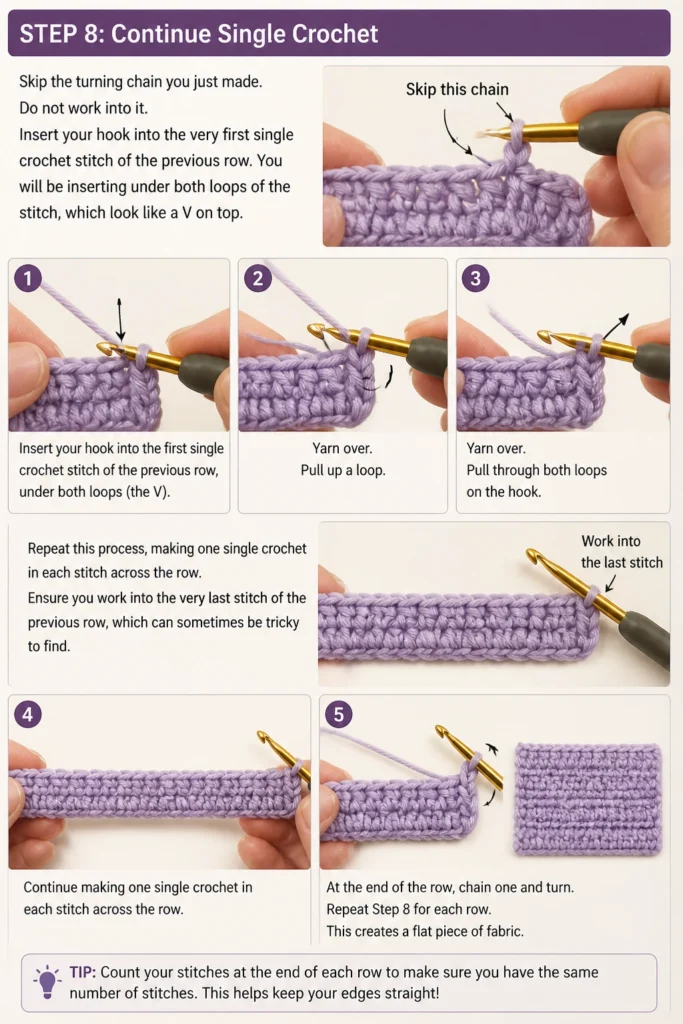
Insert your hook into the very first single crochet stitch of the previous row.
You will be inserting under both loops of the stitch, which look like a “V” on top.
Complete a single crochet stitch as you did before: yarn over, pull up a loop, yarn over, pull through both loops.
Repeat this process, making one single crochet in each stitch across the row.
Ensure you work into the very last stitch of the previous row, which can sometimes be tricky to find.
Continue making rows of single crochet, remembering to chain one and turn at the end of each row.
This creates a flat piece of fabric.
Step 9: Fasten Off
Complete your last stitch of the final row.
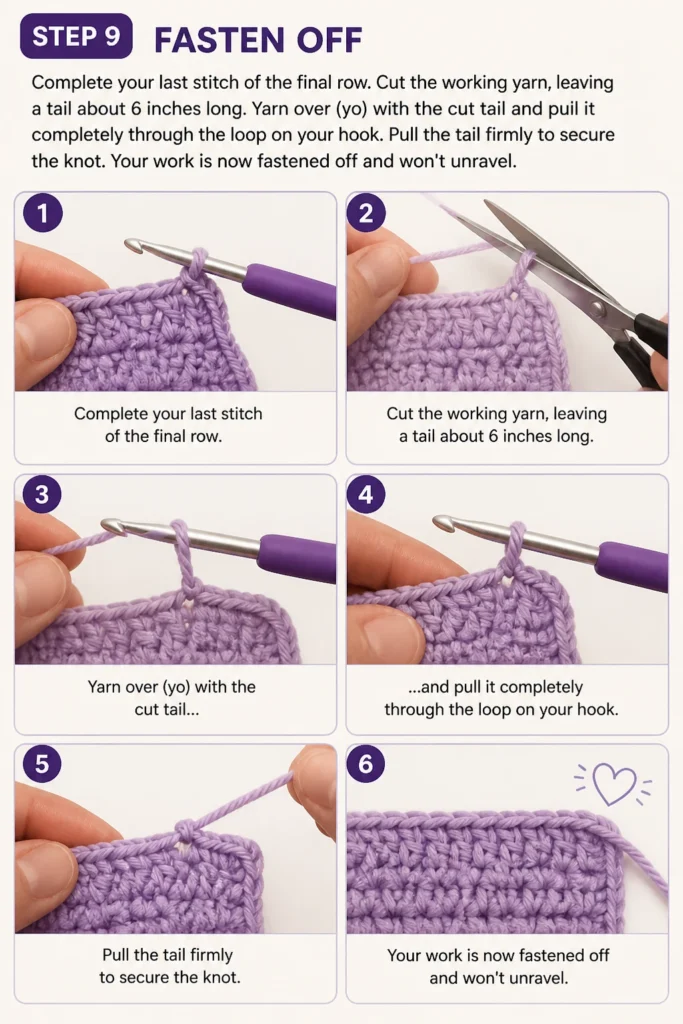
Cut the working yarn, leaving a tail about 6 inches long.
Yarn over (yo) with the cut tail and pull it completely through the loop on your hook.
Pull the tail firmly to secure the knot.
Your work is now fastened off and won’t unravel.
Step 10: Weave In Ends
Thread the yarn tail you just pulled through onto your tapestry needle.
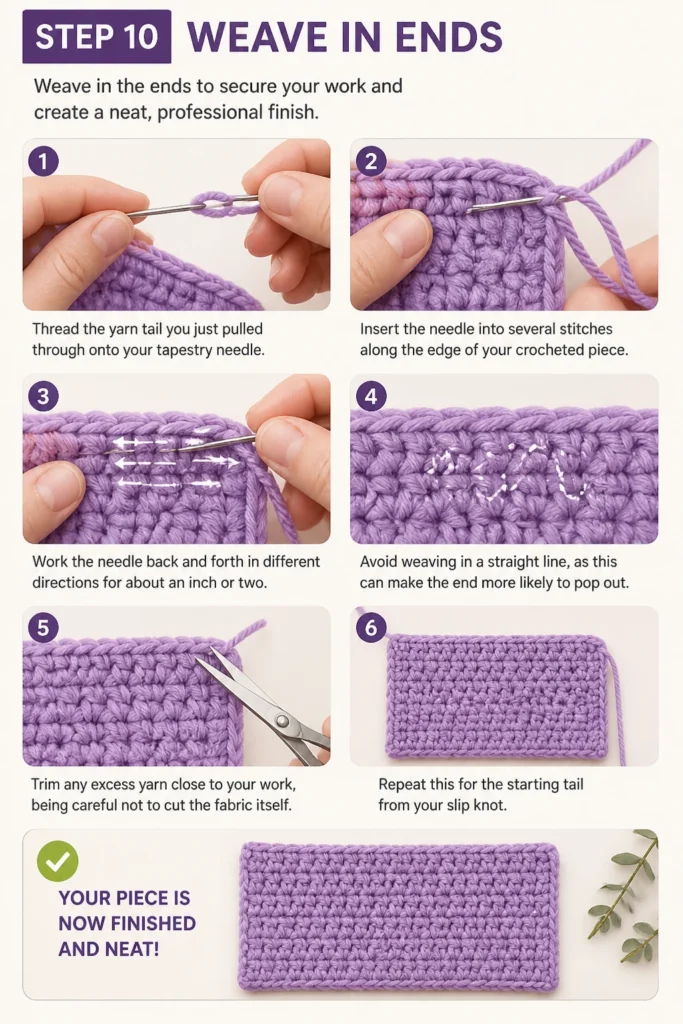
Insert the needle into several stitches along the edge of your crocheted piece.
Work the needle back and forth in different directions for about an inch or two.
Avoid weaving in a straight line, as this can make the end more likely to pop out.
Trim any excess yarn close to your work, being careful not to cut the fabric itself.
Repeat this for the starting tail from your slip knot. Your piece is now finished and neat.
Common Mistakes to Avoid
Incorrect Tension
Many beginners either crochet too tightly or too loosely. If your stitches are too tight, it’s hard to insert your hook into them, making your fabric stiff.
If they’re too loose, your fabric will be gappy and lack structure. The key is to find a relaxed grip that allows the yarn to flow smoothly.
Practice helps develop a consistent tension, so don’t be discouraged if it feels awkward at first.
Skipping Stitches
It’s common to accidentally skip the first or last stitch in a row, especially when you’re just starting out.
This leads to your work getting narrower over time. Always count your stitches at the end of each row to ensure you have the correct number.
Using a stitch marker in the first stitch of a new row can be incredibly helpful for identifying the last stitch to work into on the return row.
Wrong Hook Size
While yarn labels suggest a hook size, sometimes that size doesn’t match your personal tension.
Using a hook that’s too small for your yarn will result in a very dense, stiff fabric, while a hook that’s too large will create a loose, open fabric.
If your stitches feel too tight, try going up a hook size. If they’re too loose, try going down a size.
Not Counting Stitches
Failing to count your stitches regularly is a primary reason projects become misshapen.
You might inadvertently add stitches or drop them, leading to an uneven edge or a trapezoidal piece.
Make it a habit to count your stitches at the end of every row, or at least every few rows, to maintain a consistent shape.
Troubleshooting
My work is getting wider/narrower.
This usually means you’re either adding or skipping stitches at the beginning or end of your rows.
For single crochet, remember to always work into the very first stitch of the previous row after your turning chain, and ensure you work into the very last stitch as well.
Placing a stitch marker in the first stitch of each new row can help you identify where to place your last stitch on the return.
My stitches are too tight/loose.
Your tension needs adjustment. If stitches are too tight, try to relax your grip on both the hook and the yarn.
You might also try using a larger hook size. If stitches are too loose, try holding the yarn with a bit more tension, perhaps wrapping it an extra time around your finger.
A smaller hook size can also help tighten up your fabric.
My yarn keeps splitting.
Yarn splitting can be frustrating and is often caused by the hook catching only part of the yarn strands instead of the whole ply.
This can happen if your hook has a very sharp point, or if you’re using a yarn that is loosely plied.
Try using a hook with a blunter tip, or slow down and consciously ensure your hook goes under all strands of the yarn.
Key Takeaways
- Always start with smooth, light-colored yarn and an appropriately sized hook for easier learning.
- Practice making a consistent slip knot and even chain stitches as your foundation.
- Master the single crochet stitch; it is a building block for many other patterns.
- Regularly count your stitches to prevent your project from changing shape.
- Don’t be afraid to unravel and restart; learning is an iterative process.
- Weave in your ends securely with a tapestry needle for a professional finish.
Frequently Asked Questions
What’s the best yarn for beginners?
For beginners, smooth, worsted-weight (medium #4) acrylic yarn in a light color is highly recommended. It’s affordable, easy to work with, and the stitches are clearly visible, making it easier to learn and correct mistakes.
How do I read a crochet pattern?
Crochet patterns use abbreviations for stitches and techniques (e.g., ch for chain, sc for single crochet, yo for yarn over). Most patterns include a key to these abbreviations. You typically read patterns row by row or round by round, following the instructions for each step.
Can I use any hook with any yarn?
While you technically can, it’s best to match your hook size to your yarn weight. Yarn labels usually suggest a hook size range. Using a hook that’s too big or too small for your yarn will result in a fabric that is either too loose and gappy or too stiff and dense.
How do I change colors?
To change colors, work up to the last step of the stitch just before the color change. For example, in a single crochet, insert your hook, yarn over with the old color, and pull up a loop. Then, drop the old color, pick up the new color, yarn over with the new color, and pull through both loops on the hook. This blends the colors seamlessly.
Our Top Recommended Finds
- Ergonomic Crochet Hook Set: These hooks have comfortable grips, reducing hand fatigue during long crocheting sessions.
- Beginner-Friendly Acrylic Yarn Pack: A multipack of worsted weight acrylic yarn in various light colors offers great value and variety for practice.
- Stitch Markers: Essential for marking the beginning of rows or specific stitches, helping you keep track of your work and prevent errors.
Embark on Your Creative Journey
You now have the fundamental knowledge to begin your crochet adventure. The first few stitches might feel awkward, but with practice, they will become second nature.
Don’t be afraid to experiment with different yarns and colors as you gain confidence.
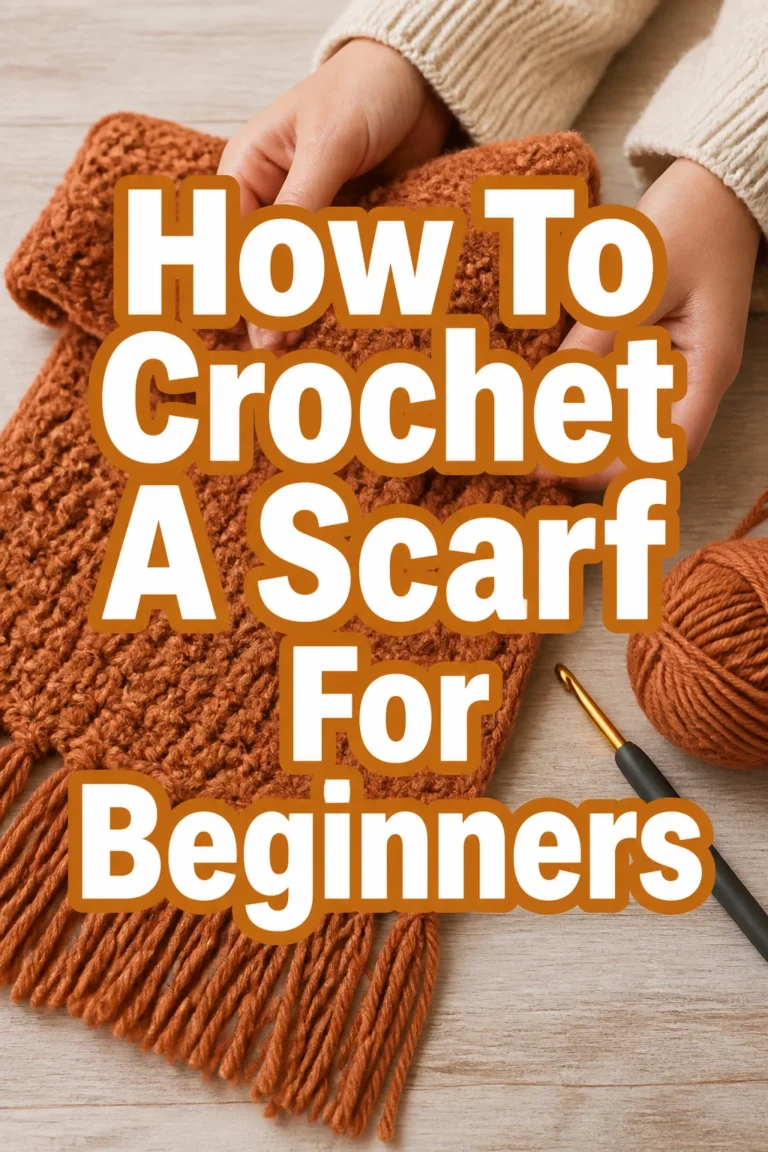
Consider trying simple projects like dishcloths, scarves, or coasters as your next step.
Pick up your hook and yarn today; a world of creative possibilities awaits.