How To Crochet A Circle Step By Step
Learning to crochet a perfect circle opens up a world of creative projects.
I remember the satisfaction of my first truly flat circle, a moment that felt like magic.
This guide will walk you through each stitch, ensuring your circle turns out just right.
Quick Overview
Crocheting a circle is a fundamental skill that builds confidence for more complex patterns. You will learn the essential techniques to create a flat, even piece, perfect for coasters, amigurumi bases, or mandalas.
- Time needed: 30-60 minutes for your first circle
- Difficulty: Beginner
- What you’ll need: Yarn, crochet hook, stitch marker, scissors
Step-by-Step Instructions
Step 1: Gather Your Materials
Choose your yarn and a corresponding crochet hook. The yarn label usually recommends a hook size, but you can adjust based on your tension.
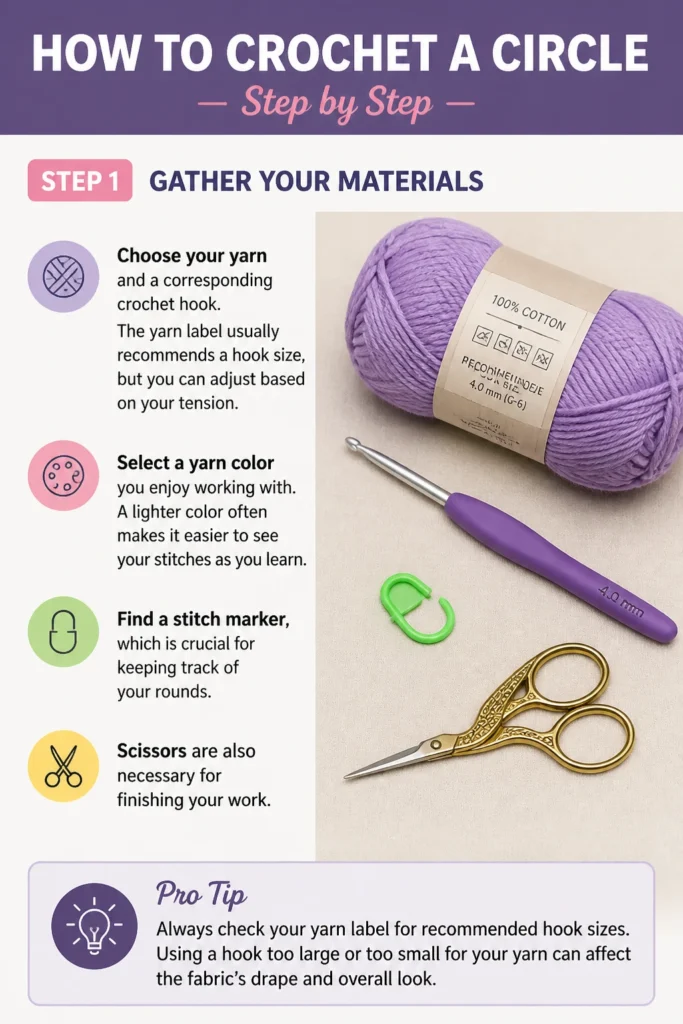
Select a yarn color you enjoy working with. A lighter color often makes it easier to see your stitches as you learn.
Find a stitch marker, which is crucial for keeping track of your rounds. Scissors are also necessary for finishing your work.
Pro Tip: Always check your yarn label for recommended hook sizes. Using a hook too large or too small for your yarn can affect the fabric’s drape and overall look.
Step 2: Create a Magic Ring (or Chain 2 Method)
The magic ring, also known as a magic circle or adjustable ring, creates a tight center hole. Drape the yarn tail over your palm, wrapping the working yarn around two fingers.
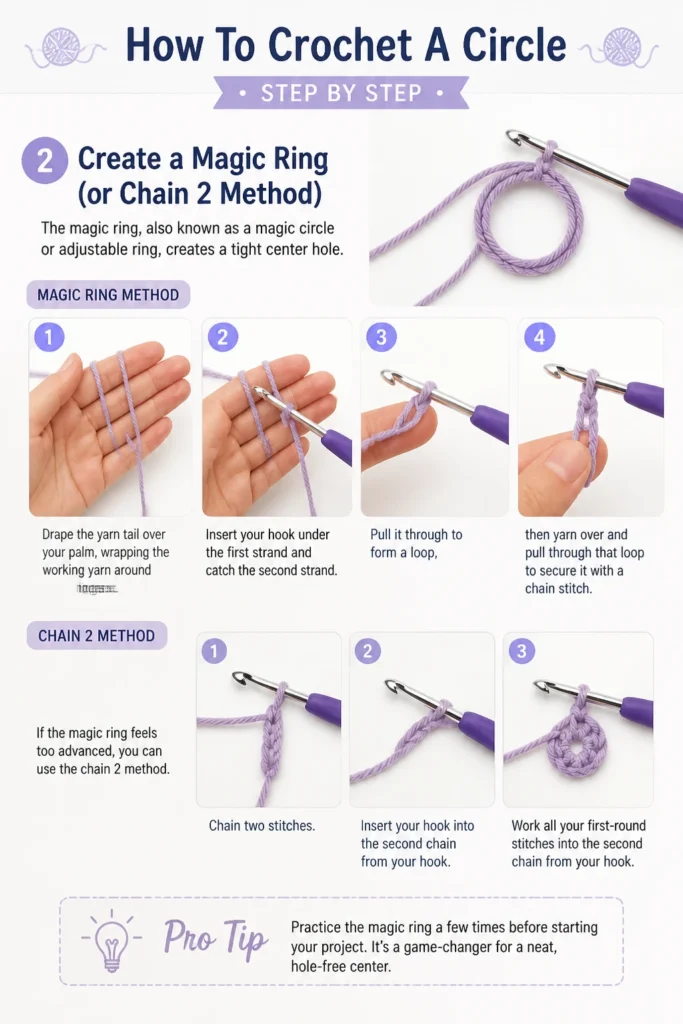
Insert your hook under the first strand and catch the second strand. Pull it through to form a loop, then yarn over and pull through that loop to secure it with a chain stitch.
If the magic ring feels too advanced, you can use the chain 2 method. Chain two stitches, then work all your first-round stitches into the second chain from your hook.
Pro Tip: Practice the magic ring a few times before starting your project. It’s a game-changer for a neat, hole-free center.
Step 3: Crochet the First Round
Work your desired number of single crochet (SC) stitches into the magic ring. For most patterns, this is 6, 8, or 10 SC stitches.
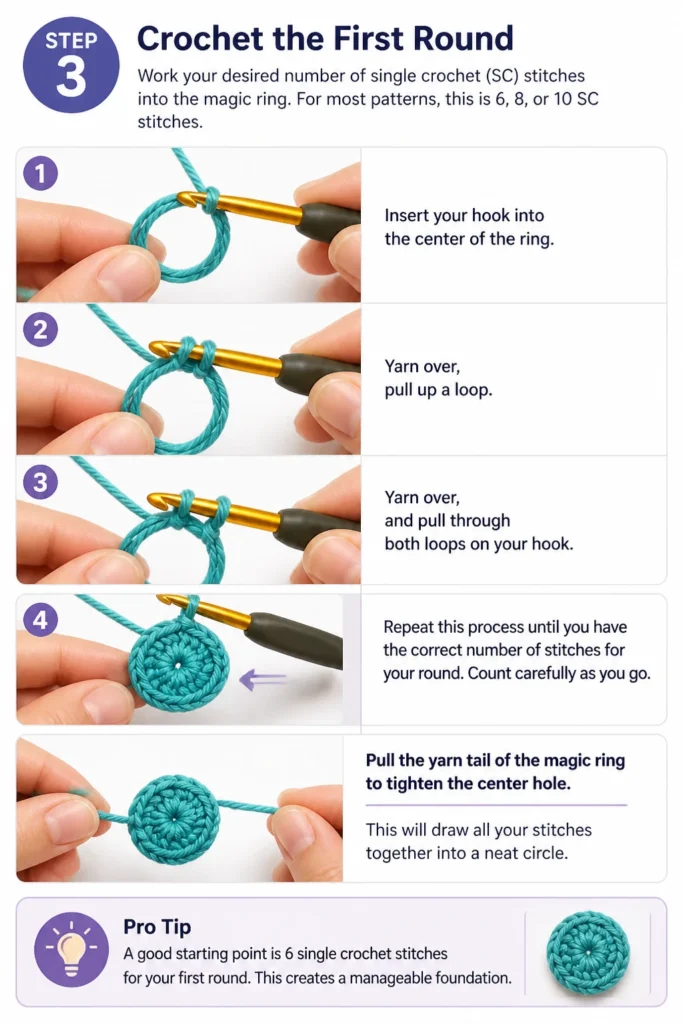
Insert your hook into the center of the ring, yarn over, pull up a loop, yarn over, and pull through both loops on your hook.
Repeat this process until you have the correct number of stitches for your round. Count carefully as you go.
Pull the yarn tail of the magic ring to tighten the center hole. This will draw all your stitches together into a neat circle.
Pro Tip: A good starting point is 6 single crochet stitches for your first round. This creates a manageable foundation.
Step 4: Close the Round and Mark Your First Stitch
After completing your first round of stitches, find the very first single crochet stitch you made.
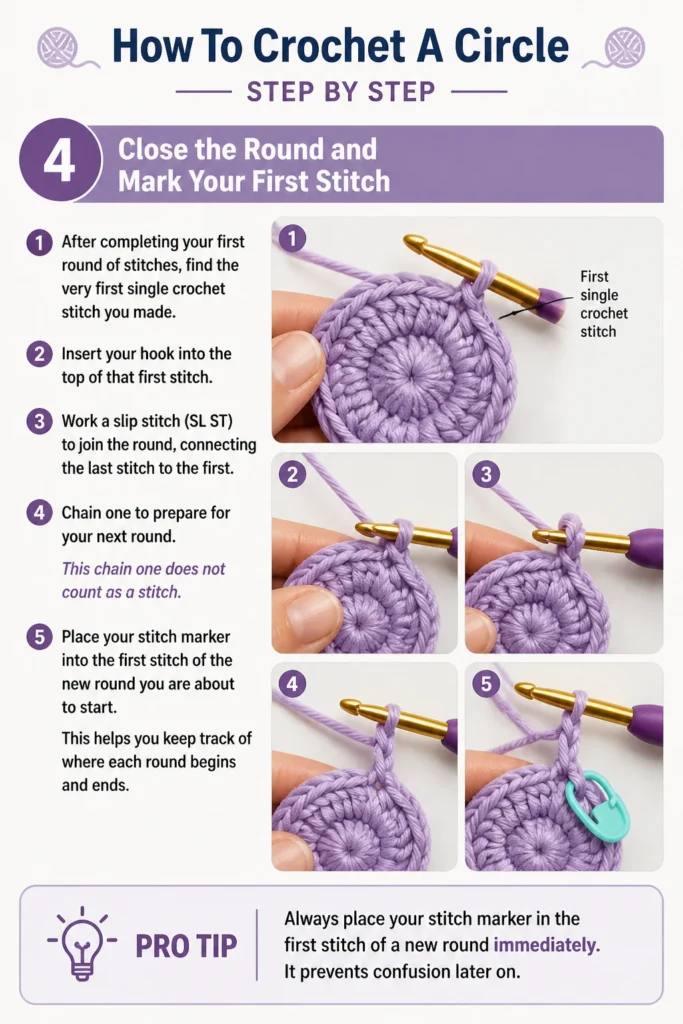
Insert your hook into the top of that first stitch. Work a slip stitch (SL ST) to join the round, connecting the last stitch to the first.
Chain one to prepare for your next round. This chain one does not count as a stitch.
Place your stitch marker into the first stitch of the new round you are about to start. This helps you keep track of where each round begins and ends.
Pro Tip: Always place your stitch marker in the first stitch of a new round immediately. It prevents confusion later on.
Step 5: Increase for Round 2
To make your circle grow flat, you need to increase the number of stitches in each round. For round two, you will typically work two single crochet stitches into every stitch from the previous round.
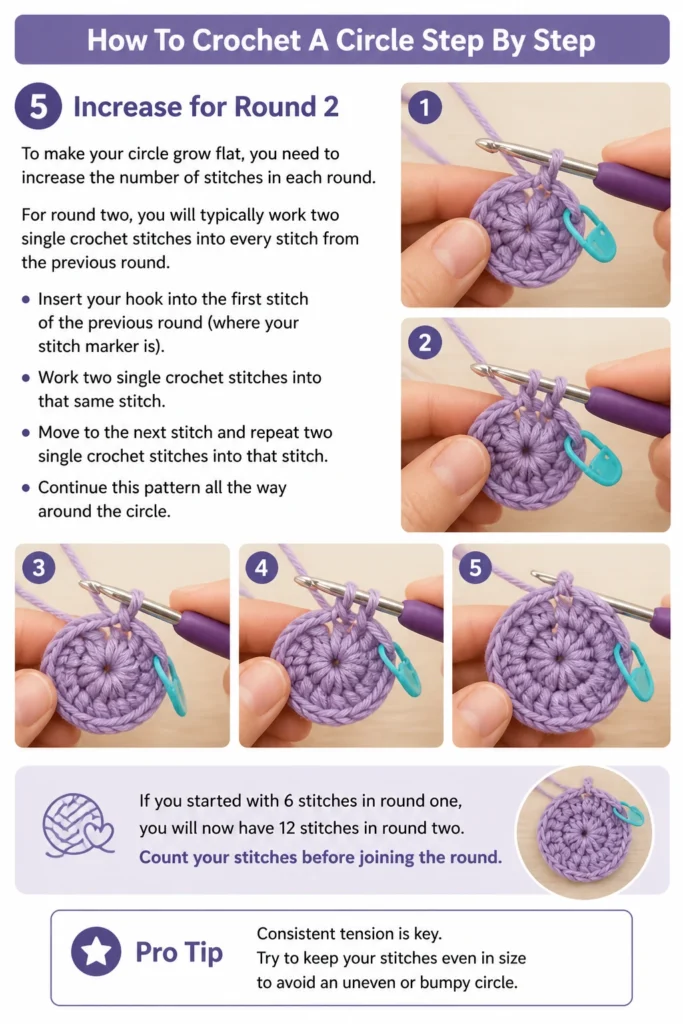
Insert your hook into the first stitch of the previous round (where your stitch marker is). Work two single crochet stitches into that same stitch.
Move to the next stitch and repeat: two single crochet stitches into that stitch. Continue this pattern all the way around the circle.
If you started with 6 stitches in round one, you will now have 12 stitches in round two. Count your stitches before joining the round.
Pro Tip: Consistent tension is key. Try to keep your stitches even in size to avoid an uneven or bumpy circle.
Step 6: Continue Increasing for Round 3
Each subsequent round will have a slightly different increase pattern to maintain a flat circle. For round three, the common pattern is one single crochet in the first stitch, two single crochet in the next stitch.
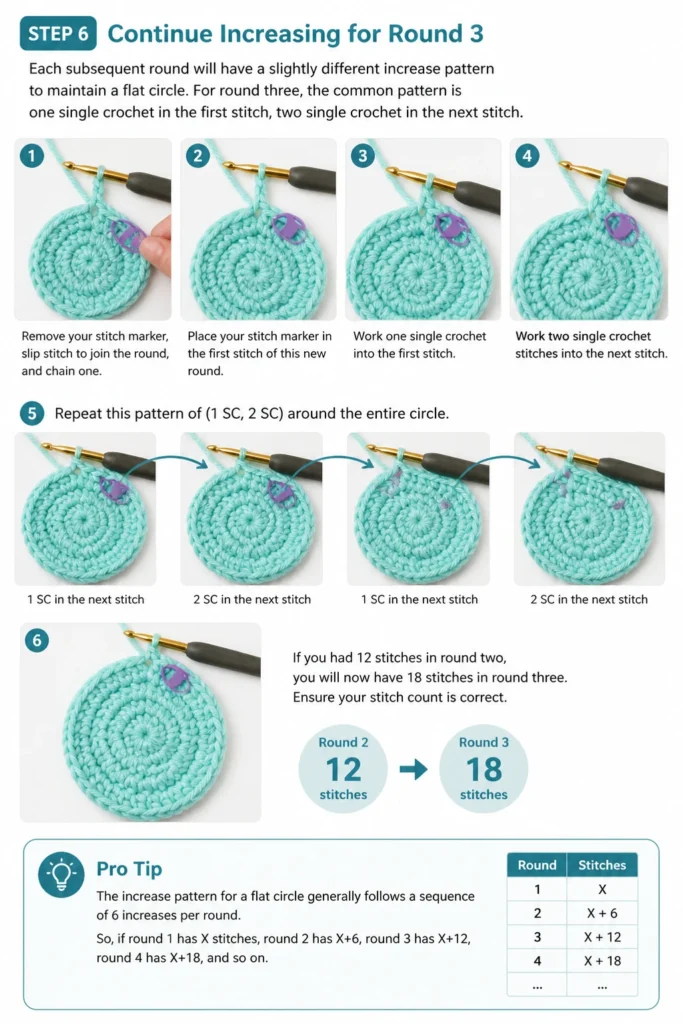
Remove your stitch marker, slip stitch to join the round, and chain one.
Place your stitch marker in the first stitch of this new round. Work one single crochet into the first stitch.
Work two single crochet stitches into the next stitch. Repeat this pattern of (1 SC, 2 SC) around the entire circle.
If you had 12 stitches in round two, you will now have 18 stitches in round three. Ensure your stitch count is correct.
Pro Tip: The increase pattern for a flat circle generally follows a sequence: 6 increases per round. So, if round 1 has X stitches, round 2 has X+6, round 3 has X+12, and so on.
Step 7: Crochet Subsequent Rounds and Finish Off
To make your circle larger, continue the increasing pattern. Round four would be 1 SC, 1 SC, 2 SC in the next stitch (or 2 SC, 1 SC, 1 SC depending on where you start your increases).
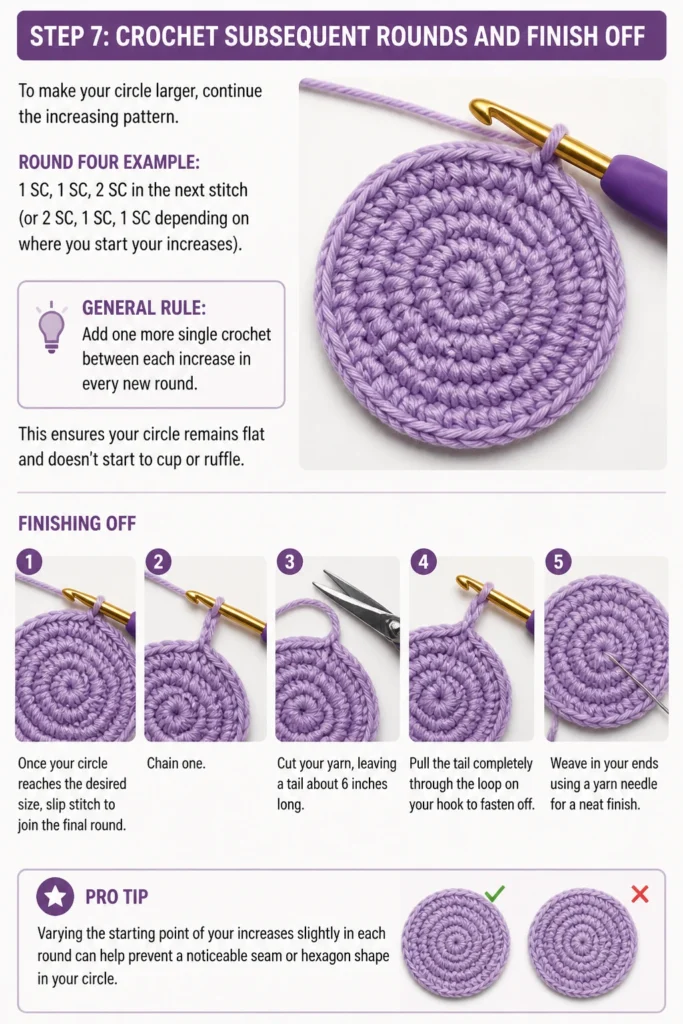
The general rule is to add one more single crochet between each increase in every new round. This ensures your circle remains flat and doesn’t start to cup or ruffle.
Once your circle reaches the desired size, slip stitch to join the final round. Chain one, then cut your yarn, leaving a tail about 6 inches long.
Pull the tail completely through the loop on your hook to fasten off. Weave in your ends using a yarn needle for a neat finish.
Pro Tip: Varying the starting point of your increases slightly in each round can help prevent a noticeable “seam” or hexagon shape in your circle.
Common Mistakes to Avoid
Inconsistent Tension
Crocheting with uneven tension leads to a lumpy or uneven circle. Some stitches might be too tight, others too loose, distorting the shape. Focus on keeping your yarn tension consistent throughout your work, which comes with practice.
Incorrect Increase Placement
Placing all your increases directly on top of each other in every round will result in a hexagonal shape, not a true circle. Distribute your increases evenly, and consider offsetting them slightly in subsequent rounds to maintain a round shape.
Not Counting Stitches
Skipping stitch counts is a common pitfall. If you don’t have the correct number of stitches at the end of each round, your circle will become wavy or start to curl. Always count your stitches before joining a round.
Forgetting the Stitch Marker
Without a stitch marker, it’s easy to lose track of where a round begins, especially for beginners. This can lead to an uneven circle or difficulty joining rounds correctly. Always use a stitch marker in the first stitch of each new round.
Troubleshooting
My Circle is Wavy or Ruffled
A wavy or ruffled circle indicates you have too many increases in your rounds. Your stitch count is growing too rapidly, causing the fabric to expand more than it needs to lay flat. Try reducing the number of stitches between your increases or decreasing the total number of increases per round.
My Circle is Cupping or Bowling
If your circle is cupping or forming a bowl shape, you are not making enough increases. The fabric is trying to lay flat but doesn’t have enough stitches to do so, causing it to curl upwards. Add more increases in your rounds to allow the fabric to spread out flat.
My Seam is Visible/Crooked
A visible or crooked seam often occurs when you always join and chain up in the exact same spot. While unavoidable to some extent, you can minimize it. Try shifting your starting chain one stitch to the left or right in alternating rounds, or practice working in continuous rounds (without joining with a slip stitch) for certain projects like amigurumi.
Key Takeaways
- The magic ring provides a neat, tight center for your circle.
- Consistent tension is crucial for an even, flat fabric.
- Always use a stitch marker to easily identify the start of each round.
- Increases are vital to make your circle grow and stay flat.
- Count your stitches at the end of every round to ensure accuracy.
- Adjust your increase pattern if your circle starts to ruffle or cup.
Frequently Asked Questions
How do I make my circle bigger?
To make your circle larger, continue adding rounds with the established increase pattern. Each round will add a set number of stitches (usually 6 for single crochet) and maintain the flat shape. Simply keep going until it reaches your desired size.
Can I use different stitches?
Yes, you can crochet a circle using other stitches like half double crochet (HDC) or double crochet (DC). The principle of increasing remains the same, but the initial number of stitches in your magic ring and the chain-up height will change. For example, DC circles usually start with 10-12 DC stitches and chain 2 or 3 to start each round.
What projects can I make with circles?
Crocheted circles are incredibly versatile. You can make coasters, placemats, pot holders, granny squares, the base for hats, baskets, or amigurumi toys. They are a fundamental building block for many creative endeavors.
Why is my magic ring loose?
A loose magic ring usually means you haven’t pulled the tail tight enough after crocheting your first round of stitches. Ensure you give the tail a firm tug to close the center hole completely. Sometimes, weaving in the tail securely can also help prevent it from loosening over time.
Our Top Recommended Finds
- Ergonomic Crochet Hooks: These hooks feature comfortable handles that reduce hand fatigue, allowing you to crochet for longer periods without discomfort.
- High-Quality Acrylic Yarn: A good acrylic yarn is soft, durable, and comes in a vast array of colors, making it perfect for practicing and creating various projects.
- Locking Stitch Markers: Essential for keeping track of your stitches and rounds, locking markers stay securely in place, preventing mistakes and frustration.
Your Next Crocheted Adventure Awaits
You have now mastered the art of crocheting a flat circle, a cornerstone skill in the world of fiber arts.
This fundamental technique opens the door to countless projects, from simple coasters to intricate mandalas.
Now, grab your hook and yarn, and start creating something beautiful today. Consider exploring patterns for granny squares or even a simple circular placemat to build on your new skill.