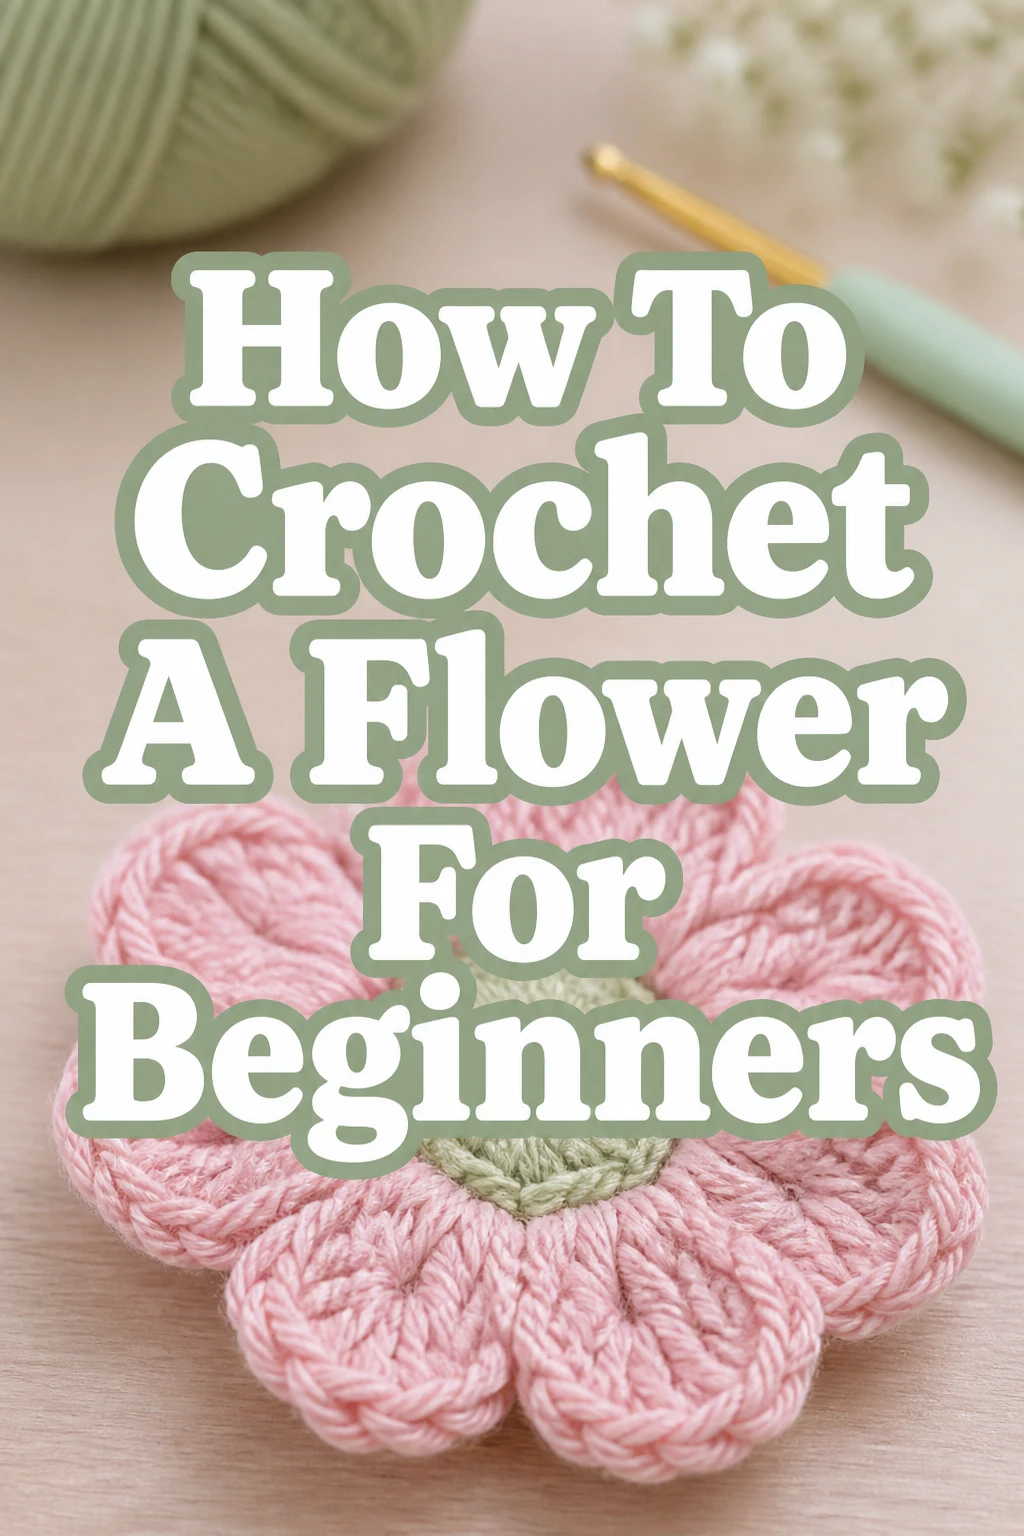
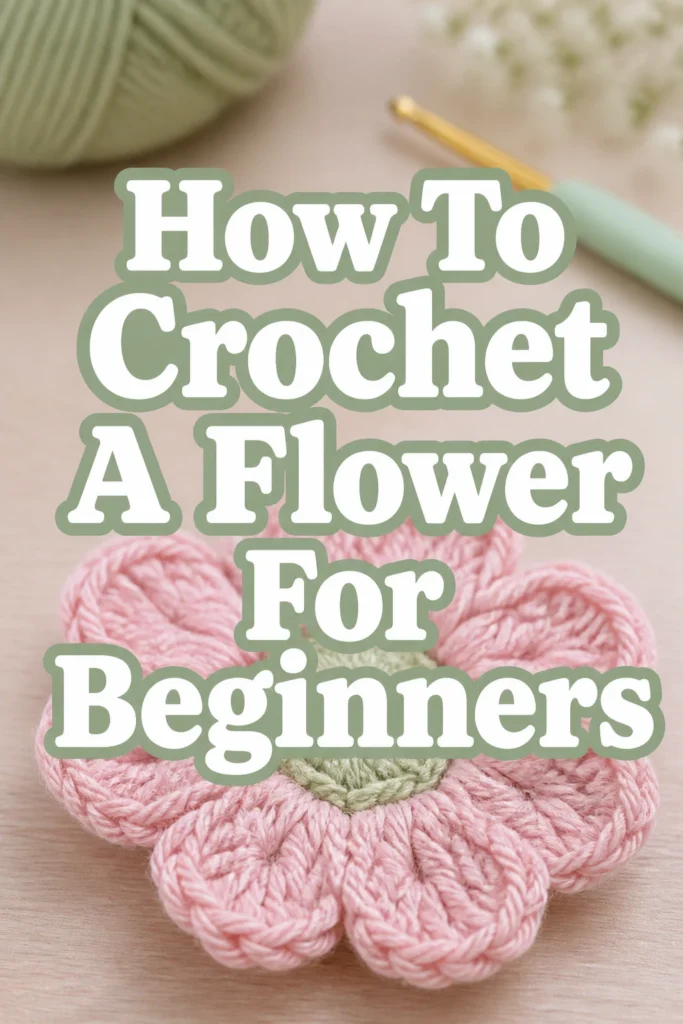
How To Crochet A Flower For Beginners
Learning to crochet a flower is a truly rewarding experience.
It’s often one of the first projects I recommend to new crocheters because it builds fundamental skills in a fun, tangible way.
I still remember the joy of making my first little bloom, and this guide will help you experience that same satisfaction.
Quick Overview
This guide will walk you through creating a simple yet beautiful crochet flower, perfect for absolute beginners. You’ll learn essential stitches and techniques that form the foundation for countless other projects.
- Time needed: 30-60 minutes for your first flower, less with practice.
- Difficulty: Beginner
- What you’ll need: Yarn, crochet hook, scissors, yarn needle.
Step-by-Step Instructions
Step 1: Gather Your Materials
Before you begin, ensure you have all the necessary supplies within reach. Having everything organized makes the process smoother and more enjoyable.
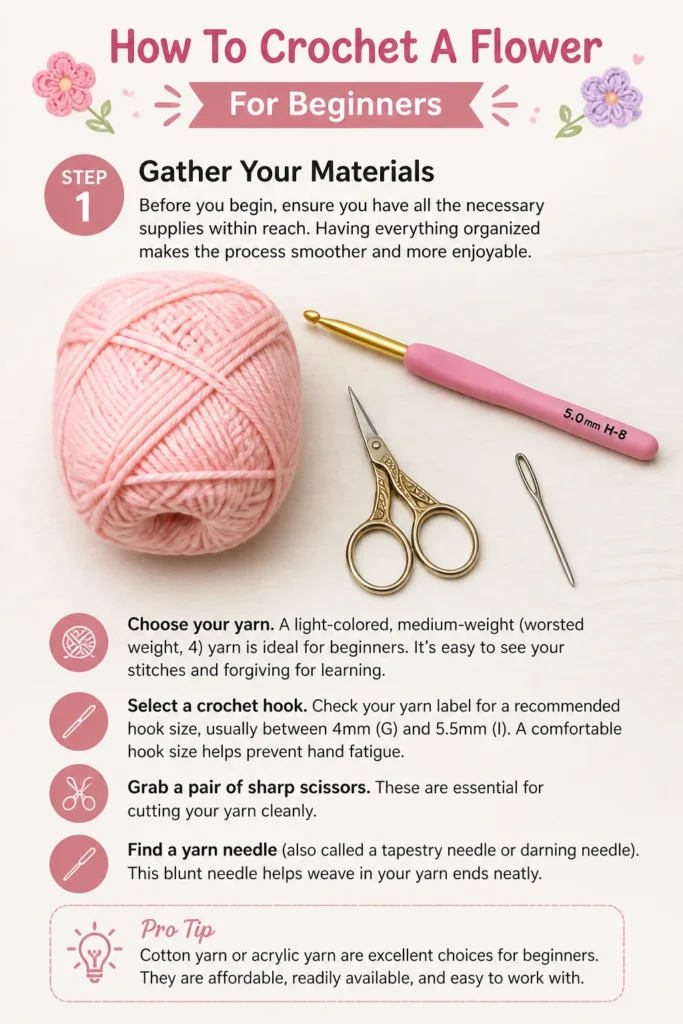
- Choose your yarn. A light-colored, medium-weight (worsted weight, 4) yarn is ideal for beginners. It’s easy to see your stitches and forgiving for learning.
- Select a crochet hook. Check your yarn label for a recommended hook size, usually between 4mm (G) and 5.5mm (I). A comfortable hook size helps prevent hand fatigue.
- Grab a pair of sharp scissors. These are essential for cutting your yarn cleanly.
- Find a yarn needle (also called a tapestry needle or darning needle). This blunt needle helps weave in your yarn ends neatly.
Pro Tip: Cotton yarn or acrylic yarn are excellent choices for beginners. They are affordable, readily available, and easy to work with. Avoid very dark or fuzzy yarns for your first project, as they can obscure your stitches.
Step 2: Make a Slip Knot
The slip knot is the very first step in almost every crochet project. It creates the initial loop on your hook.
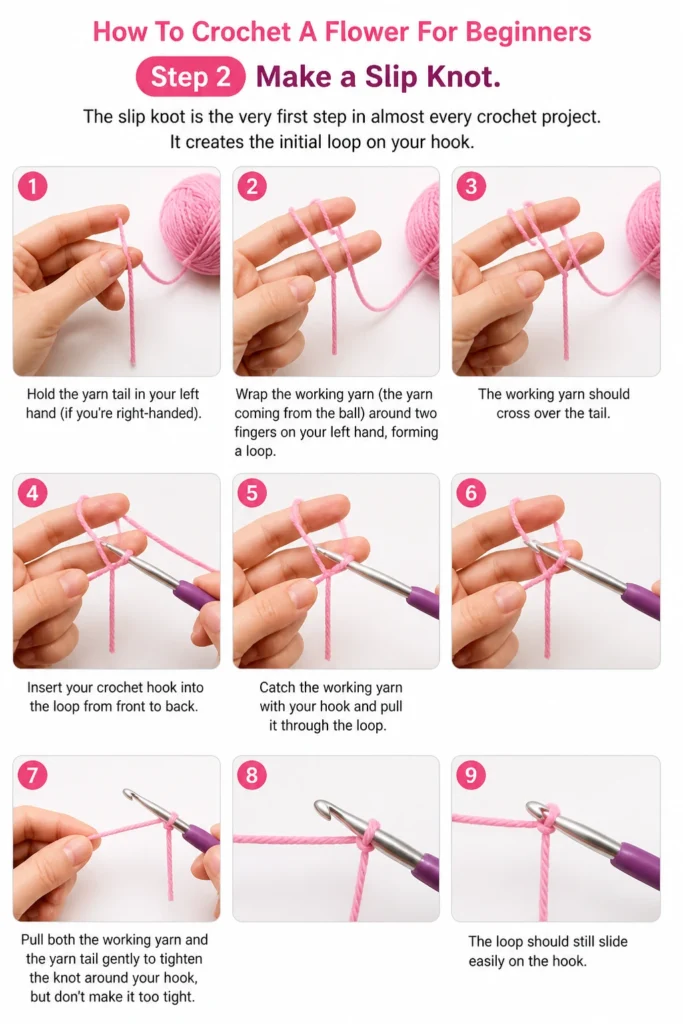
- Hold the yarn tail in your left hand (if you’re right-handed).
- Wrap the working yarn (the yarn coming from the ball) around two fingers on your left hand, forming a loop. The working yarn should cross over the tail.
- Insert your crochet hook into the loop from front to back.
- Catch the working yarn with your hook and pull it through the loop.
- Pull both the working yarn and the yarn tail gently to tighten the knot around your hook, but don’t make it too tight. The loop should still slide easily on the hook.
Step 3: Chain Stitch (ch)
The chain stitch is the most basic crochet stitch and forms the foundation for nearly all projects. For our flower, we’ll start with a small chain to create the center.
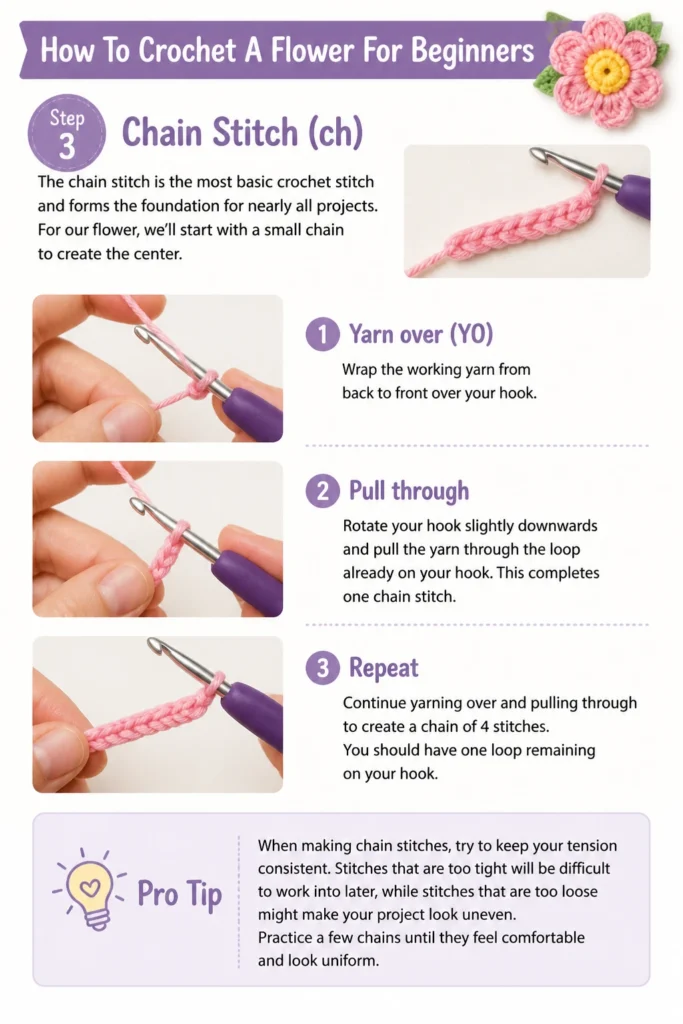
- Yarn over (YO): Wrap the working yarn from back to front over your hook.
- Pull through: Rotate your hook slightly downwards and pull the yarn through the loop already on your hook. This completes one chain stitch.
- Repeat: Continue yarning over and pulling through to create a chain of 4 stitches. You should have one loop remaining on your hook.
Pro Tip: When making chain stitches, try to keep your tension consistent. Stitches that are too tight will be difficult to work into later, while stitches that are too loose might make your project look uneven. Practice a few chains until they feel comfortable and look uniform.
Step 4: Form the Center Ring
Instead of a magic ring, which can be tricky for beginners, we’ll form a simple ring by joining our chain. This creates the base for the flower’s center.
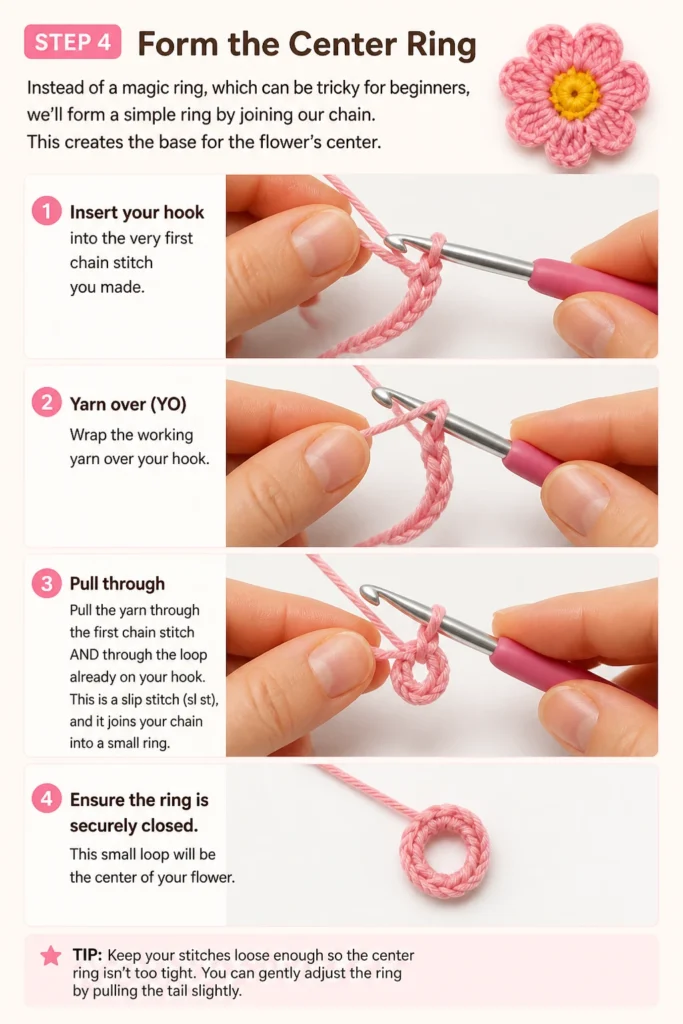
- Insert your hook into the very first chain stitch you made.
- Yarn over (YO): Wrap the working yarn over your hook.
- Pull through: Pull the yarn through the first chain stitch AND through the loop already on your hook. This is a slip stitch (sl st), and it joins your chain into a small ring.
- Ensure the ring is securely closed. This small loop will be the center of your flower.
Step 5: Create the Flower’s Center (Round 1)
Now we’ll work stitches into the ring to build the base for our petals. We’ll use single crochet (sc) stitches for a neat, compact center.
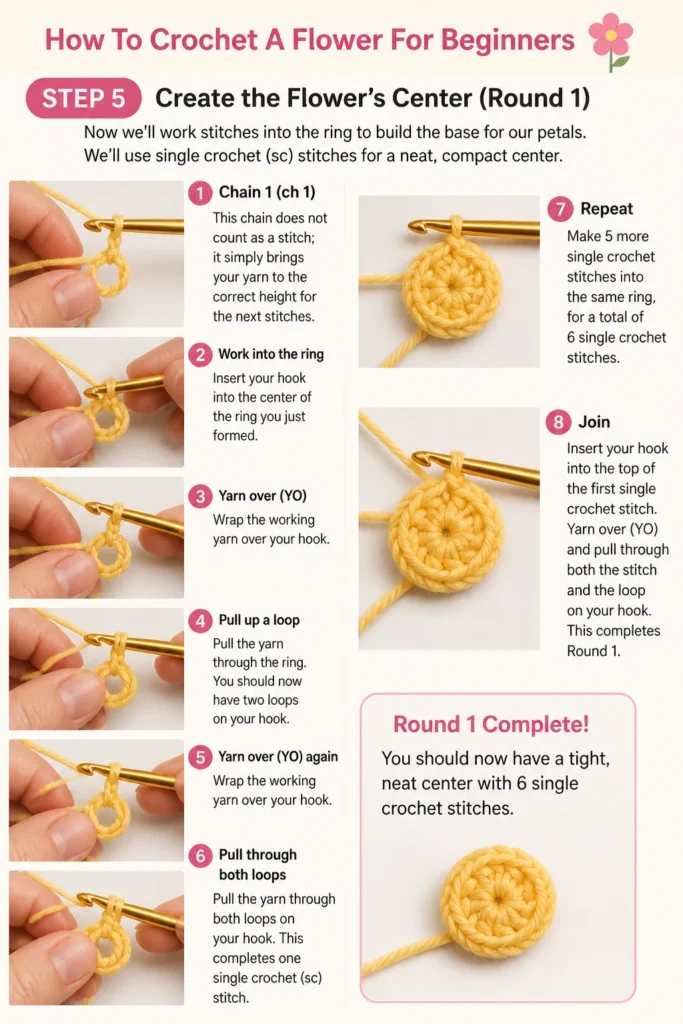
- Chain 1 (ch 1): This chain does not count as a stitch; it simply brings your yarn to the correct height for the next stitches.
- Work into the ring: Insert your hook into the center of the ring you just formed.
- Yarn over (YO): Wrap the working yarn over your hook.
- Pull up a loop: Pull the yarn through the ring. You should now have two loops on your hook.
- Yarn over (YO) again: Wrap the working yarn over your hook.
- Pull through both loops: Pull the yarn through both loops on your hook. This completes one single crochet (sc) stitch.
- Repeat: Make 5 more single crochet stitches into the same ring, for a total of 6 single crochet stitches.
- Join: Insert your hook into the first single crochet stitch you made (not the chain 1). Make a slip stitch to join the round.
Step 6: Form the Petals (Round 2)
This is where your flower truly begins to take shape! We’ll create simple petals using a combination of half double crochet and double crochet stitches.
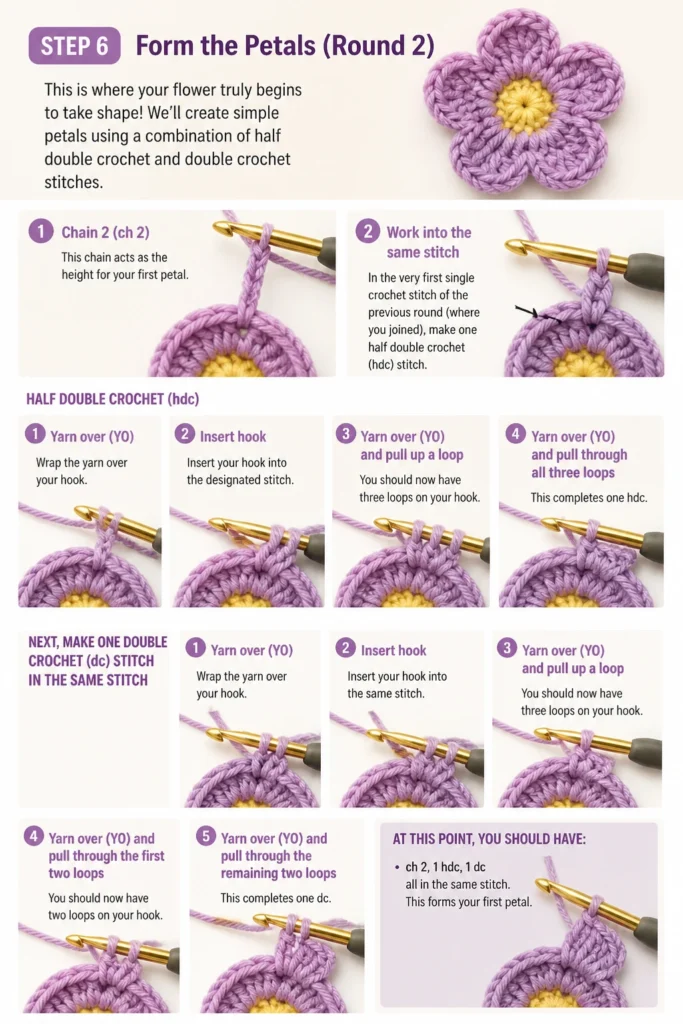
- Chain 2 (ch 2): This chain acts as the height for your first petal.
- Work into the same stitch: In the very first single crochet stitch of the previous round (where you joined), make one half double crochet (hdc) stitch.
- Yarn over (YO): Wrap the yarn over your hook.
- Insert hook: Insert your hook into the designated stitch.
- Yarn over (YO) and pull up a loop: You should now have three loops on your hook.
- Yarn over (YO) and pull through all three loops: This completes one hdc.
- Next, make one double crochet (dc) stitch in the same stitch:
- Yarn over (YO): Wrap the yarn over your hook.
- Insert hook: Insert your hook into the same stitch.
- Yarn over (YO) and pull up a loop: You should have three loops on your hook.
- Yarn over (YO) and pull through two loops: You will have two loops remaining on your hook.
- Yarn over (YO) and pull through the remaining two loops: This completes one dc.
- Make another hdc in the same stitch: Follow the hdc instructions again, all in the same initial stitch.
- Slip stitch (sl st) into the next single crochet stitch: This anchors your first petal and prepares you for the next one.
- Repeat: Continue this pattern for each petal: (Ch 2, hdc, dc, hdc) all into one single crochet stitch, then sl st into the next single crochet stitch. You will make a total of 6 petals.
Pro Tip: Don’t worry if your first petals look a little uneven. Crochet is a skill that improves with practice. Focus on getting the stitch counts right and the general shape will follow. You can always gently block your flower later to help it lie flat.
Step 7: Finish Off Your Flower
Once all your petals are complete, it’s time to secure your work and make it look tidy.
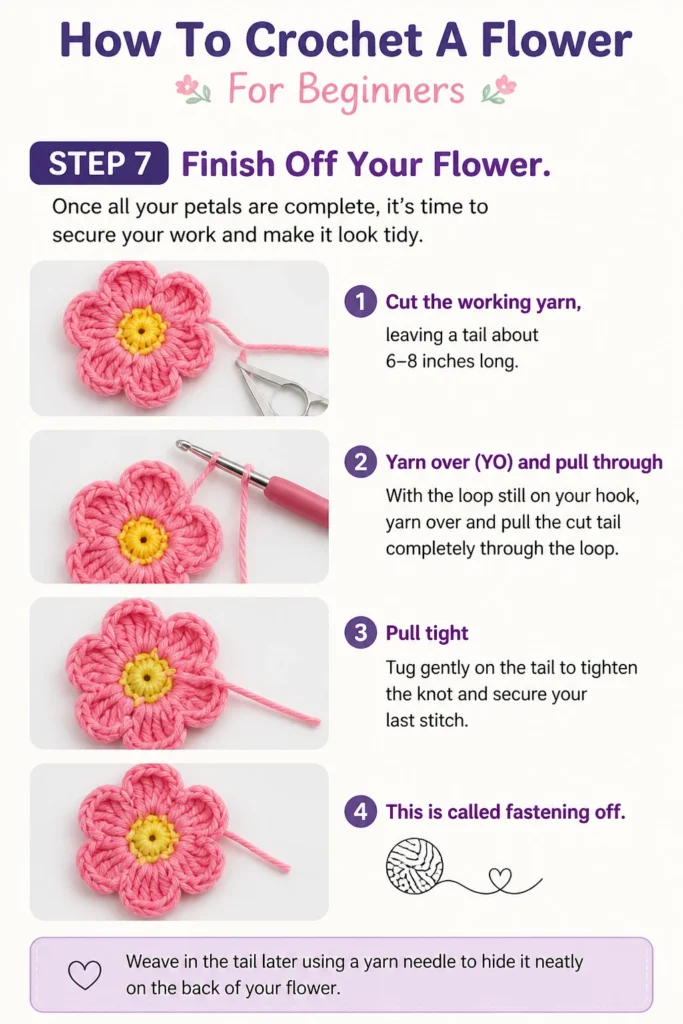
- Cut the working yarn, leaving a tail about 6-8 inches long.
- Yarn over (YO) and pull through: With the loop still on your hook, yarn over and pull the cut tail completely through the loop.
- Pull tight: Tug gently on the tail to tighten the knot and secure your last stitch. This is called “fastening off.”
Step 8: Weave in Ends
Weaving in your yarn tails ensures your flower won’t unravel and gives it a professional, finished look.
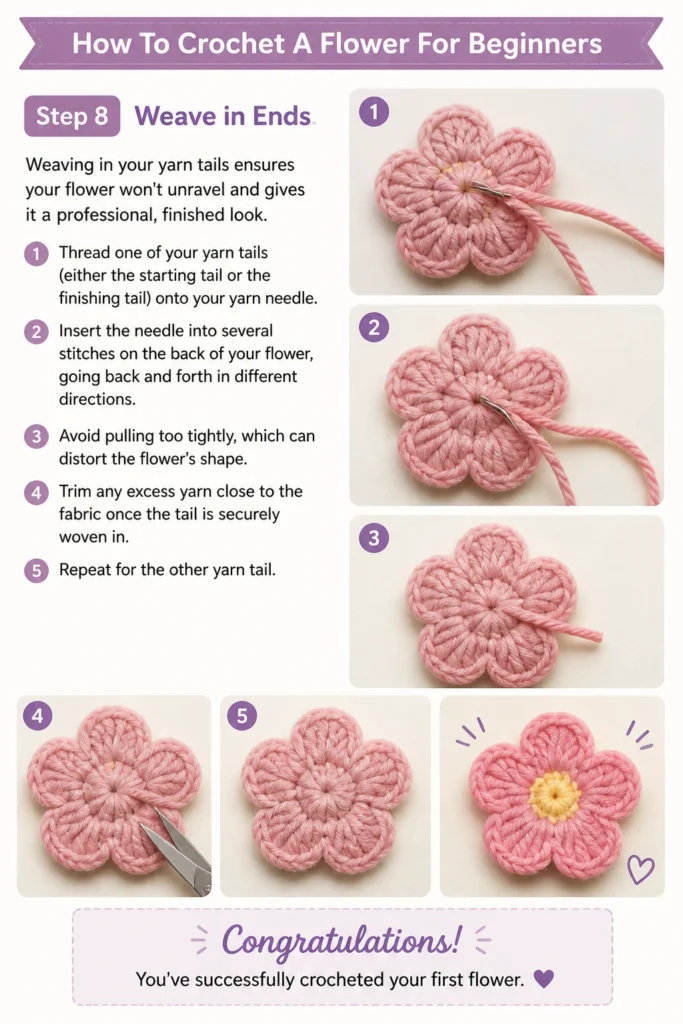
- Thread one of your yarn tails (either the starting tail or the finishing tail) onto your yarn needle.
- Insert the needle into several stitches on the back of your flower, going back and forth in different directions. Avoid pulling too tightly, which can distort the flower’s shape.
- Trim any excess yarn close to the fabric once the tail is securely woven in.
- Repeat for the other yarn tail.
Congratulations! You’ve successfully crocheted your first flower.
Common Mistakes to Avoid
Incorrect Tension
New crocheters often struggle with maintaining consistent tension. If your stitches are too tight, they will be difficult to work into, and your flower might curl. If they are too loose, your flower might look gappy and lack definition.
Practice makes perfect. Try to relax your grip on the yarn and hook. The yarn should glide smoothly, not be pulled taut or left too slack. Your stitches should feel firm but not stiff.
Losing Count
It’s easy to get distracted and lose track of your stitch count, especially in the early rounds. An incorrect stitch count can lead to a lopsided or incorrectly sized flower.
Count your stitches frequently, especially at the end of each round before joining. Stitch markers can be incredibly helpful for marking the first stitch of a round or specific points in your pattern. Don’t be afraid to unravel a few stitches if you realize you’ve made a mistake.
Forgetting to Fasten Off Properly
After completing your last stitch, it’s crucial to properly fasten off your yarn. Simply cutting the yarn without securing it will cause your work to unravel.
Always remember to cut your yarn, then yarn over and pull the tail completely through the last loop on your hook. Give it a gentle tug to create a secure knot. This simple step protects all your hard work.
Troubleshooting
My Flower is Curling Up
If your flower is curling, it’s usually a sign of too much tension or too many stitches in a round. Sometimes, it can also be due to not enough height in your stitches (e.g., using sc where dc is needed).
Try to relax your grip and ensure your stitches aren’t too tight. You can also gently block your finished flower by spritzing it with water and pinning it flat to dry, which often helps it lay correctly.
Stitches Are Too Tight/Loose
This is a common issue related to tension. If your stitches are consistently too tight, try using a slightly larger hook size. This will make your stitches looser without changing your personal tension.
If your stitches are too loose, try using a slightly smaller hook size. This will tighten up your stitches. Practice is the best way to find a comfortable tension that works for you.
Difficulty with the Center Ring
Some beginners find the initial chain and slip stitch to form a ring a bit fiddly. Getting the hook into that first chain can be tricky.
Make your starting chain stitches a little looser than usual to make them easier to work into. If you’re still struggling, you can try starting with a “magic ring” (also called a magic circle), but that’s an advanced beginner technique often introduced later.
Key Takeaways
- Start with light-colored, medium-weight yarn and an appropriately sized hook for ease of learning.
- Master the slip knot and chain stitch as foundational elements for all crochet projects.
- Count your stitches carefully in each round to ensure your flower maintains its correct shape.
- Practice maintaining consistent tension; it’s vital for neat and even fabric.
- Always fasten off securely and weave in your yarn ends for a finished, durable product.
- Don’t be afraid to unravel and restart; learning is part of the process.
Frequently Asked Questions
What type of yarn is best for a beginner flower?
Worsted weight (medium, 4) acrylic or cotton yarn is highly recommended for beginners. It’s easy to see the stitch definition, affordable, and widely available. Avoid novelty yarns or very thin threads for your first project.
Can I make a bigger or smaller flower?
Yes! To make a bigger flower, you can use a thicker yarn and a larger hook, or simply add more stitches and rounds to your pattern. To make a smaller flower, use a thinner yarn and a smaller hook, or reduce the number of stitches and rounds.
How do I attach my crochet flower to other projects?
You can attach your crochet flower using a yarn needle and sewing thread, stitching it directly onto fabric or another crochet piece. Alternatively, you can use fabric glue or hot glue for a quicker attachment, especially for decorative items that won’t be washed frequently.
Why is my flower lopsided or uneven?
Lopsided flowers are usually a result of inconsistent tension or an incorrect stitch count in one or more rounds. Double-check your stitch count at the end of each round. With practice, your tension will naturally become more consistent, leading to more symmetrical results.
Our Top Recommended Finds
- Basic Worsted Weight Yarn Pack: A multipack of acrylic yarn in various colors allows you to experiment without a large investment.
- Ergonomic Crochet Hook Set: Hooks with comfortable handles can reduce hand strain, making your crocheting sessions more enjoyable, especially when learning.
- Large-Eye Yarn Needles: These blunt needles are essential for weaving in ends and have eyes large enough for various yarn weights, making finishing your projects a breeze.
Embrace Your Creative Journey
You’ve just taken a fantastic first step into the world of crochet by creating a beautiful flower. This simple project builds a strong foundation.
Consider making a bouquet in different colors, or try attaching your flower to a hat, bag, or headband. The possibilities are endless once you master these basic skills.
Keep practicing, enjoy the process, and let your creativity bloom!