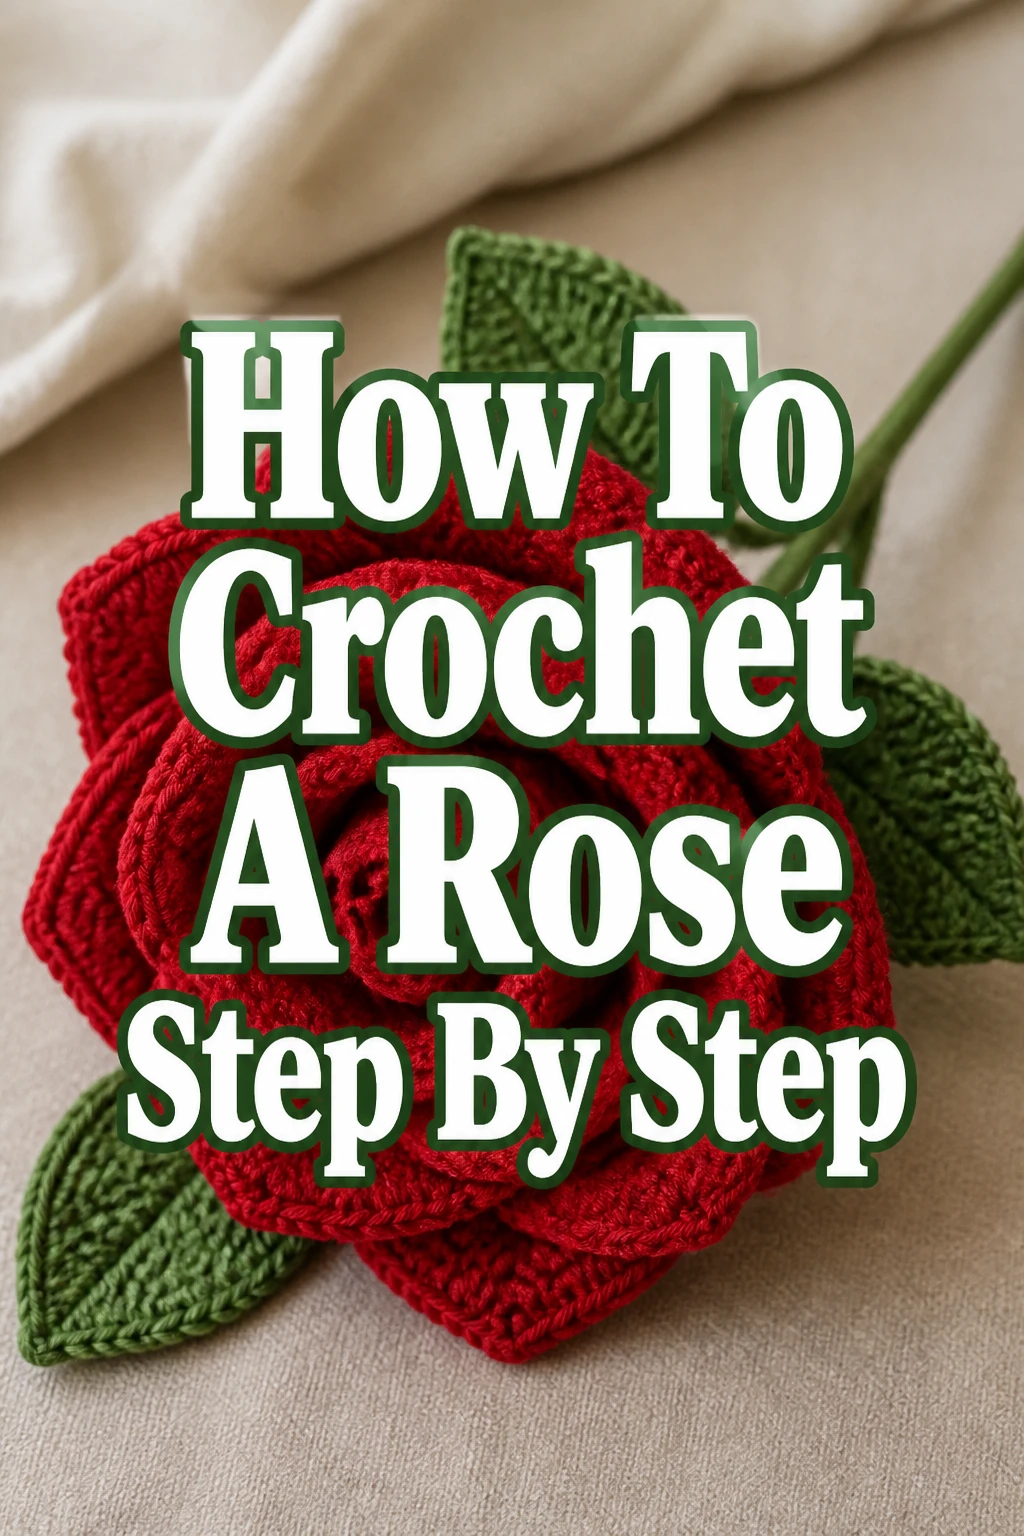
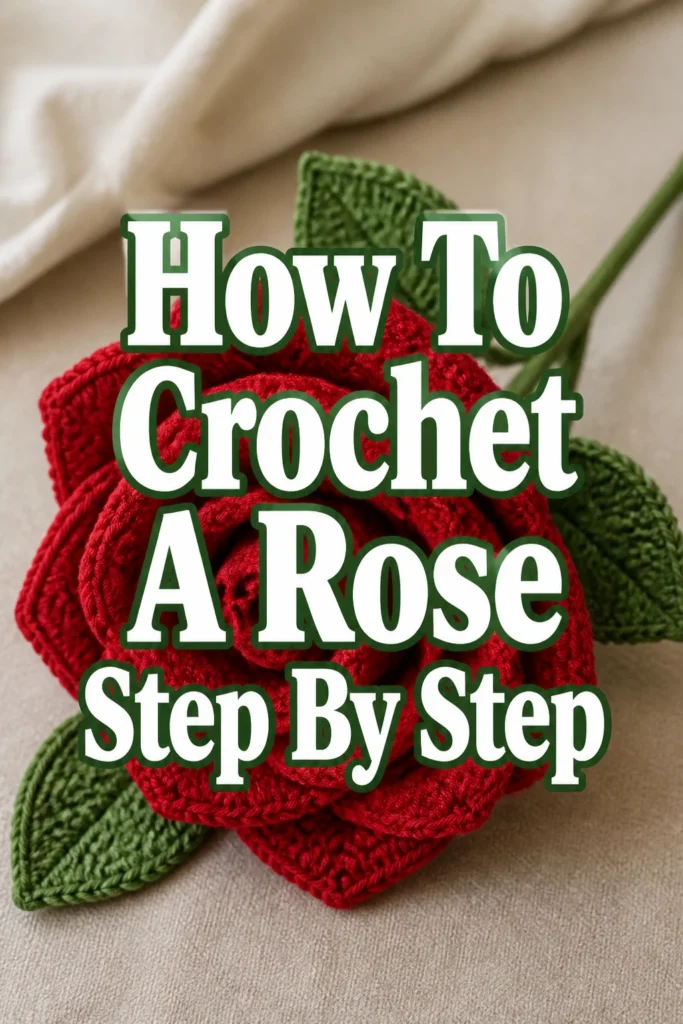
How To Crochet A Rose Step By Step
Crocheting a rose brings a touch of handmade beauty into your world. It’s a wonderful way to create lasting floral arrangements or unique embellishments for gifts. I’ve spent countless hours crafting these little blooms, often finding myself lost in the rhythmic motion of the hook and yarn. This guide shares the exact method I use to create perfect, realistic roses every time.
Quick Overview
This guide will walk you through creating a beautiful, multi-layered crochet rose. You’ll learn the essential stitches and techniques to form delicate petals and assemble your finished flower.
- Time needed: 1-2 hours (depending on experience)
- Difficulty: Intermediate (Beginners with basic stitch knowledge can follow along)
- What you’ll need: Yarn (worsted weight recommended), crochet hook, scissors, yarn needle
Step-by-Step Instructions
Step 1: Gather Your Materials
Select your yarn. Worsted weight cotton or acrylic yarn works wonderfully for roses, providing good structure and definition. Choose a color that speaks to you, whether it’s classic red, delicate pink, or even a whimsical blue.
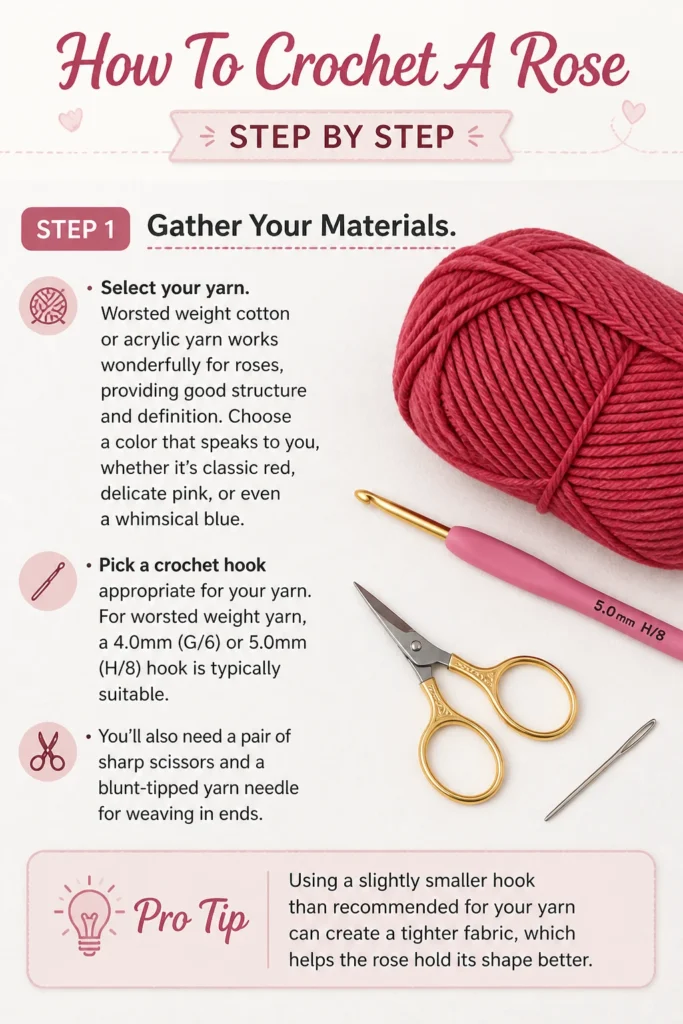
Pick a crochet hook appropriate for your yarn. For worsted weight yarn, a 4.0mm (G/6) or 5.0mm (H/8) hook is typically suitable. You’ll also need a pair of sharp scissors and a blunt-tipped yarn needle for weaving in ends.
Pro Tip: Using a slightly smaller hook than recommended for your yarn can create a tighter fabric, which helps the rose hold its shape better.
Step 2: Create the Foundation Chain
Begin by making a slip knot on your crochet hook. This forms the starting point for your work.
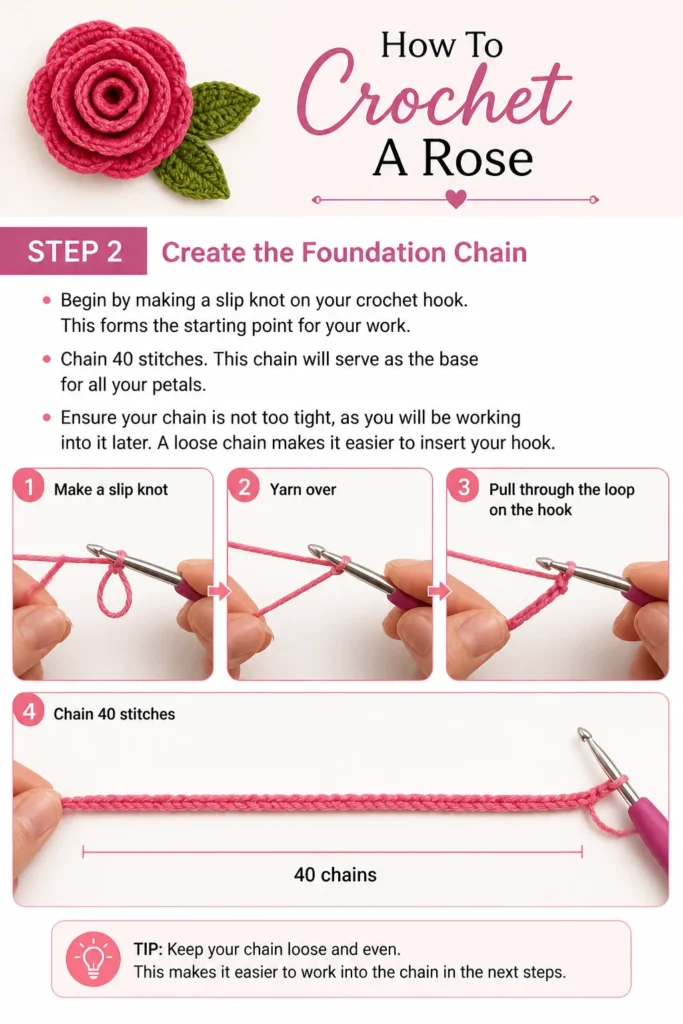
Chain 40 stitches. This chain will serve as the base for all your petals. Ensure your chain is not too tight, as you will be working into it later. A loose chain makes it easier to insert your hook.
Step 3: Form the First Petal Layer (Small Petals)
Work into the second chain from your hook. Make a single crochet (sc) in that stitch. This anchors your first petal section.
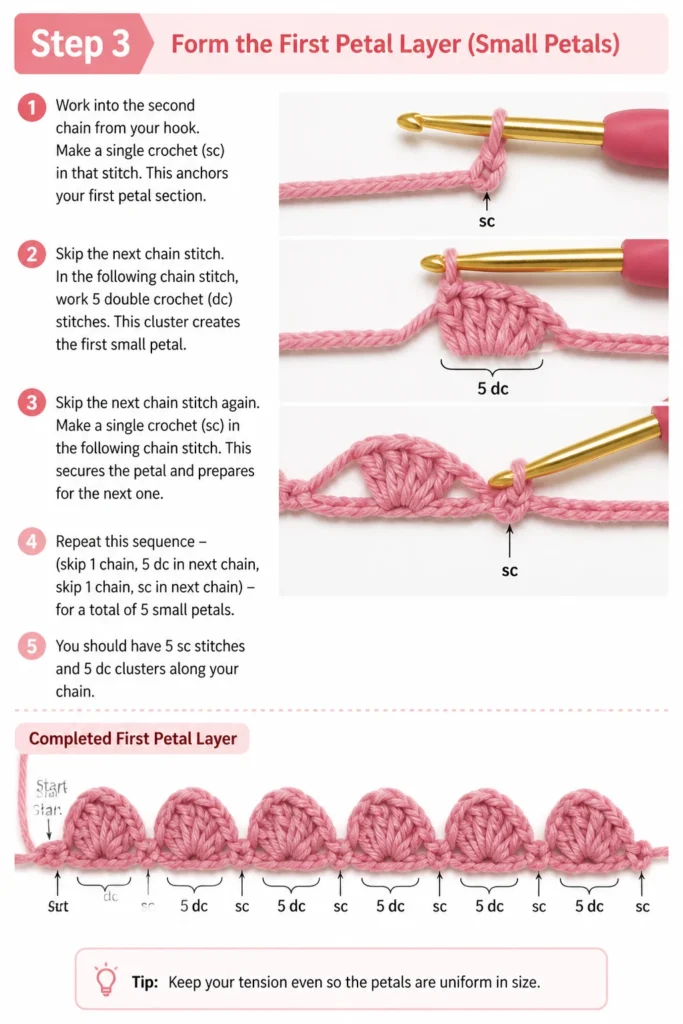
Skip the next chain stitch. In the following chain stitch, work 5 double crochet (dc) stitches. This cluster creates the first small petal.
Skip the next chain stitch again. Make a single crochet (sc) in the following chain stitch. This secures the petal and prepares for the next one. Repeat this sequence – (skip 1 chain, 5 dc in next chain, skip 1 chain, sc in next chain) – for a total of 5 small petals. You should have 5 sc stitches and 5 dc clusters along your chain.
Step 4: Build the Second Petal Layer (Medium Petals)
Chain 2 after completing your last single crochet of the first layer. Turn your work. This chain 2 acts as the turning chain and the height for your next set of stitches.
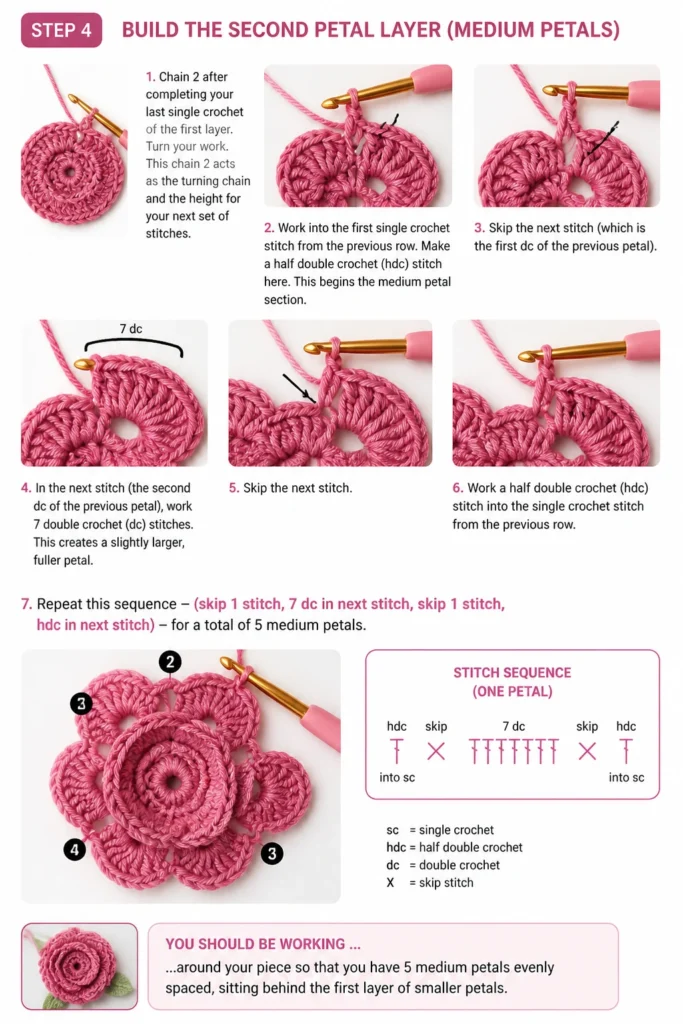
Work into the first single crochet stitch from the previous row. Make a half double crochet (hdc) stitch here. This begins the medium petal section.
Skip the next stitch (which is the first dc of the previous petal). In the next stitch (the second dc of the previous petal), work 7 double crochet (dc) stitches. This creates a slightly larger, fuller petal.
Skip the next stitch. Work a half double crochet (hdc) stitch into the single crochet stitch from the previous row. Repeat this sequence – (skip 1 stitch, 7 dc in next stitch, skip 1 stitch, hdc in next stitch) – for a total of 5 medium petals. You should be working into the sc stitches from the previous row for your hdc stitches, and into the middle dc of the previous row’s petal for your 7 dc stitches.
Step 5: Create the Third Petal Layer (Large Petals)
Chain 3 after finishing your last half double crochet of the second layer. Turn your work. This chain 3 serves as the turning chain for your largest petals.
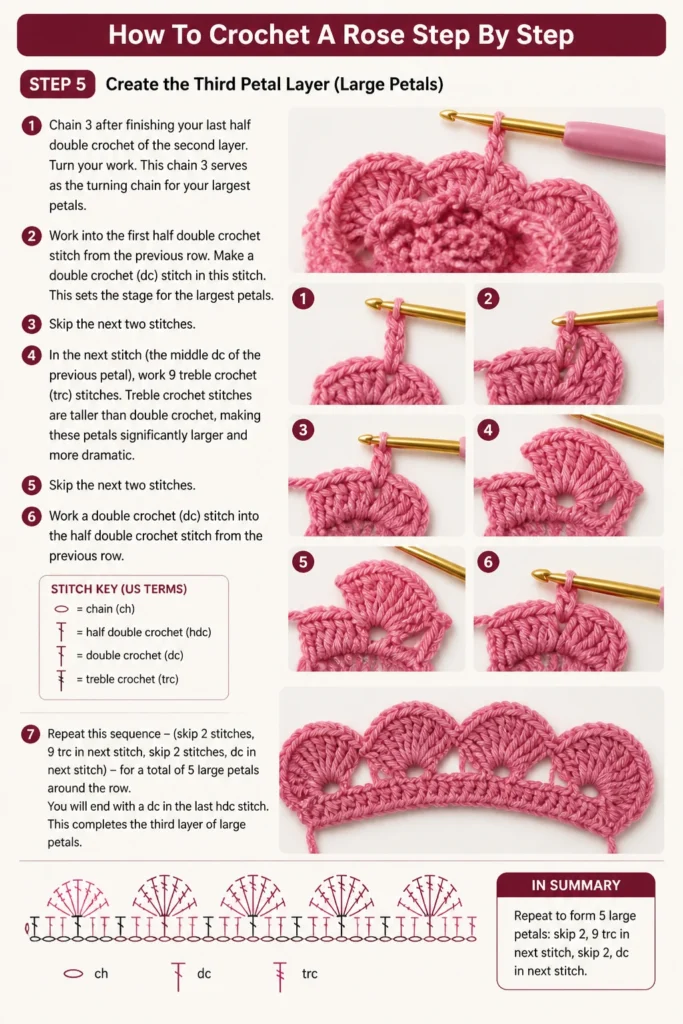
Work into the first half double crochet stitch from the previous row. Make a double crochet (dc) stitch in this stitch. This sets the stage for the largest petals.
Skip the next two stitches. In the next stitch (the middle dc of the previous petal), work 9 treble crochet (trc) stitches. Treble crochet stitches are taller than double crochet, making these petals significantly larger and more dramatic.
Skip the next two stitches. Work a double crochet (dc) stitch into the half double crochet stitch from the previous row. Repeat this sequence – (skip 2 stitches, 9 trc in next stitch, skip 2 stitches, dc in next stitch) – for a total of 5 large petals. You will again be using the dc stitches from the previous row’s petals for your 9 trc clusters, and the hdc stitches for your dc stitches.
Step 6: Prepare for Assembly
Fasten off your yarn, leaving a long tail, approximately 12-18 inches. This long tail will be crucial for assembling and securing your rose. Do not weave in this tail yet.
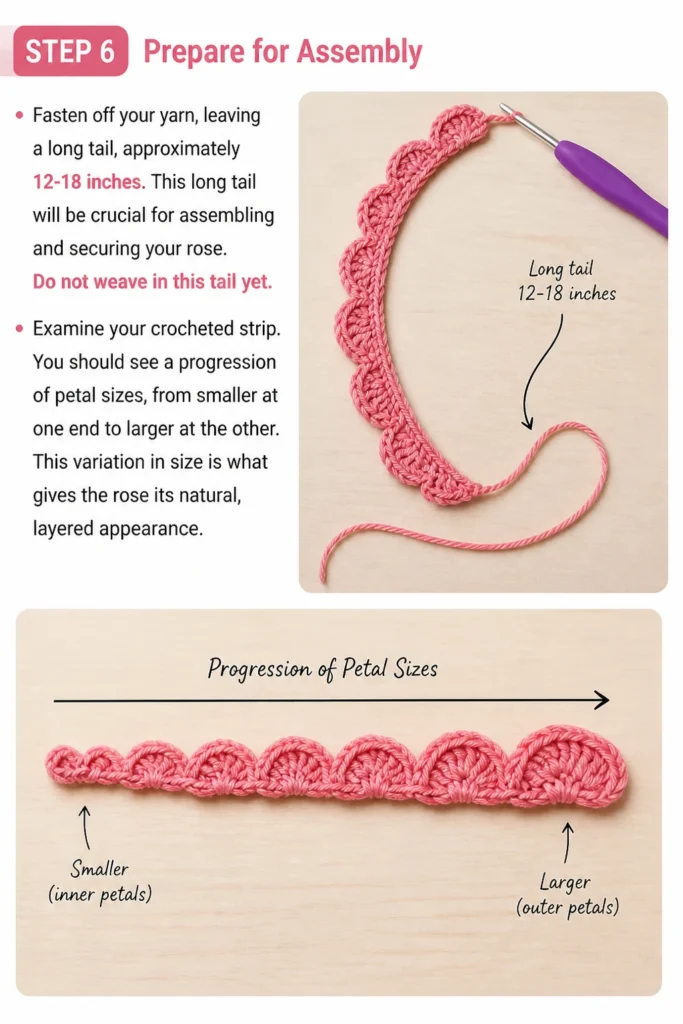
Examine your crocheted strip. You should see a progression of petal sizes, from smaller at one end to larger at the other. This variation in size is what gives the rose its natural, layered appearance.
Step 7: Shape and Assemble the Rose
Begin rolling your crocheted strip from the end with the smallest petals. Roll it tightly at first to form the central bud of the rose.
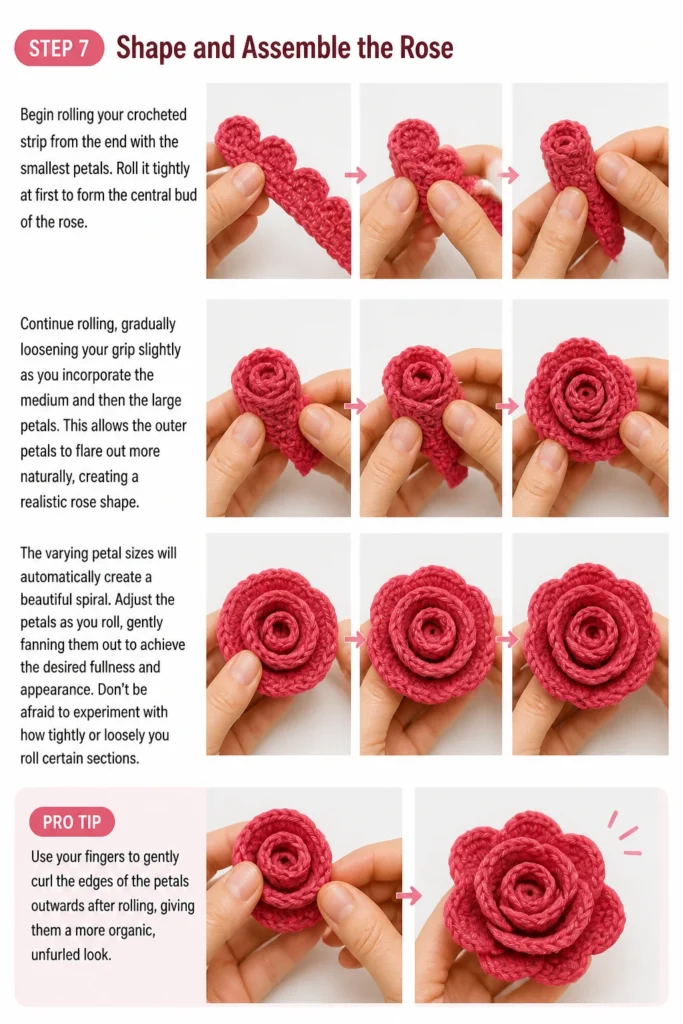
Continue rolling, gradually loosening your grip slightly as you incorporate the medium and then the large petals. This allows the outer petals to flare out more naturally, creating a realistic rose shape. The varying petal sizes will automatically create a beautiful spiral.
Adjust the petals as you roll, gently fanning them out to achieve the desired fullness and appearance. Don’t be afraid to experiment with how tightly or loosely you roll certain sections.
Pro Tip: Use your fingers to gently curl the edges of the petals outwards after rolling, giving them a more organic, unfurled look.
Step 8: Secure the Rose and Weave in Ends
Thread your long yarn tail onto your yarn needle. Carefully stitch through all layers of the rose base from the bottom, going back and forth several times. This secures the rolled shape.
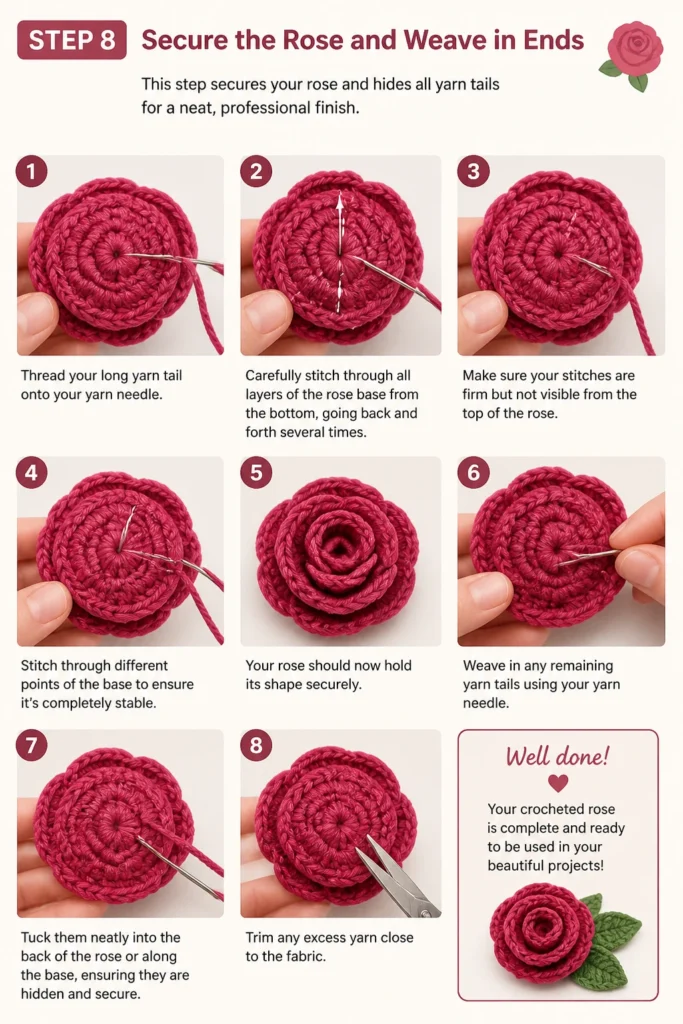
Make sure your stitches are firm but not visible from the top of the rose. Stitch through different points of the base to ensure it’s completely stable.
Weave in any remaining yarn tails using your yarn needle. Tuck them neatly into the back of the rose or along the base, ensuring they are hidden and secure. Trim any excess yarn close to the fabric.
Common Mistakes to Avoid
Too Tight or Too Loose Stitches
Crocheting with an inconsistent tension can lead to a rose that is either too stiff and rigid or too floppy and shapeless. Aim for an even tension throughout your work, where stitches are firm enough to hold their shape but not so tight they are difficult to work into. Practice helps develop consistent tension.
Incorrect Stitch Counts
Missing or adding stitches, especially in the petal clusters, will result in uneven petals or an incorrect number of petals. Always double-check your stitch counts after completing each petal cluster and at the end of each row. Using stitch markers can help keep track of important stitches.
Forgetting to Skip Stitches
The “skip stitch” instructions are crucial for creating the correct spacing between petals and defining their shape. If you forget to skip stitches, your petals will be too close together, overlapping awkwardly, and the overall structure of the rose will be compromised. Pay close attention to these directives.
Cutting Yarn Tail Too Short
Leaving an insufficient yarn tail for assembly is a common oversight. A short tail makes it incredibly difficult, if not impossible, to securely stitch all the layers of the rose together. Always err on the side of a longer tail (12-18 inches) to ensure you have enough length for robust assembly.
Troubleshooting
Rose Doesn’t Hold Its Shape
If your finished rose seems too flimsy or unravels easily, it’s likely due to insufficient stitching during assembly or overly loose tension. Re-thread your yarn tail and stitch through the base more thoroughly, ensuring you catch all layers. Consider using a slightly smaller hook for future projects to create a denser fabric.
Petals Look Uneven or Gappy
Uneven petals often stem from inconsistent stitch height or incorrect placement of stitches. Review the stitch instructions for double crochet and treble crochet to ensure you’re forming them correctly. Also, double-check that you’re working into the designated stitches (e.g., the middle dc of a previous petal) rather than skipping or misplacing.
Difficulty Rolling the Rose
If the rose is hard to roll or looks messy, you might be rolling it too uniformly or too tightly throughout. Remember to start tight for the center bud and gradually loosen your roll for the outer petals. Gently adjusting and fanning out petals as you go will help achieve a more natural, organic form. Take your time with this step, it’s where the rose truly comes to life.
Key Takeaways
- Consistent stitch tension is vital for a well-formed rose.
- Careful counting of stitches in each petal cluster ensures symmetry.
- The varying stitch heights (sc, hdc, dc, trc) create the distinct petal layers.
- Leaving a long tail for assembly is crucial for securely stitching the rose together.
- Gentle rolling and shaping during assembly brings the rose to life.
- Don’t be afraid to experiment with yarn types and hook sizes for different effects.
Frequently Asked Questions
Can I make a larger or smaller rose?
Yes, you can easily adjust the size. To make a larger rose, simply start with a longer foundation chain and add more repeats of each petal layer. For a smaller rose, use a shorter foundation chain and fewer petal repeats, or use a finer yarn and smaller hook.
What type of yarn is best for crochet roses?
Worsted weight cotton or acrylic yarn is highly recommended. Cotton provides excellent stitch definition and holds its shape well, while acrylic is durable and comes in a vast array of colors. Avoid very fuzzy or bulky yarns, as they can obscure petal details.
How can I make my rose more realistic?
To enhance realism, consider using variegated yarn for subtle color changes, or try lightly misting your finished rose with fabric stiffener to help it maintain shape. You can also add green leaves or a stem using floral wire wrapped in green yarn.
Can I attach a stem to my crochet rose?
Absolutely! After securing the rose base, you can insert a piece of floral wire into the center base and wrap it with green floral tape or crochet a simple green stem and sew it to the bottom. This makes the rose perfect for bouquets or arrangements.
Our Top Recommended Finds
- Cotton Worsted Weight Yarn: Excellent for clear stitch definition and a lovely natural feel.
- Ergonomic Crochet Hook Set: Reduces hand fatigue, especially when working on projects with repetitive stitches.
- Blunt-Tipped Yarn Needles: Essential for safely weaving in ends without splitting your yarn.
Your Next Creative Bloom Awaits
You’ve just completed a beautiful crochet rose, a testament to your growing skills and patience. Each rose you create will be unique, reflecting your personal touch. This project is a fantastic stepping stone to other floral creations, like leaves, buds, or even entire bouquets.
Why not try crocheting a different flower next, or experiment with various yarn weights and colors for your roses? The world of crochet flowers is vast and inviting. Pick up your hook today and let your creativity blossom.