How To Crochet For Beginners Step By Step Learning Pictures
Learning to crochet can seem daunting, but it’s a wonderfully relaxing and rewarding craft.
I distinctly remember the thrill of completing my very first wonky scarf, filled with pride despite its imperfections.
This guide will walk you through each step, just like I learned, so you can experience that same joy from your first stitch.
Quick Overview
This guide will help you master the fundamental techniques of crochet, allowing you to create your very first fabric swatch.
You’ll learn how to hold your tools, create basic stitches, and understand the foundation for most projects.
- Time needed: 1-2 hours for initial learning, ongoing practice for mastery
- Difficulty: Beginner
- What you’ll need: Crochet hook, worsted weight yarn, scissors, tapestry needle
Step-by-Step Instructions
Step 1: Gather Your Supplies
Before you begin, ensure you have all the necessary materials. Starting with the right tools makes the learning process much smoother.
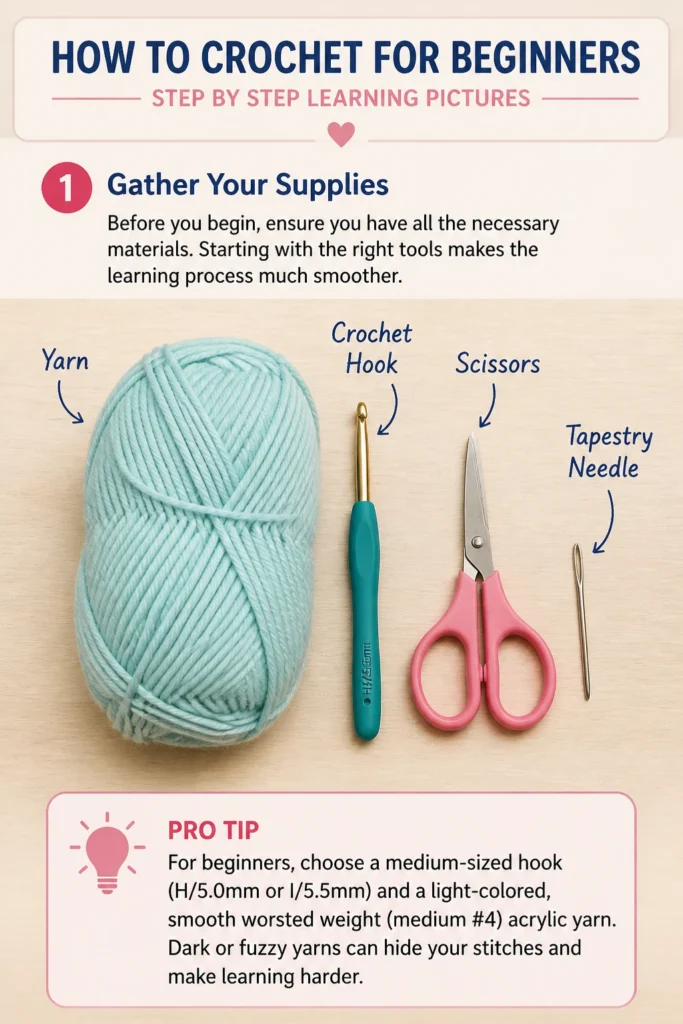
You will need a crochet hook, a skein of yarn, a pair of scissors, and a tapestry needle for finishing.
Pro Tip: For beginners, choose a medium-sized hook (H/5.0mm or I/5.5mm) and a light-colored, smooth worsted weight (medium #4) acrylic yarn. Dark or fuzzy yarns can hide your stitches and make learning harder.
Step 2: Hold Your Hook and Yarn
Proper grip is crucial for comfort and control. There are two main ways to hold your hook.
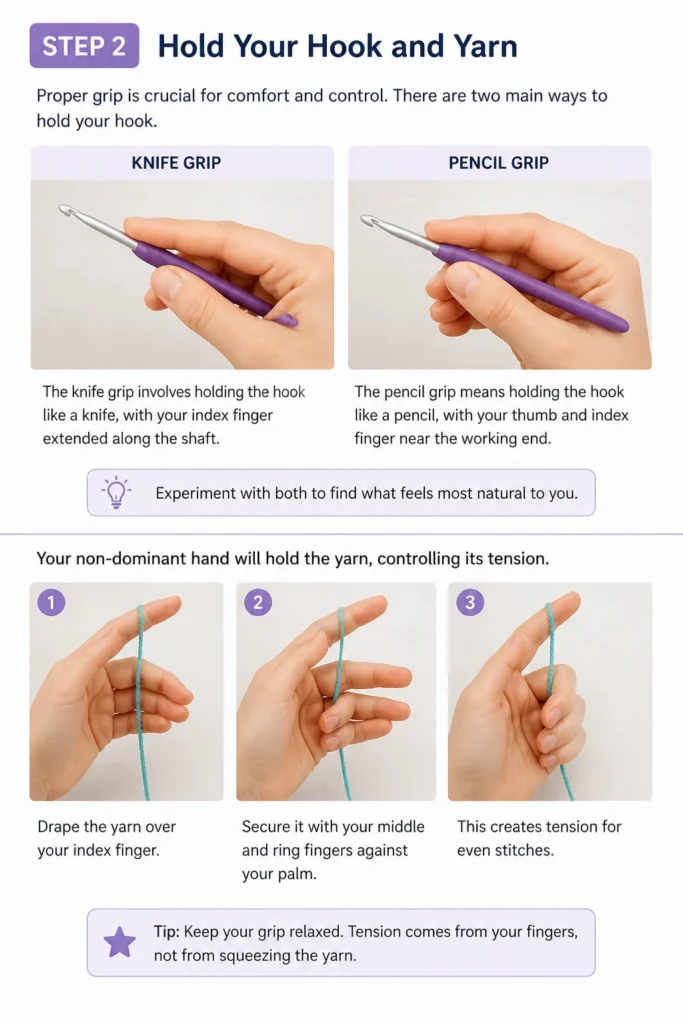
The “knife grip” involves holding the hook like a knife, with your index finger extended along the shaft.
The “pencil grip” means holding the hook like a pencil, with your thumb and index finger near the working end.
Experiment with both to find what feels most natural to you. Your non-dominant hand will hold the yarn, controlling its tension.
Drape the yarn over your index finger and secure it with your middle and ring fingers against your palm. This creates tension for even stitches.
Step 3: Make a Slip Knot
Every crochet project begins with a slip knot on your hook. This forms the first loop.
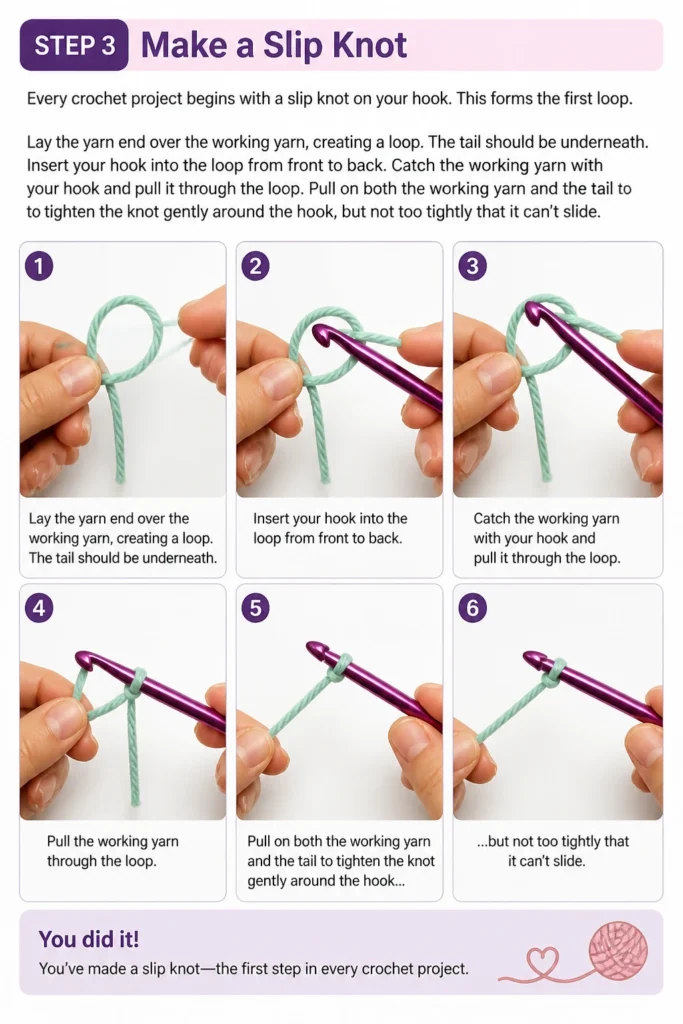
Lay the yarn end over the working yarn, creating a loop. The tail should be underneath.
Insert your hook into the loop from front to back.
Catch the working yarn with your hook and pull it through the loop.
Pull on both the working yarn and the tail to tighten the knot gently around the hook, but not too tightly that it can’t slide.
Step 4: Create a Foundation Chain (Chain Stitch)
The chain stitch (ch) is the most basic stitch and forms the foundation for almost all crochet projects.
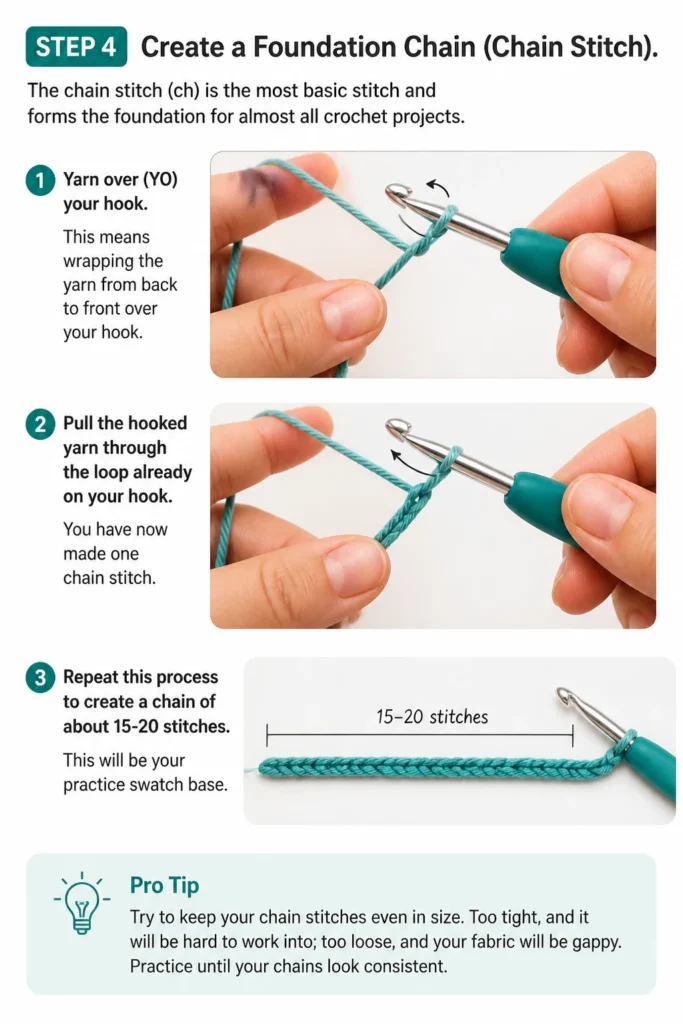
Yarn over (YO) your hook. This means wrapping the yarn from back to front over your hook.
Pull the hooked yarn through the loop already on your hook. You have now made one chain stitch.
Repeat this process to create a chain of about 15-20 stitches. This will be your practice swatch base.
Pro Tip: Try to keep your chain stitches even in size. Too tight, and it will be hard to work into; too loose, and your fabric will be gappy. Practice until your chains look consistent.
Step 5: Learn the Single Crochet Stitch
The single crochet (sc) is a fundamental stitch, creating a dense, sturdy fabric. It’s often the first stitch learned after the chain.
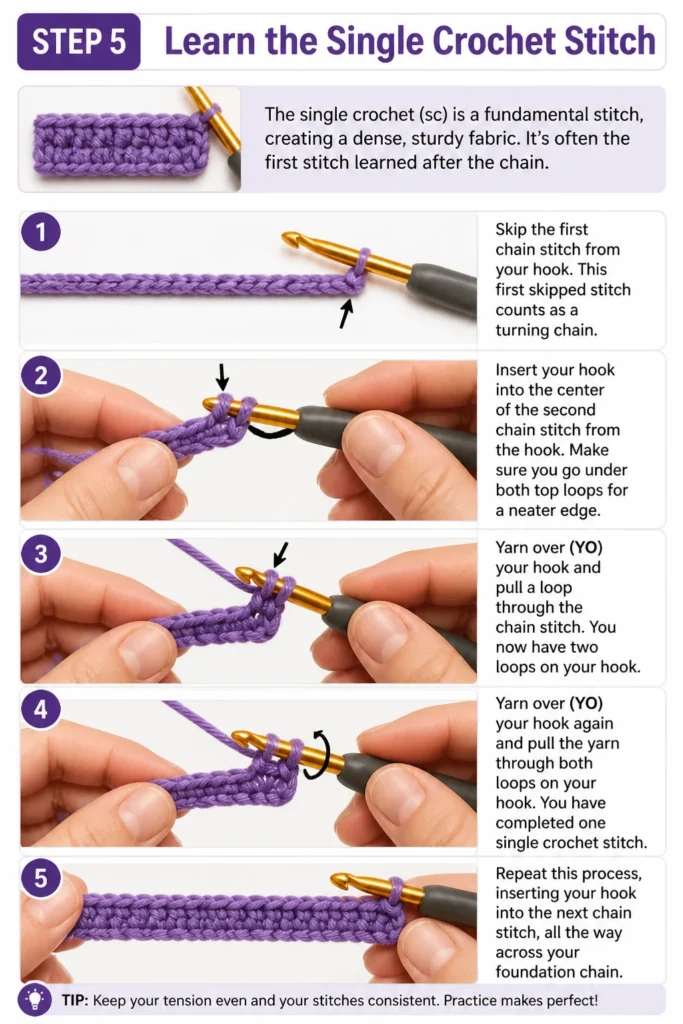
Skip the first chain stitch from your hook. This first skipped stitch counts as a turning chain.
Insert your hook into the center of the second chain stitch from the hook. Make sure you go under both top loops for a neater edge.
Yarn over (YO) your hook and pull a loop through the chain stitch. You now have two loops on your hook.
Yarn over (YO) your hook again and pull the yarn through both loops on your hook. You have completed one single crochet stitch.
Repeat this process, inserting your hook into the next chain stitch, all the way across your foundation chain.
Step 6: Practice Turning and Working in Rows
Once you reach the end of your first row of single crochet, it’s time to turn your work and start a new row.
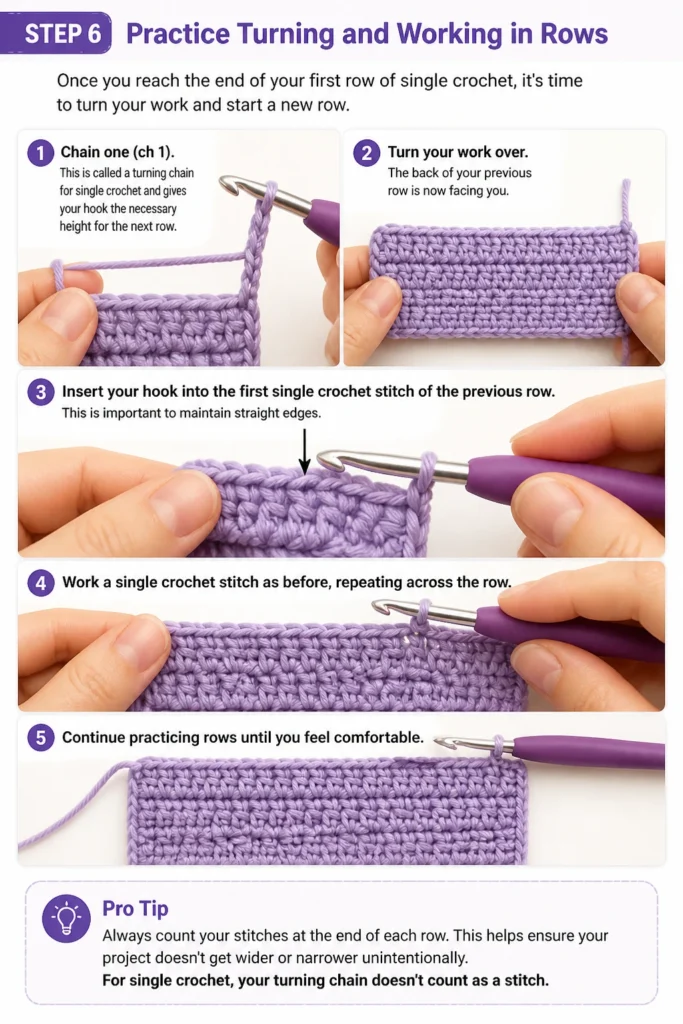
Chain one (ch 1). This is called a turning chain for single crochet and gives your hook the necessary height for the next row.
Turn your work over. The back of your previous row is now facing you.
Insert your hook into the first single crochet stitch of the previous row. This is important to maintain straight edges.
Work a single crochet stitch as before, repeating across the row. Continue practicing rows until you feel comfortable.
Pro Tip: Always count your stitches at the end of each row. This helps ensure your project doesn’t get wider or narrower unintentionally. For single crochet, your turning chain doesn’t count as a stitch.
Step 7: Finish Your Work (Fasten Off)
Once you’ve practiced enough and are ready to end your swatch, you need to fasten off your work to secure the stitches.
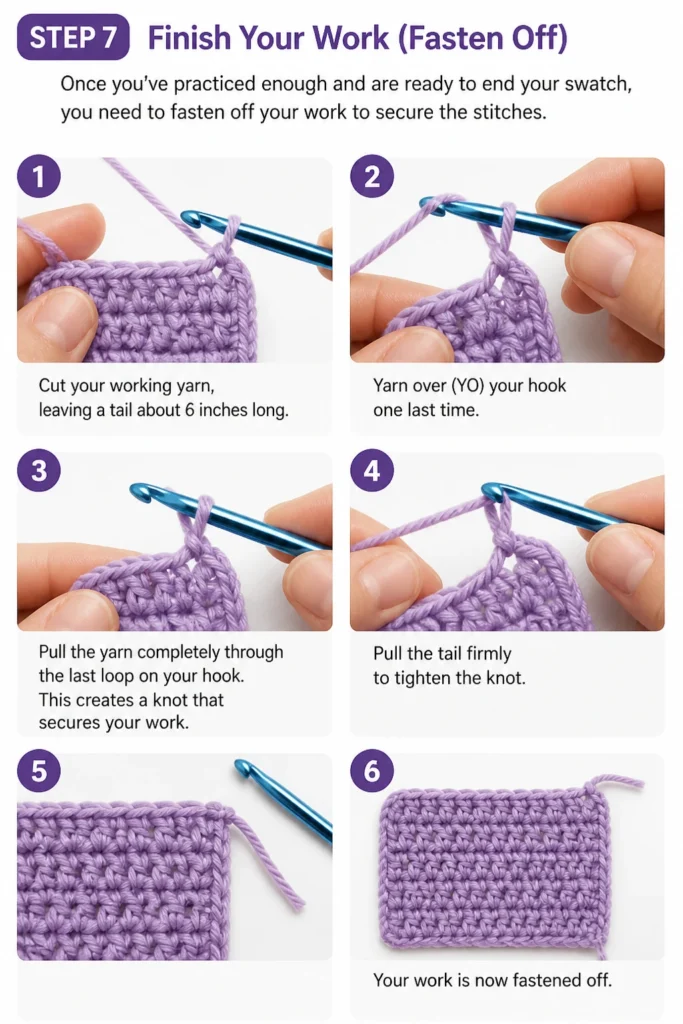
Cut your working yarn, leaving a tail about 6 inches long.
Yarn over (YO) your hook one last time.
Pull the yarn completely through the last loop on your hook. This creates a knot that secures your work.
Pull the tail firmly to tighten the knot. Your work is now fastened off.
Common Mistakes to Avoid
Tension Too Tight or Too Loose
One of the most common challenges for beginners is maintaining consistent tension. If your stitches are too tight, they will be difficult to work into, and your fabric will be stiff. If they are too loose, your fabric will be gappy and uneven. Practice holding your yarn and hook until you find a comfortable tension that allows for smooth, even stitches.
Skipping Stitches or Adding Extra Stitches
It’s easy to accidentally skip a stitch at the beginning or end of a row, or to work into the same stitch twice. This leads to uneven edges and changes in your project’s width. Always count your stitches at the end of each row to ensure you have the correct number. Pay close attention to where you insert your hook, especially into the first and last stitch of a row.
Incorrect Hook Size for Yarn
Using a hook size that is too small for your yarn will result in a very dense, stiff fabric that is hard to work. Conversely, a hook that is too large will create a loose, open fabric. Always check the yarn label for the recommended hook size. As a beginner, sticking to these recommendations will give you the best results.
Troubleshooting
My Edges Are Uneven
Uneven edges typically happen when you’re not consistently working into the first and last stitch of each row, or when your turning chains aren’t uniform. Ensure you’re always inserting your hook into the very first stitch of the previous row and not skipping it. Also, make sure your turning chain has the correct height for the stitch you are making.
My Fabric Is Curling
Curling often occurs when your tension is too tight, especially in the foundation chain or the first few rows. Try to relax your grip on the yarn and hook. Sometimes, a slight increase in hook size can also help alleviate curling, especially for dense stitches like single crochet. As your fabric grows, the weight can also help it flatten out.
It’s Hard to Insert My Hook Into Stitches
If you’re struggling to get your hook into previous stitches, your tension is likely too tight. Your stitches should be firm but flexible enough for the hook to pass through easily. Relax your grip on the yarn. If the problem persists, try using a slightly larger hook size, even if just for the foundation chain, to make subsequent rows easier to work into.
Key Takeaways
- Always begin with a slip knot on your hook.
- The chain stitch forms the essential foundation for nearly all crochet projects.
- The single crochet stitch is a fundamental building block for many patterns.
- Maintaining consistent yarn tension is vital for creating even, attractive fabric.
- Always count your stitches at the end of each row to keep your edges straight.
- Practice is key; don’t be discouraged by initial imperfections.
Frequently Asked Questions
What type of yarn is best for beginners?
Worsted weight (medium #4) acrylic yarn is highly recommended for beginners. It’s affordable, widely available, easy to work with, and less prone to splitting than other fibers. Light colors make it easier to see your stitches.
How do I choose the right hook size?
The yarn label will typically recommend a hook size. For beginners, it’s best to start with this recommendation. As you gain experience, you might adjust your hook size based on your personal tension and the desired fabric drape.
What’s the easiest first project to make?
A simple dishcloth, washcloth, or a very basic scarf made entirely of single crochet stitches is an excellent first project. These allow you to practice straight rows and consistent tension without complex shaping.
How do I read crochet patterns?
Crochet patterns use standard abbreviations for stitches and techniques. Most patterns include a list of abbreviations. Start with patterns labeled “beginner” that primarily use chain and single crochet stitches, and refer to an abbreviation chart as you go.
Our Top Recommended Finds
- Ergonomic Crochet Hook Set: These hooks have comfortable handles that reduce hand fatigue, making long practice sessions more enjoyable.
- Beginner-Friendly Yarn Pack: A small pack of worsted weight acrylic yarn in various light colors allows you to experiment without committing to large skeins.
- Stitch Markers: Essential for marking the first or last stitch of a row, or for keeping track of pattern repeats, preventing common mistakes.
Your Crochet Journey Starts Now
You now have the fundamental knowledge to begin your crochet adventure. This guide has provided you with the stepping stones to create your first piece of fabric.
Don’t hesitate to revisit these steps, rewind your progress, and practice each motion until it feels natural.
Grab your hook and yarn today, and experience the satisfaction of creating something beautiful with your own hands. The world of crochet awaits!