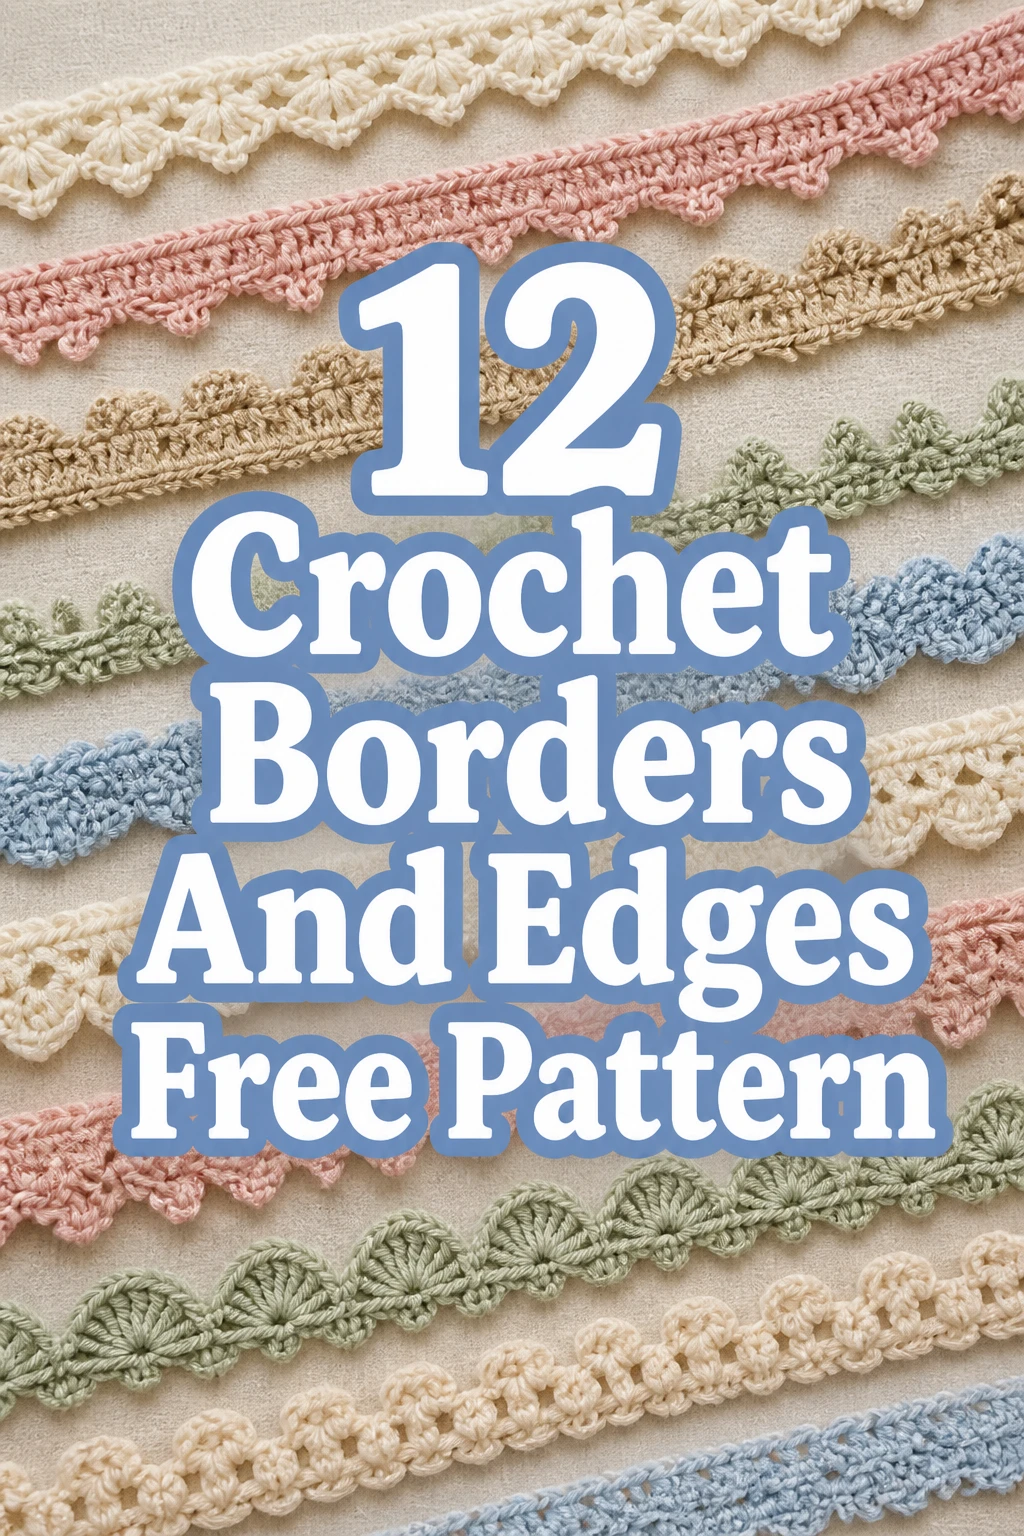
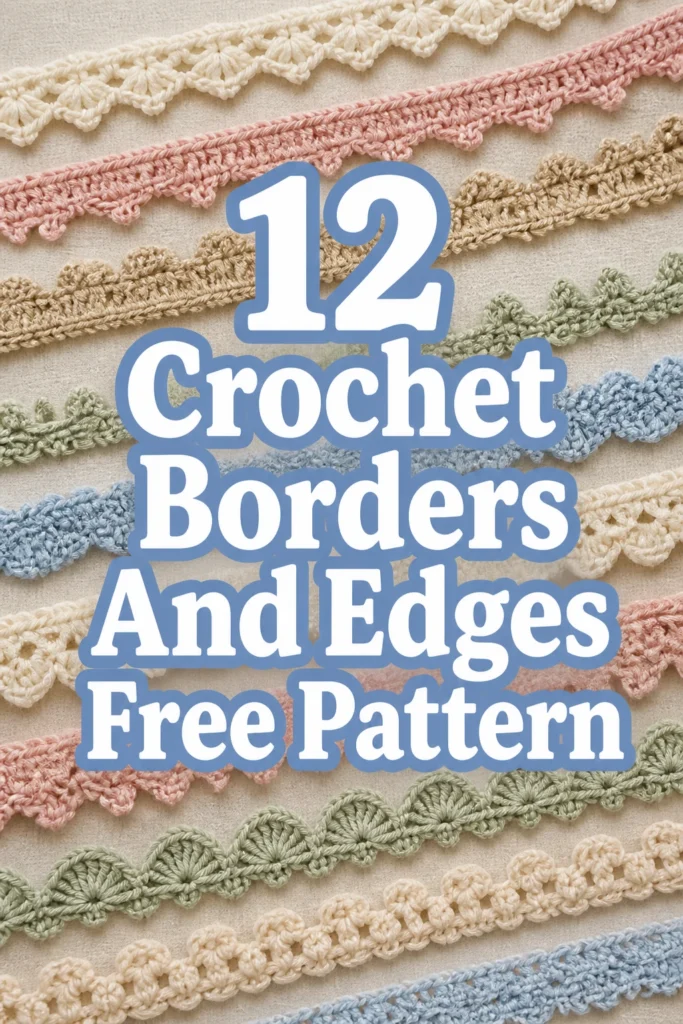
12 Crochet Borders And Edges Free Pattern
Ever finish a gorgeous crochet project, only to stare at the edge feeling like something’s just… missing
Yeah, we’ve all been there. It’s like your masterpiece needs that final mic-drop moment, right
Good news, fam. We’ve rounded up 12 killer crochet borders and edges that will elevate your work from “pretty good” to “OMG, where did you get that”
1. The Picot Perfection Edge
- Best For: Baby blankets, delicate scarves, anything needing a sweet, classic touch.
- Vibe: Whimsical, refined, a little bit fancy.
- Why it works: It adds tiny, adorable bobbles that scream “I know what I’m doing.”
This border gives off serious vintage vibes without looking dusty. Imagine it in a soft pastel yarn, like a blush pink or a creamy ivory, around a little newborn’s blanket. It’s simple to master but looks incredibly intricate, making you seem far more skilled than you probably feel after tangling with a tricky pattern.
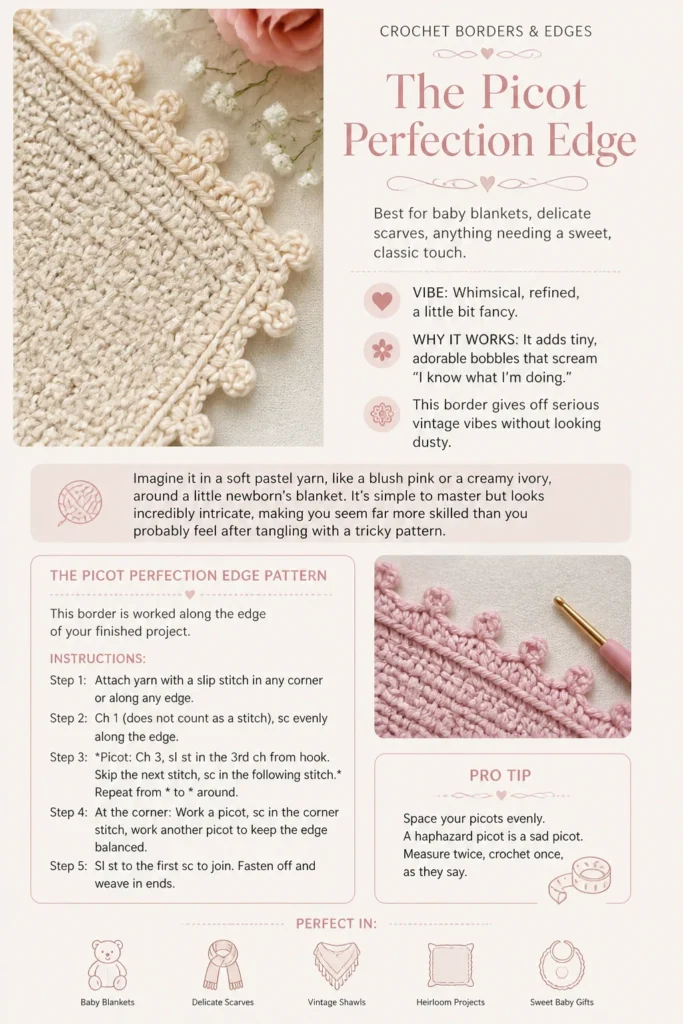
Pro Tip: Space your picots evenly. A haphazard picot is a sad picot. Measure twice, crochet once, as they say.
2. The Crab Stitch Reverse Single Crochet
- Best For: Dishcloths, placemats, sturdy bags, anything that needs a clean, rope-like finish.
- Vibe: Modern, crisp, incredibly polished.
- Why it works: It creates a fantastic, sturdy edge that won’t curl or stretch.
Don’t let the name scare you; it’s just single crochet worked backward. This edge is a game-changer for items that get a lot of use, like a set of cotton dishcloths in vibrant kitchen colors. It practically screams “I’m durable and I look good doing it.”
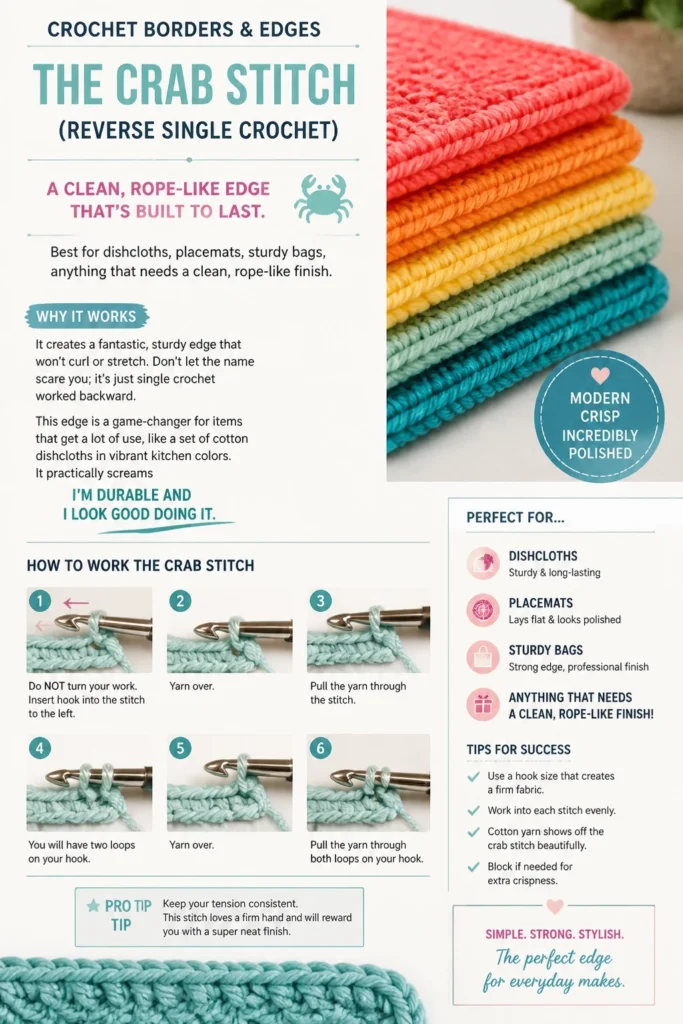
Pro Tip: Keep your tension consistent. This stitch loves a firm hand and will reward you with a super neat finish.
3. The Shell Stitch Border
- Best For: Afghan throws, shawls, cardigan edges, anything craving a touch of elegance.
- Vibe: Classic, romantic, a little bit grand.
- Why it works: It adds beautiful texture and a scalloped effect that’s universally loved.
This is your go-to when you want to make a statement without being over the top. Picture a cozy wool blend throw in a deep jewel tone, framed by these lovely scallops. It’s like adding a fancy trim to a designer dress; instant upgrade, zero effort (okay, minimal effort).
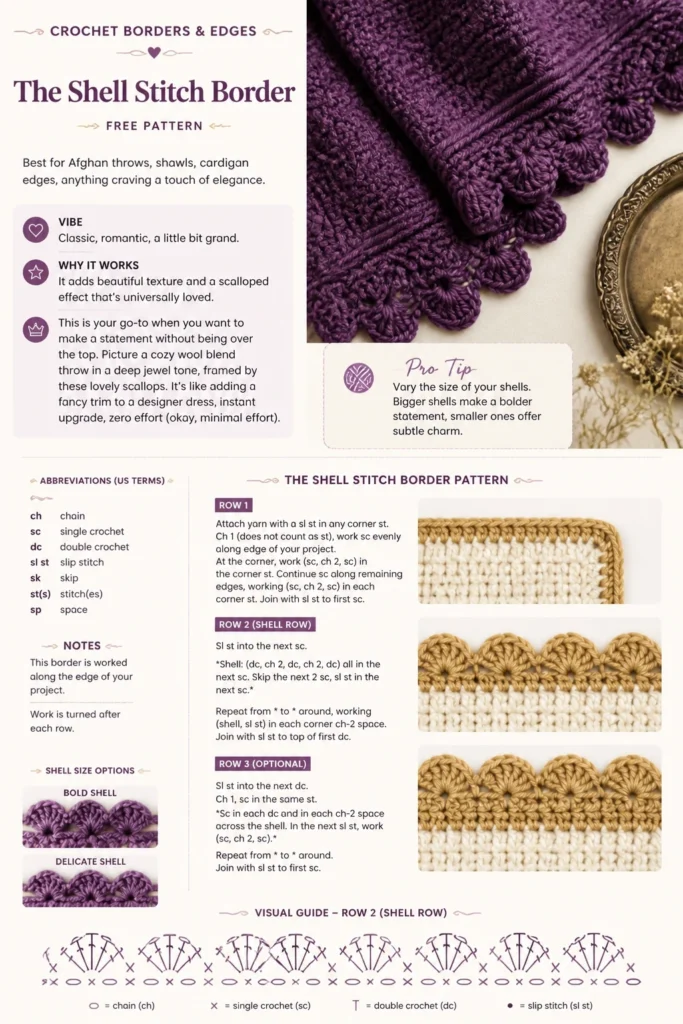
Pro Tip: Vary the size of your shells. Bigger shells make a bolder statement, smaller ones offer subtle charm.
4. The Block Stitch Edge
- Best For: Blankets, scarves, home decor items, anything needing a bold, graphic look.
- Vibe: Playful, geometric, eye-catching.
- Why it works: It creates a cool, checkered pattern that adds visual interest.
If you’re into color blocking or just want to break up a solid fabric, this is your jam. Try it in contrasting colors, like a bright teal against a charcoal gray, for a modern blanket. It’s like a little architectural detail for your crochet project.
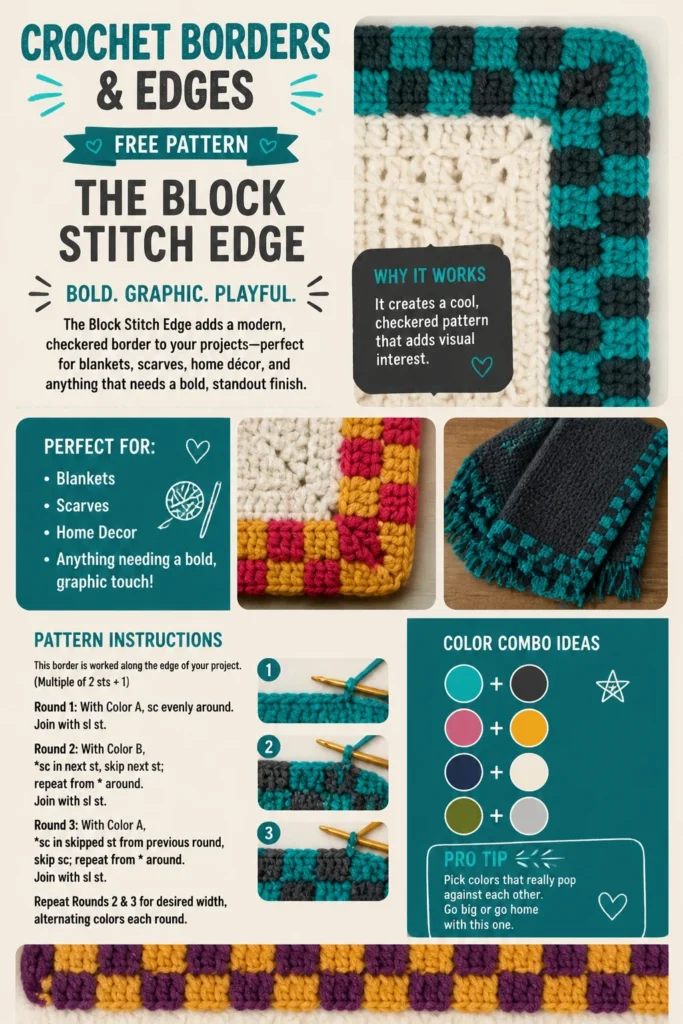
Pro Tip: Pick colors that really pop against each other. Go big or go home with this one.
5. The Scallop Edge
- Best For: Baby clothes, little bags, anything needing a sweet, delicate wave.
- Vibe: Cute, whimsical, subtly feminine.
- Why it works: It’s a simple, repetitive wave that adds softness and charm.
This is probably one of the most classic borders for a reason. It’s easy, fast, and always looks good. A little crochet clutch in a soft cotton yarn with a scallop edge just screams “summer picnic chic.”
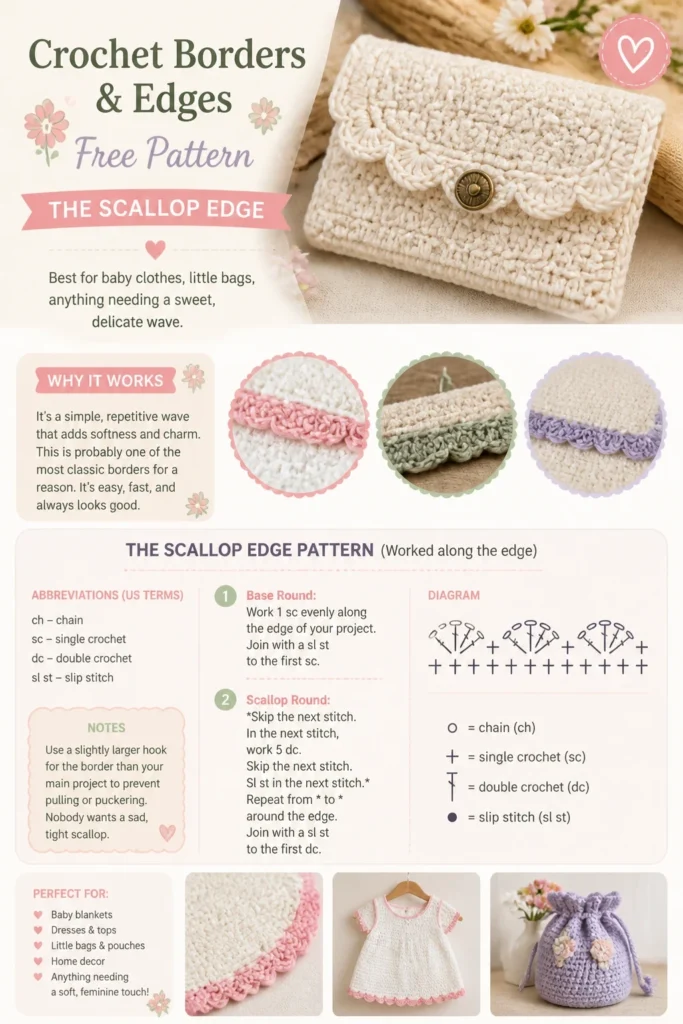
Pro Tip: Use a slightly larger hook for the border than your main project to prevent pulling or puckering. Nobody wants a sad, tight scallop.
6. The Pointed Lace Edge
- Best For: Doilies, lightweight scarves, intricate garments, anything requiring a delicate, airy feel.
- Vibe: Elegant, intricate, vintage glamour.
- Why it works: It creates a beautiful, openwork pattern that looks incredibly delicate.
When you want to impress without actually doing a ton of complicated stitches, this is your secret weapon. Imagine a fine lace weight merino wool scarf with this border; it would look like it cost a fortune. It’s airy, delicate, and surprisingly achievable.
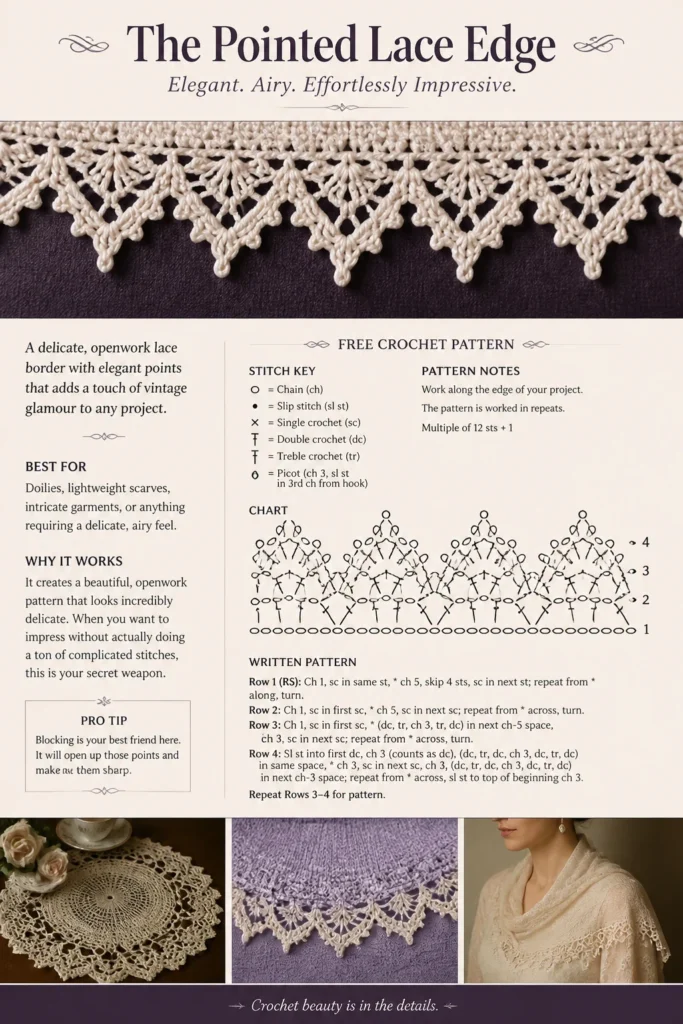
Pro Tip: Blocking is your best friend here. It will open up those points and make them sharp.
7. The Bobble Stitch Border
- Best For: Coasters, cushions, kids’ blankets, anything needing a fun, tactile texture.
- Vibe: Bubbly, playful, wonderfully squishy.
- Why it works: It adds fantastic 3D texture and a whimsical feel.
Who doesn’t love a good bobble It’s like adding little pom-poms to your project, but they’re attached. A set of chunky yarn coasters with a bobble border would be perfect for a cozy coffee morning. They’re just begging to be touched.
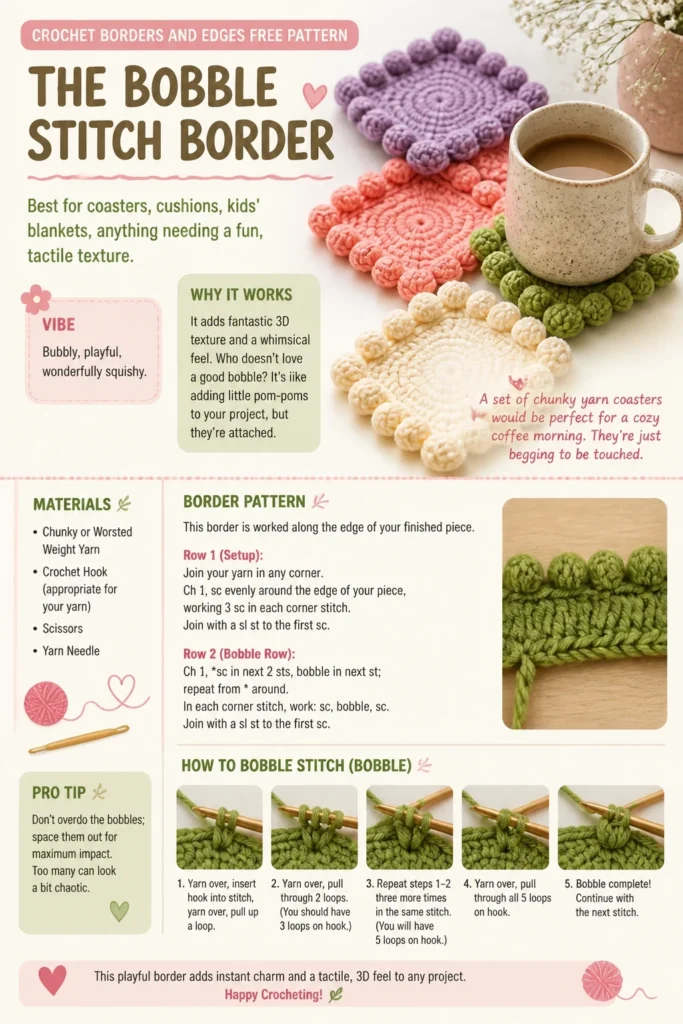
Pro Tip: Don’t overdo the bobbles; space them out for maximum impact. Too many can look a bit chaotic.
8. The Reverse Shell Border
- Best For: Afghans, throws, anything needing a more textured, defined scallop.
- Vibe: Rich, dimensional, a slight twist on a classic.
- Why it works: It offers a more pronounced, almost ruffled, version of the traditional shell.
This border takes the beloved shell stitch and gives it a little extra oomph. It’s perfect for a substantial acrylic blend blanket that needs a border with some serious presence. It’s like the regular shell stitch went to the gym and got buff.
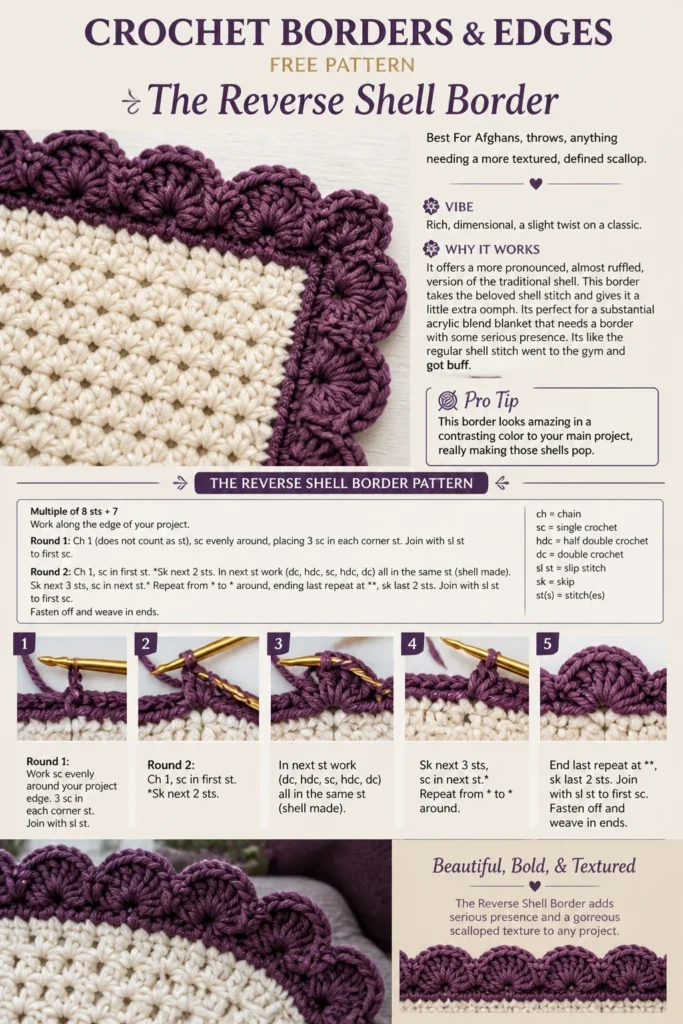
Pro Tip: This border looks amazing in a contrasting color to your main project, really making those shells pop.
9. The Ruffle Edge
- Best For: Skirts, pillowcases, doll clothes, anything needing a flirty, feminine touch.
- Vibe: Sweet, playful, wonderfully voluminous.
- Why it works: It adds instant volume and a charming, gathered effect.
Feeling a bit extra This border is for you. It’s super easy to create by simply increasing stitches in certain rows. A plain cotton pillowcase instantly becomes adorable with a ruffle edge in a bright, cheerful color. It’s basically happiness in yarn form.
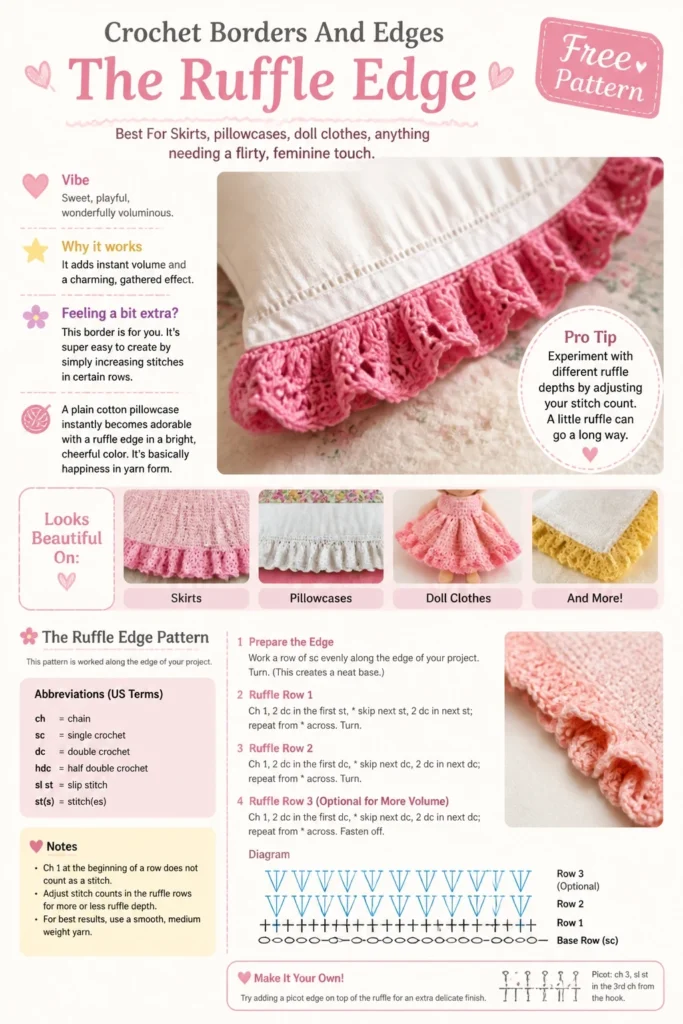
Pro Tip: Experiment with different ruffle depths by adjusting your stitch count. A little ruffle can go a long way.
10. The Basketweave Border
- Best For: Blankets, scarves, placemats, anything needing a strong, textural frame.
- Vibe: Rustic, cozy, incredibly tactile.
- Why it works: It mimics the woven look of a basket, adding incredible depth.
This border is a fantastic way to add a sophisticated, textured finish. It looks amazing on a solid-colored blanket, especially in an earthy tone like forest green or burnt orange. It’s like putting a fancy frame on a piece of art.
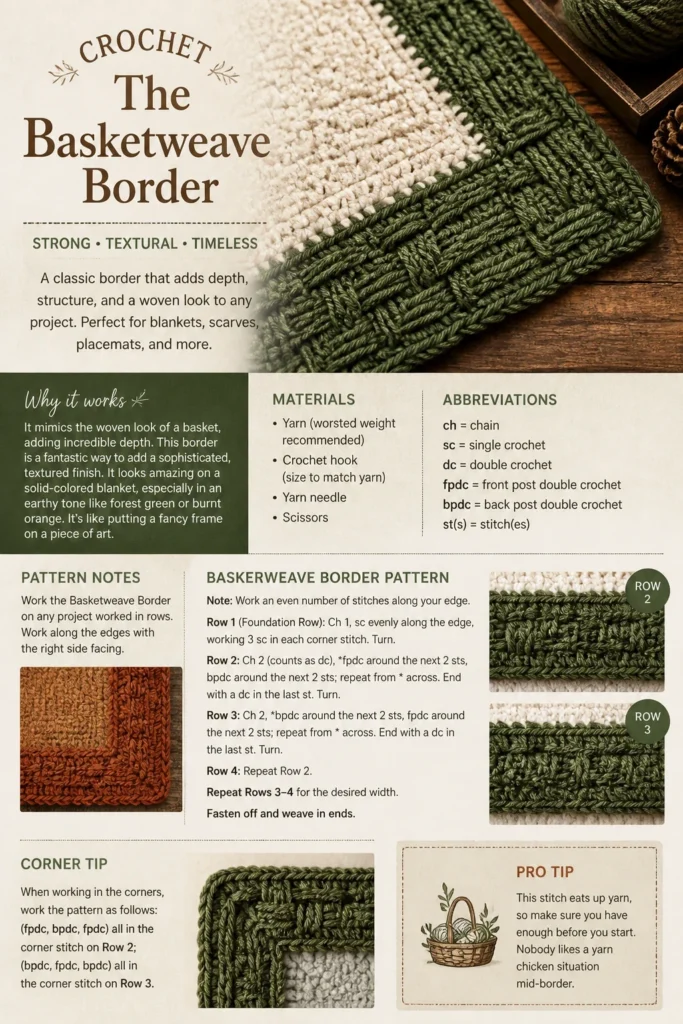
Pro Tip: This stitch eats up yarn, so make sure you have enough before you start. Nobody likes a yarn chicken situation mid-border.
11. The Spike Stitch Border
- Best For: Modern blankets, graphic placemats, anything needing a sharp, defined line.
- Vibe: Edgy, contemporary, visually striking.
- Why it works: It creates cool, elongated stitches that break up the monotony.
If you’re bored of basic, the spike stitch is your new best friend. It’s super simple but looks incredibly clever. Try it on a minimalist tapestry crochet wall hanging in a bold black against a white background. It’s a subtle way to add big impact.
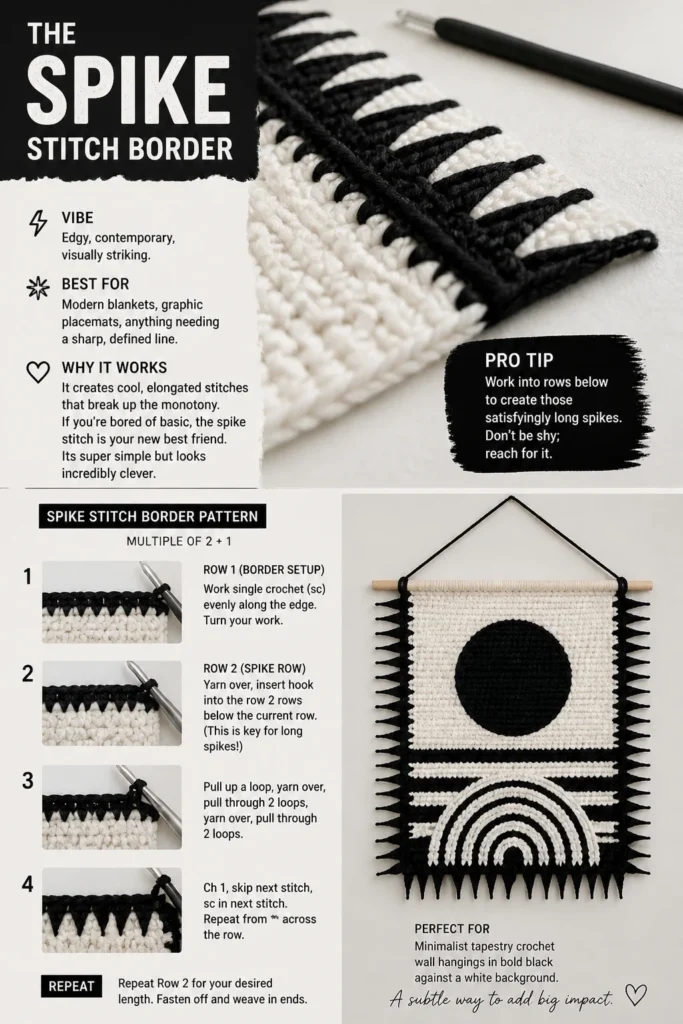
Pro Tip: Work into rows below to create those satisfyingly long spikes. Don’t be shy; reach for it.
12. The V-Stitch Edge
- Best For: Shawls, delicate blankets, anything needing an open, airy, and elegant finish.
- Vibe: Graceful, light, subtly intricate.
- Why it works: It creates a lovely, open lattice effect that is both beautiful and functional.
This border is perfect when you want a delicate, almost lacy finish without all the fuss. A flowing rayon blend shawl with a V-stitch edge would drape beautifully. It’s the kind of detail that makes people say, “Wow, you made that” (and you totally did).
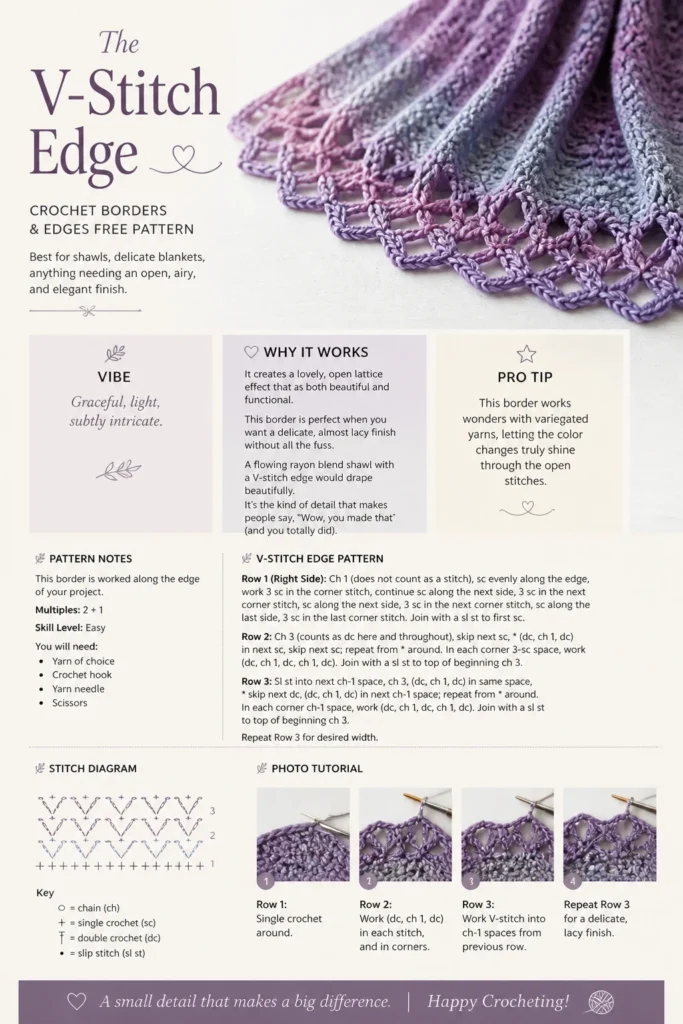
Pro Tip: This border works wonders with variegated yarns, letting the color changes truly shine through the open stitches.
Our Top Recommended Finds
To really nail these borders, you need the right gear, obviously.
- Ergonomic Crochet Hook Set: Your hands will thank you after hours of perfecting those picots. Comfort is king.
- High-Quality Yarn Clippers: A clean snip makes all the difference for a professional finish. No frayed ends here, darling.
- Blocking Mats with Pins: Essential for shaping those lace edges and making everything look crisp and intentional. Don’t skip this step.
Which of these will you try first
Seriously, ditch those naked edges. Your projects deserve to look as fabulous as you are.
Which border is calling your name for your next masterpiece Drop a comment below and let us know your pick