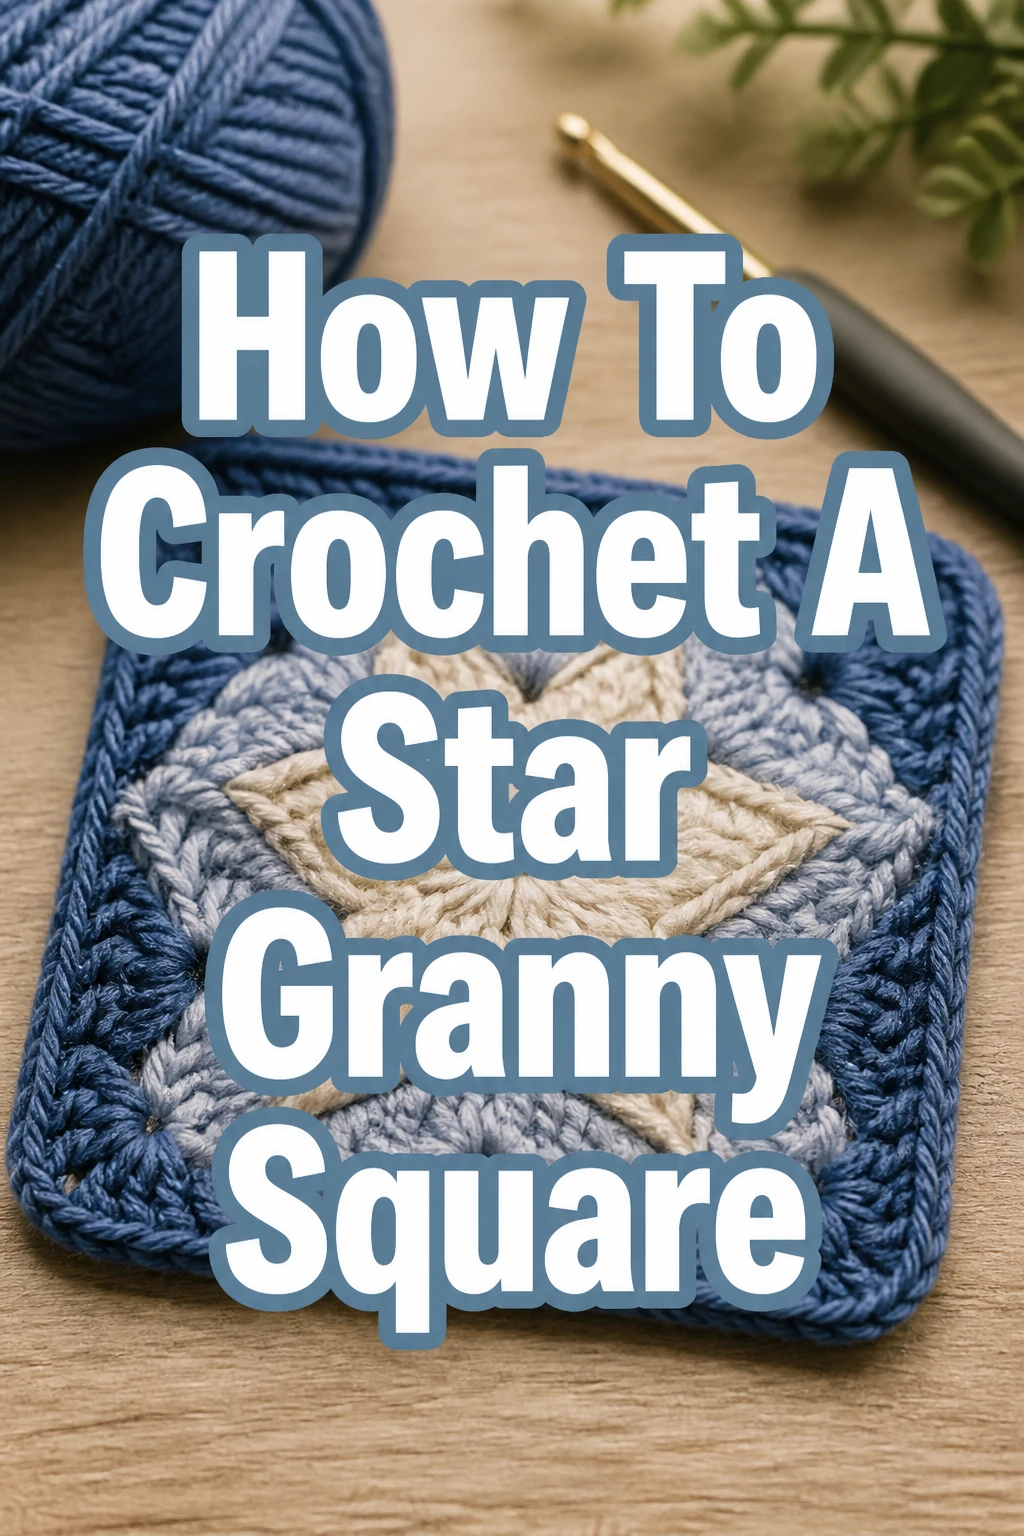
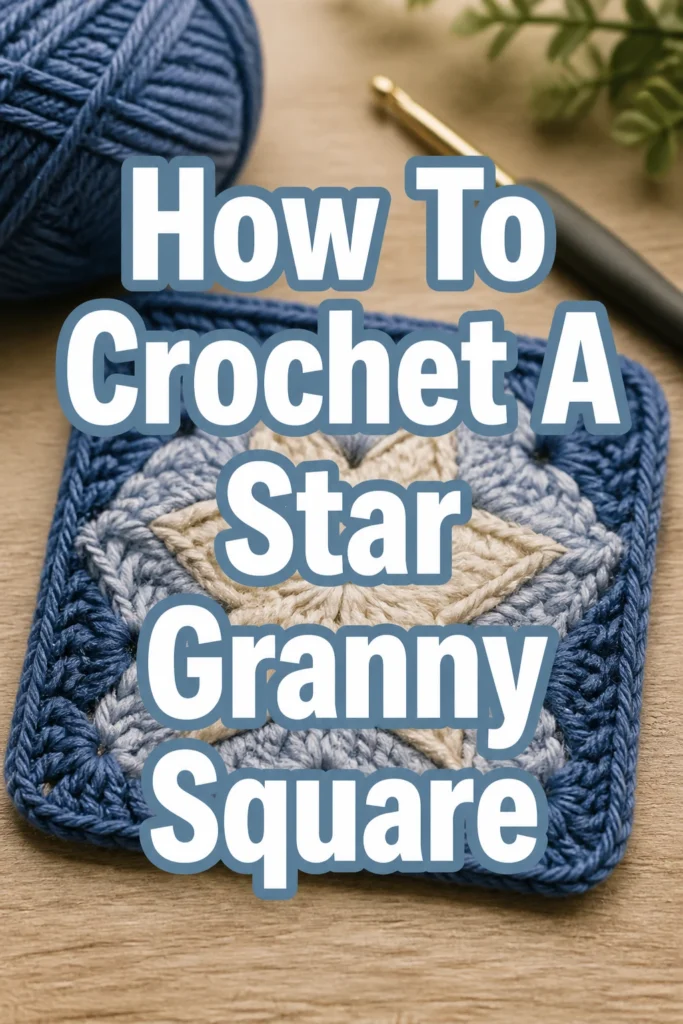
How To Crochet A Star Granny Square
Crocheting a star granny square adds a touch of charm to any project. I remember the first time I made one, seeing the star emerge felt truly magical. This guide will walk you through each stitch, ensuring you create a beautiful square with confidence.
You’ll soon master this delightful pattern, ready to incorporate it into blankets, garments, or decorative items.
Quick Overview
You’re about to create a stunning star-shaped motif, then transform it into a classic granny square. This project is incredibly rewarding and perfect for adding unique flair to your crochet work.
You’ll gain confidence in intricate stitch placement and color changes, if you choose to use them.
- Time needed: 2-3 hours for your first square, quicker with practice
- Difficulty: Intermediate
- What you’ll need: Yarn, crochet hook, scissors, yarn needle
Step-by-Step Instructions
Step 1: Gather Your Materials and Start the Center
Before you begin, ensure you have all your supplies ready and within reach. Choose a yarn weight and corresponding hook size that you are comfortable working with.
A medium worsted weight yarn and a 5.0mm (H) hook are good starting points for this project.
Create a Magic Ring (or Chain 4 and join): Make a magic ring to begin your square. This creates a tight center hole, which is ideal for this pattern.
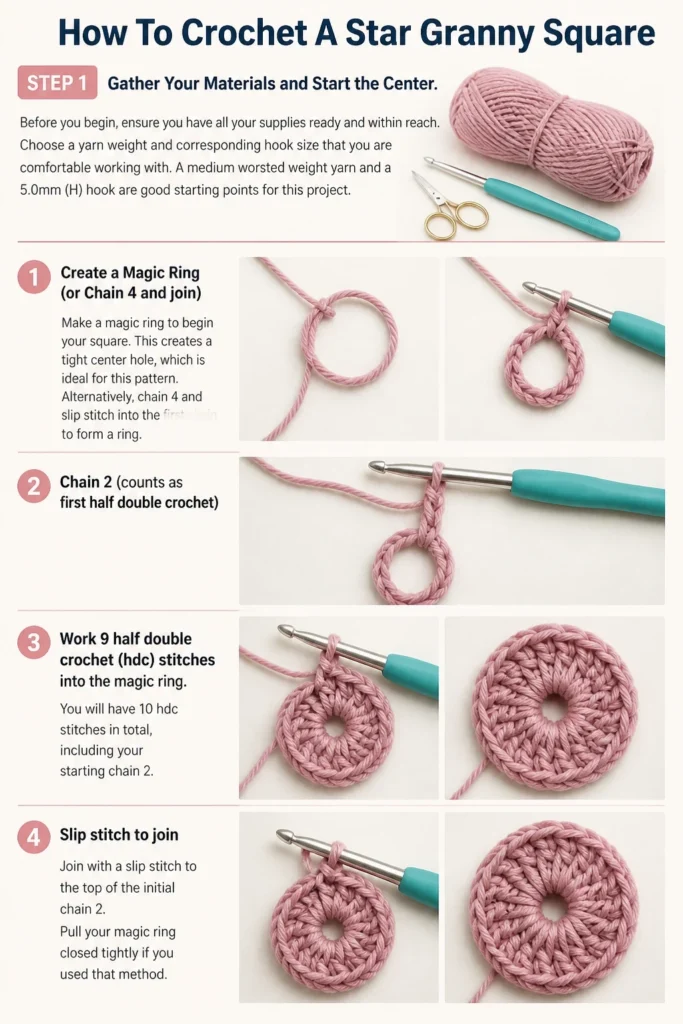
Alternatively, chain 4 and slip stitch into the first chain to form a ring.
Chain 2 (counts as first half double crochet): Work 9 half double crochet (hdc) stitches into the magic ring. You will have 10 hdc stitches in total, including your starting chain 2.
Slip stitch to join: Join with a slip stitch to the top of the initial chain 2. Pull your magic ring closed tightly if you used that method.
Pro Tip: Using a magic ring provides a much neater, more closed center for your star. Practice it a few times if it’s new to you, it’s worth the effort!
Step 2: Establish the Star Points Base
This round lays the foundation for your star’s distinct points. Precision here ensures a symmetrical and beautiful outcome.
You will be creating small clusters that will eventually form the tips of your star.
Chain 2 (counts as first hdc): Work 1 hdc into the same stitch where you joined. You now have 2 hdc in that first stitch.
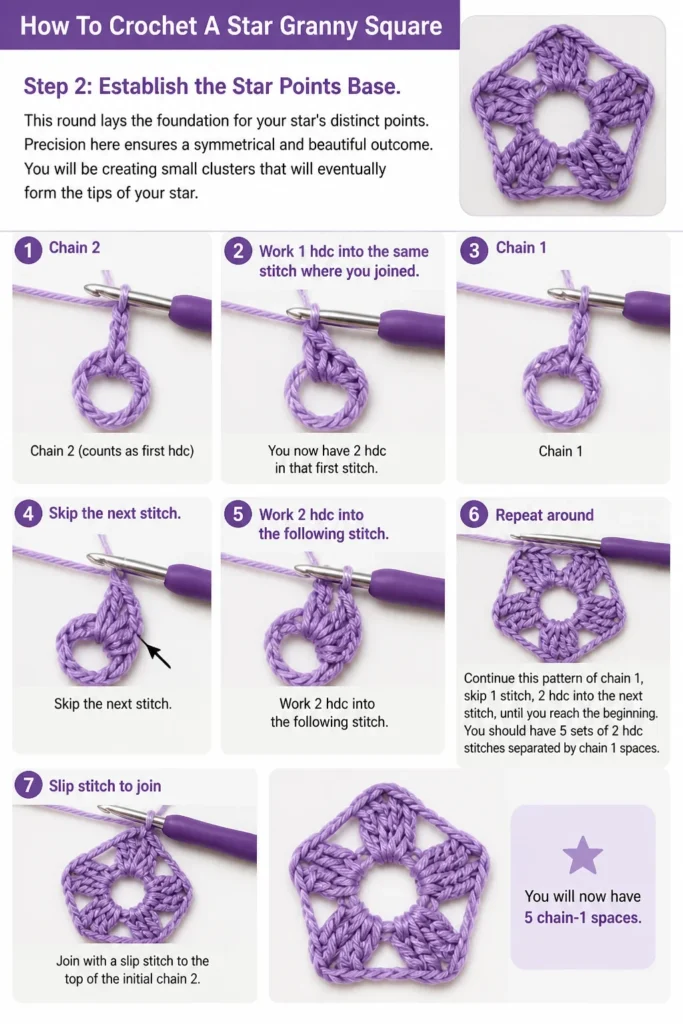
Chain 1: Skip the next stitch. Work 2 hdc into the following stitch.
Repeat around: Continue this pattern of chain 1, skip 1 stitch, 2 hdc into the next stitch, until you reach the beginning. You should have 5 sets of 2 hdc stitches separated by chain 1 spaces.
Slip stitch to join: Join with a slip stitch to the top of the initial chain 2. You will now have 5 chain-1 spaces.
Step 3: Build the Star Points
Now you will begin to form the actual points of your star. This involves working into the chain-1 spaces from the previous round.
Each point will consist of a cluster of stitches, creating a defined shape.
Chain 3 (counts as first double crochet): Work 2 double crochet (dc) stitches into the first chain-1 space. This creates the first side of your star point.
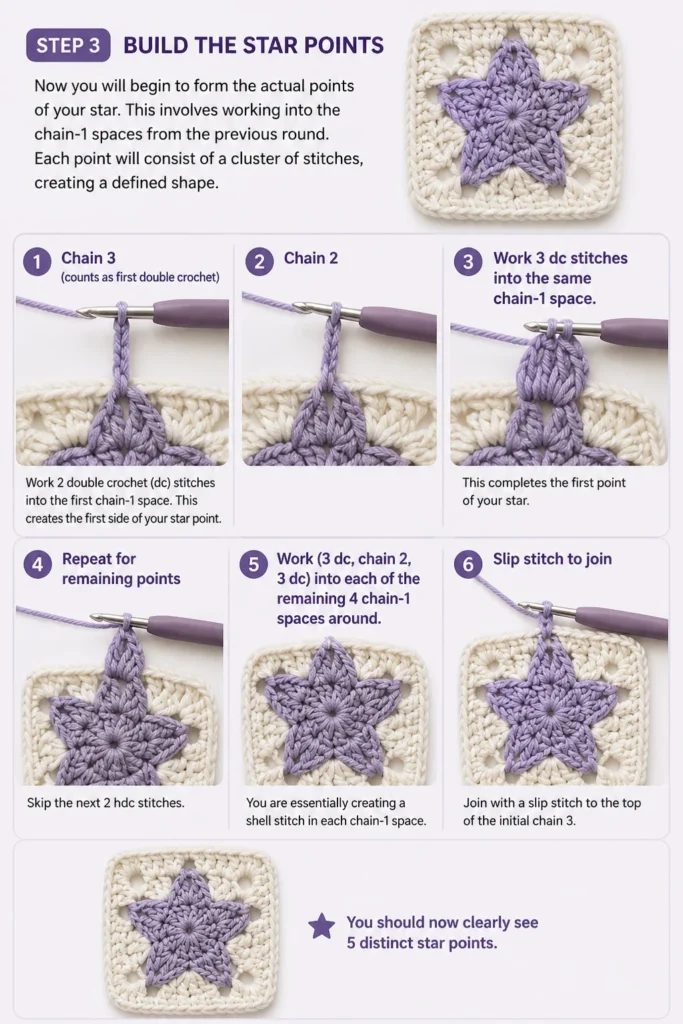
Chain 2: Work 3 dc stitches into the same chain-1 space. This completes the first point of your star.
Repeat for remaining points: Skip the next 2 hdc stitches. Work (3 dc, chain 2, 3 dc) into each of the remaining 4 chain-1 spaces around. You are essentially creating a shell stitch in each chain-1 space.
Slip stitch to join: Join with a slip stitch to the top of the initial chain 3. You should now clearly see 5 distinct star points.
Step 4: Connect the Star Points
This round connects your star points, beginning to form a more cohesive shape. It also prepares the ground for squaring off the star into a granny square.
You will be working into the spaces between your star points.
Chain 1 (does not count as a stitch): Work 1 single crochet (sc) into the same stitch where you joined. This anchors your work for the round.
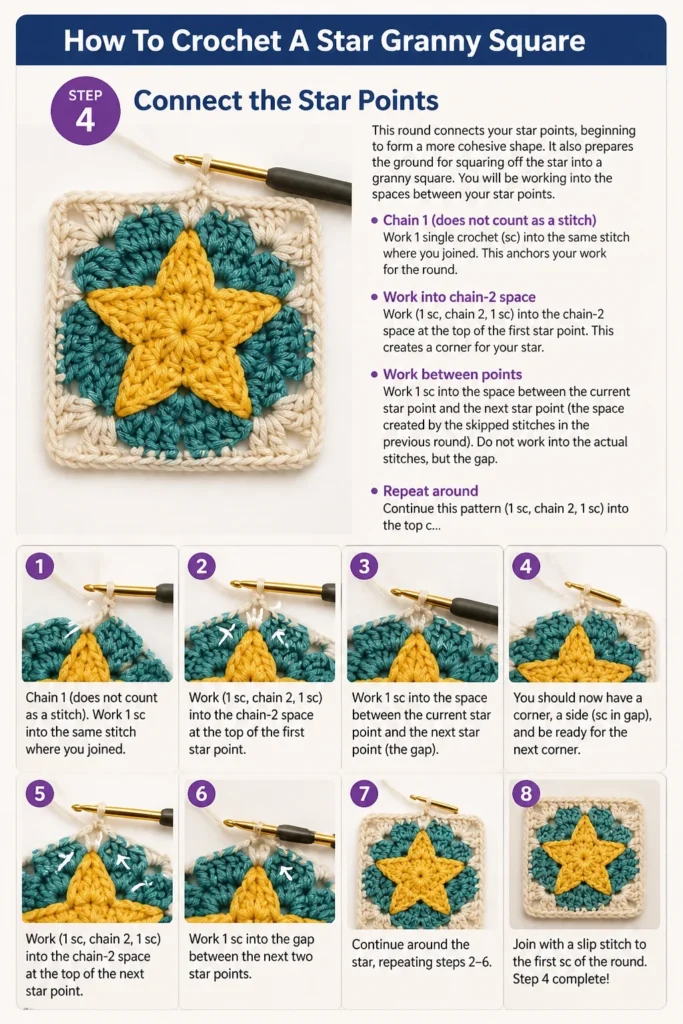
Work into chain-2 space: Work (1 sc, chain 2, 1 sc) into the chain-2 space at the top of the first star point. This creates a corner for your star.
Work between points: Work 1 sc into the space between the current star point and the next star point (the space created by the skipped stitches in the previous round). Do not work into the actual stitches, but the gap.
Repeat around: Continue this pattern: (1 sc, chain 2, 1 sc) into the top chain-2 space of each star point, then 1 sc in the space between points. You will have 5 chain-2 spaces and 5 single crochet stitches between them.
Slip stitch to join: Join with a slip stitch to the first single crochet of the round. You should have 5 corner chain-2 spaces and 5 single crochet stitches between them.
Step 5: Square Up the Star – Round 1
Now it’s time to transform your beautiful star into a square shape. This round introduces the traditional granny square clusters.
You will establish the four corners of your square in this step.
Chain 3 (counts as first dc): Work 2 dc into the same stitch where you joined. This creates your first cluster.
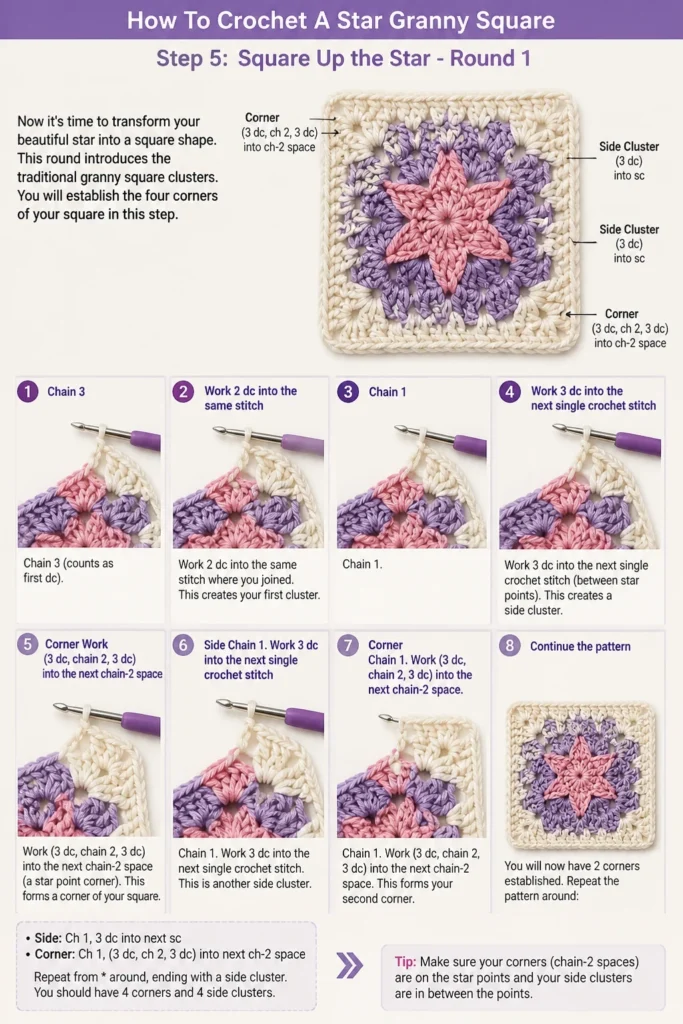
Chain 1: Work 3 dc into the next single crochet stitch (between star points). This creates a side cluster.
Corner: Work (3 dc, chain 2, 3 dc) into the next chain-2 space (a star point corner). This forms a corner of your square.
Side: Chain 1. Work 3 dc into the next single crochet stitch. This is another side cluster.
Corner: Chain 1. Work (3 dc, chain 2, 3 dc) into the next chain-2 space. This forms your second corner.
Continue the pattern: You will now have 2 corners established. Repeat the side cluster (chain 1, 3 dc into sc) and corner (chain 1, (3 dc, chain 2, 3 dc) into ch-2 space) pattern twice more. You will have 4 corners and 4 side clusters after this round.
Slip stitch to join: Join with a slip stitch to the top of the initial chain 3. Fasten off if changing colors, or continue with the same yarn.
Pro Tip: When squaring up, ensure your chain-1 spaces between clusters are consistent. This helps maintain the square’s shape and prevents puckering.
Step 6: Square Up the Star – Round 2 and Beyond
This round builds upon the previous one, expanding the square and making it larger. You will continue the granny square pattern of clusters and chain spaces.
Each subsequent round will follow a similar pattern, increasing the size of your square.
If changing colors: Join your new yarn with a slip stitch into any chain-2 corner space. Chain 3 (counts as first dc).
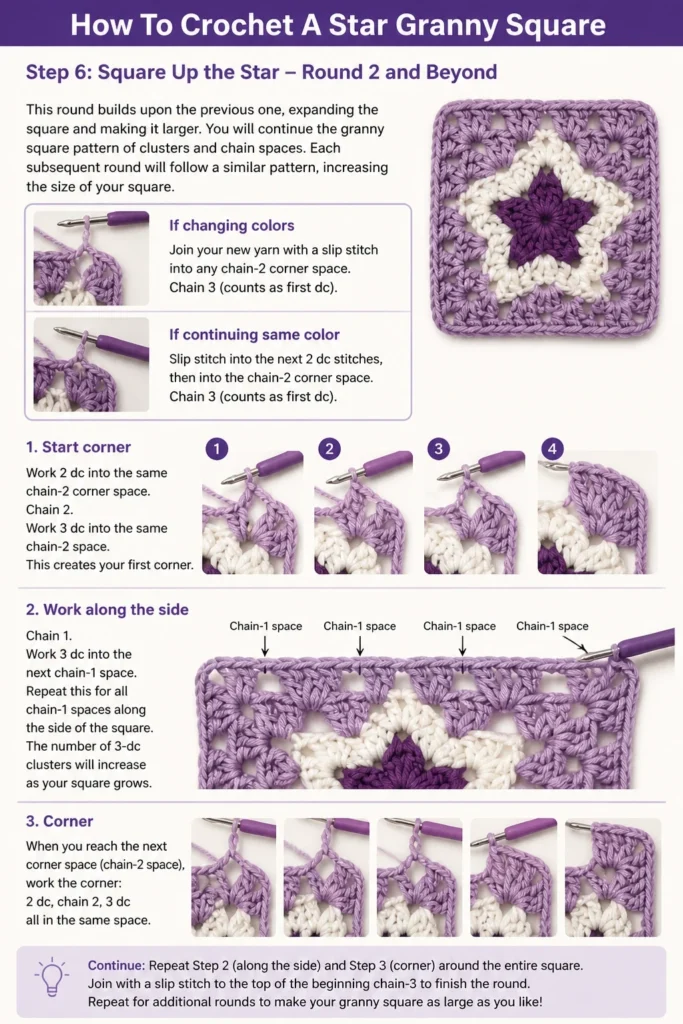
If continuing same color: Slip stitch into the next 2 dc stitches, then into the chain-2 corner space. Chain 3 (counts as first dc).
Start corner: Work 2 dc into the same chain-2 corner space. Chain 2. Work 3 dc into the same chain-2 space. This creates your first corner.
Work along the side: Chain 1. Work 3 dc into the next chain-1 space. Repeat this for all chain-1 spaces along the side of the square. The number of 3-dc clusters will increase with each round.
Next corner: Chain 1. Work (3 dc, chain 2, 3 dc) into the next chain-2 corner space. This establishes your next corner.
Repeat around: Continue the pattern of working 3 dc clusters into chain-1 spaces along the sides, and (3 dc, chain 2, 3 dc) into the chain-2 corner spaces. Always chain 1 between clusters along the sides.
Slip stitch to join: Join with a slip stitch to the top of the initial chain 3. Fasten off and weave in ends, or continue for a larger square.
Step 7: Finishing Touches
Once your star granny square has reached your desired size, it’s time for the final steps. Proper finishing ensures your square looks professional and durable.
Don’t skip these crucial steps, as they make a big difference in the final appearance.
Fasten off: Cut your yarn, leaving a tail about 6 inches long. Yarn over your hook and pull the tail completely through the loop on your hook to secure the stitch.
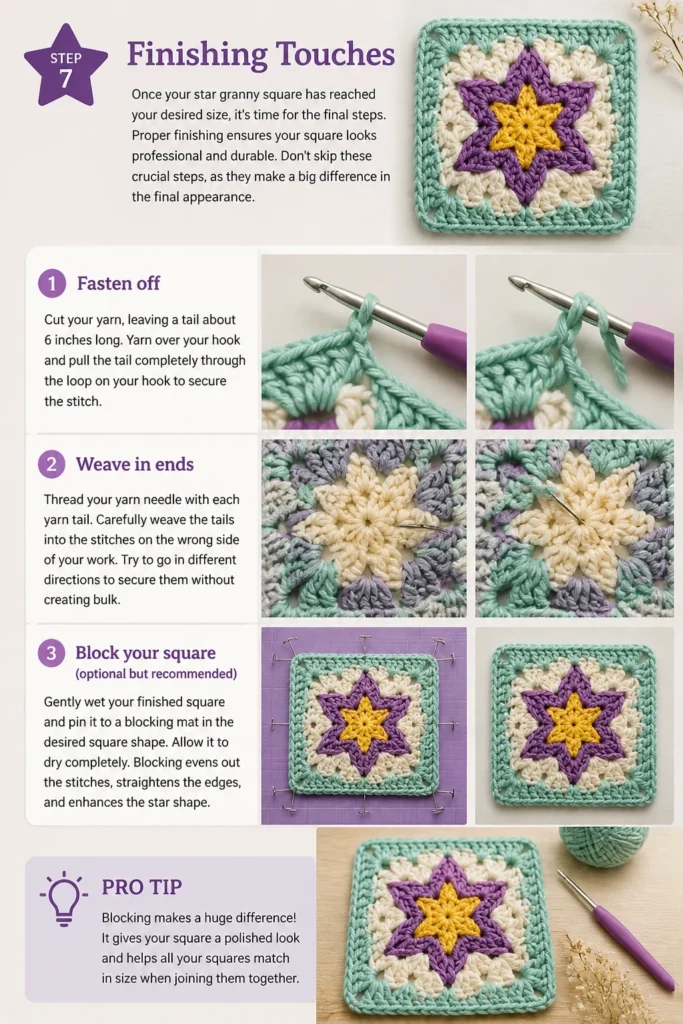
Weave in ends: Thread your yarn needle with each yarn tail. Carefully weave the tails into the stitches on the wrong side of your work. Try to go in different directions to secure them without creating bulk.
Block your square (optional but recommended): Gently wet your finished square and pin it to a blocking mat in the desired square shape. Allow it to dry completely. Blocking evens out stitches and makes your square lay flat.
Common Mistakes to Avoid
Skipping Stitches or Chain Spaces
It’s easy to accidentally skip a stitch or a chain space, especially in the earlier rounds. This can throw off your stitch count and lead to an uneven or lopsided star. Always count your stitches and chain spaces carefully after each round to ensure accuracy. If your stitch count is off, unravel and re-crochet the round.
Loose or Tight Tension
Inconsistent tension is a common issue that affects the overall look of your square. If your tension is too tight, the fabric might pucker; if it’s too loose, the square could be floppy and gappy. Practice maintaining an even tension throughout your work. Experiment with different hook sizes if you find your natural tension is consistently too tight or too loose.
Not Weaving in Ends Properly
Leaving loose ends or weaving them in too sparsely can cause your project to unravel over time. It also makes the square look unfinished. Take the time to weave in all ends securely and discreetly, going in various directions to lock them into place within the fabric. This ensures a clean and lasting finish.
Incorrect Join Location
Joining in the wrong stitch at the end of a round can lead to a crooked seam or an uneven edge. Always ensure you are slip stitching into the correct stitch, usually the top of the first stitch or the beginning chain of the round. Pay close attention to the instructions for each join.
Troubleshooting
My Star Points Look Uneven
If your star points appear to be different sizes or not perfectly symmetrical, it’s often due to inconsistent tension or stitch count within the “point” clusters. Double-check that you are working the exact number of double crochet stitches and chain spaces for each point. Ensure your tension is consistent when working these clusters.
My Square is Curling or Not Lying Flat
Curling typically indicates that your tension is too tight, or you might be missing some chain spaces between your clusters in the squaring-up rounds. Try using a slightly larger hook size. Also, ensure you are chaining 1 between all 3-dc clusters along the sides, and chaining 2 for the corners. Blocking the finished square can also help immensely.
There are Gaps in the Center of My Star
If you used a magic ring and still have a gap, it might not have been pulled tight enough. For a persistent gap, you can thread a yarn tail through the center after finishing and pull it taut, then secure it. If you used the chain 4 method, a small gap is normal but should be minimized by slip stitching firmly.
Key Takeaways
- Mastering the magic ring creates a neat, closed center for your star.
- Consistent stitch count and tension are vital for symmetrical star points.
- The squaring-up rounds transform the star into a versatile granny square shape.
- Always pay attention to chain spaces, especially in corners and between clusters.
- Properly weaving in ends and blocking are essential for a professional finish.
- Practice makes perfect; don’t be discouraged by initial imperfections.
Frequently Asked Questions
Can I make this star granny square larger?
Absolutely! Once you’ve completed the initial squaring-up rounds, you can continue adding more rounds of the traditional granny square pattern. Simply keep working 3 dc clusters into chain-1 spaces and (3 dc, ch 2, 3 dc) into corner chain-2 spaces until your square reaches the desired size.
What type of yarn is best for this pattern?
For beginners, a smooth, light-colored worsted weight (medium #4) acrylic or cotton yarn is ideal. It’s easy to work with, stitches are visible, and it holds its shape well. Once comfortable, you can experiment with different fiber types and weights.
How can I change colors effectively in this pattern?
To change colors, complete the last stitch of the round with the old color up until the final yarn over. Then, yarn over with the new color and pull through to complete the stitch. This seamlessly transitions to the new color for the next round. Always fasten off and weave in the old color’s tail securely.
Can I use this star granny square for a blanket?
Yes, this star granny square is perfect for blankets! You can make many squares and join them together using various joining methods like slip stitch, single crochet, or a decorative join. The unique star design will add visual interest to your blanket.
Our Top Recommended Finds
- Ergonomic Crochet Hooks: These hooks reduce hand fatigue, making longer crafting sessions more comfortable and enjoyable. They are a worthwhile investment for any dedicated crocheter.
- Quality Acrylic Yarn: Soft, durable, and available in a vast array of colors, good quality acrylic yarn is perfect for practicing new stitches and creating lasting projects. It’s also easy to care for.
- Blocking Mats with Grid Lines: Essential for shaping your finished squares, these mats help you achieve perfectly uniform dimensions. The grid lines ensure your squares are truly square.
Embark on Your Next Creative Journey
You’ve successfully crocheted a beautiful star granny square, a testament to your growing skills. This versatile motif opens up a world of project possibilities, from cozy blankets to decorative pillows.
Consider exploring other granny square variations or combining different squares into a larger, unique design. Keep practicing, keep creating, and let your imagination guide your next crochet adventure.